Compression fittings are essential components used across various industries, including hydraulic systems, plumbing, and more, to create secure, leak-free connections between different sections of tubing or piping. Proper installation of compression fittings is crucial for ensuring optimal performance and longevity of the system, as incorrect installation can lead to leaks, system inefficiencies, and potential failures. This post aims to provide a comprehensive, step-by-step guide on installing compression fittings on plastic tubing.
Choosing the correct type of plastic tubing is crucial for ensuring a successful installation of compression fittings. There are several types of plastic tubing commonly used in hydraulic and plumbing applications, including PVC (polyvinyl chloride), PEX (cross-linked polyethylene), and PE (polyethylene). Each type of tubing has its unique properties and advantages. For instance, PVC tubing is known for its rigidity and durability, making it suitable for high-pressure applications. PEX tubing is flexible and resistant to freezing, which is ideal for both hot and cold water supply lines. PE tubing is lightweight and flexible, often used in low-pressure applications such as irrigation systems.
It’s essential to match the tubing diameter with the fitting size to ensure a secure and leak-free connection. Using the wrong diameter can lead to improper fitting installation, which may cause leaks or system failures. Always refer to the manufacturer’s specifications to confirm the correct tubing size for your specific fittings.
Once you have selected the appropriate tubing, the next step is to cut it to the required length. Accurate measurement is key to ensuring that the tubing fits perfectly within the system without any excess or shortage. Use a measuring tape to determine the precise length needed, and mark the cut point with a marker.
For cutting the tubing, a pipe cutter is the best tool as it provides a clean, straight cut without deforming the tubing. Place the tubing in the pipe cutter and rotate the cutter around the tubing, tightening it gradually until the tubing is cut through. A clean cut is essential for ensuring a proper fit with the compression fitting, as any irregularities can compromise the connection.
After cutting the tubing, it’s important to remove any burrs or rough edges left on the cut end. Burrs can hinder the fitting installation and potentially cause leaks. Using a deburring tool or a utility knife, carefully remove any burrs from the inner and outer edges of the tubing. This step ensures that the tubing will fit smoothly into the compression fitting without causing damage to the fitting components.
Properly deburred edges contribute to a secure and reliable connection, preventing potential issues that may arise from rough or uneven surfaces. Taking the time to prepare the tubing correctly will ultimately enhance the performance and longevity of your compression fitting installation.
By following these steps—selecting the right tubing, cutting it accurately, and deburring the edges—you’ll ensure that your plastic tubing is well-prepared for the installation of compression fittings, leading to a durable and efficient system.
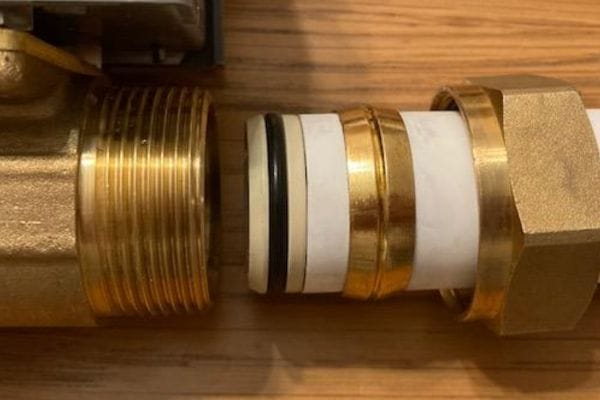
The first step in the installation process is to correctly position the components of the compression fitting onto the tubing. Begin by sliding the compression nut onto the end of the plastic tubing. Ensure the nut’s threads are facing the open end of the tubing. Following the nut, slide the ferrule (also known as the olive) onto the tubing. The ferrule is typically a small, ring-like component that plays a critical role in creating a tight seal when compressed. Make sure the ferrule is oriented correctly according to the manufacturer’s instructions, usually with its tapered end facing towards the fitting body.
Next, insert the prepared end of the plastic tubing into the compression fitting body. It’s crucial to push the tubing all the way into the fitting until it bottoms out. A properly seated tubing ensures that the ferrule can effectively create a seal around the tubing when compressed. Verify that the tubing is straight and aligned correctly with the fitting body to prevent any misalignment that could lead to leaks or weak connections. Double-check to ensure the ferrule and nut remain in their correct positions during this process.
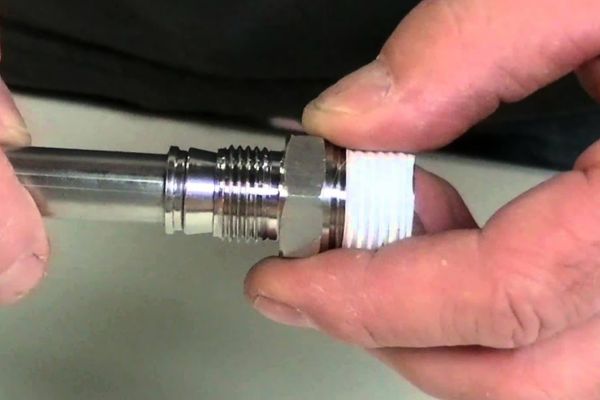
With the tubing fully seated in the fitting body, begin tightening the compression nut. Start by hand-tightening the nut to bring the components together and ensure they are aligned correctly. Hand-tightening helps to snug the nut against the ferrule and the fitting body without cross-threading or misalignment.
Once the nut is hand-tight, use a wrench to continue tightening the nut. Hold the fitting body steady with another wrench to prevent it from turning. Gradually tighten the nut in small increments, ensuring even pressure is applied around the ferrule. It is important not to over-tighten the nut, as excessive force can deform the ferrule or damage the tubing, leading to potential leaks or failure of the fitting. Generally, turning the nut an additional one-half to three-quarters of a turn with the wrench after hand-tightening is sufficient, but always refer to the manufacturer’s guidelines for the exact amount of tightening required.
By following these steps carefully—sliding the nut and ferrule onto the tubing, inserting the tubing fully into the fitting body, and properly tightening the nut—you will achieve a secure and leak-free connection. Proper technique in each step ensures the longevity and reliability of your compression fitting installation, essential for maintaining the integrity of the hydraulic or plumbing system.
Visual Inspection
After completing the installation of the compression fitting, the first step in testing the connection is a thorough visual inspection. Check the alignment of the tubing with the fitting to ensure it is straight and fully seated in the fitting body. Inspect the nut and ferrule to confirm they are correctly positioned and tightened appropriately. Look for any signs of stress or deformation on the tubing and fitting components. Ensuring proper alignment and tightness at this stage can help prevent potential issues when the system is pressurized.
Leak Testing
Once the visual inspection is complete, proceed with leak testing to verify the integrity of the connection. There are several methods to test for leaks, each suitable for different applications and levels of pressure.
Pressure Test
For systems that will operate under pressure, perform a pressure test by gradually introducing pressure into the system. Monitor the pressure gauge to ensure it maintains the desired pressure level without any drop, which would indicate a leak. Allow the system to remain pressurized for a specific period, as recommended by the manufacturer, to confirm the stability of the connection.
Soapy Water Test
For a quick and effective method to detect leaks, use a soapy water solution. Apply the soapy water around the connection, particularly at the junction of the tubing and fitting. Look for bubbles forming, which would indicate escaping air or fluid from a leak. This method is especially useful for low-pressure applications or preliminary leak detection.

If leaks are detected during the testing phase, it is essential to identify the source and address the issue promptly to ensure a secure connection.
Identifying Leaks:
Carefully inspect the fitting and tubing to locate the exact point of the leak. Leaks can occur due to several reasons, such as improper seating of the tubing, misalignment, or inadequate tightening of the nut.
Re-tightening:
If the leak is minor, it may be resolved by re-tightening the compression nut. Use a wrench to tighten the nut gradually, applying additional torque in small increments. Be cautious not to over-tighten, as this can damage the ferrule or tubing.
Re-installing:
For persistent leaks or significant issues, disassemble the fitting and inspect the components for any defects or damage. Ensure the tubing is cut cleanly and deburred correctly. Re-install the fitting, following the step-by-step installation process to achieve a proper connection. Sometimes replacing the ferrule or nut may be necessary if they are damaged or deformed.
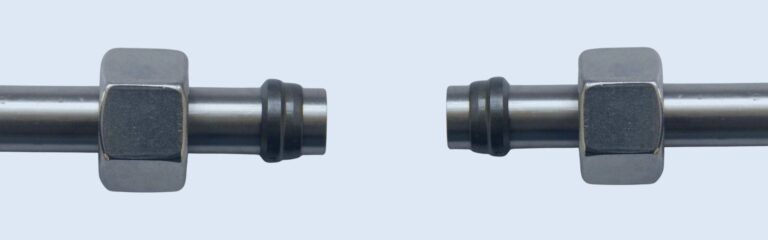
Proper Alignment
Ensuring proper alignment of the tubing is critical for a secure and leak-free connection. When installing the compression fitting, make sure the tubing is straight and properly seated within the fitting body. Misalignment can cause the ferrule to compress unevenly, leading to an inadequate seal and potential leaks. To achieve proper alignment:
Check the Tubing: Before installation, inspect the tubing for any bends or warping. Straighten the tubing if necessary to ensure it fits snugly into the fitting body.
Insert Fully: Push the tubing into the fitting until it bottoms out. This ensures that the ferrule can properly compress around the tubing to create a tight seal.
Hold Steady: During tightening, hold the fitting body steady with a wrench to prevent it from turning and causing misalignment.
Avoiding Over-tightening
Over-tightening the compression nut is a common mistake that can damage the fitting components and tubing, leading to leaks and connection failures. The goal is to apply just enough force to compress the ferrule and create a seal without deforming the tubing or the fitting. To avoid over-tightening:
Initial Hand-Tightening: Start by hand-tightening the nut to bring the components together and ensure they are correctly aligned.
Use a Wrench: Use a wrench to tighten the nut further, typically an additional one-half to three-quarters of a turn after hand-tightening. This provides enough compression to seal the ferrule without over-stressing the components.
Follow Manufacturer’s Guidelines: Always refer to the manufacturer’s instructions for the recommended amount of torque. Different fittings and tubing materials may require specific tightening procedures.
Check for Resistance: During tightening, if you feel excessive resistance or the nut becomes very difficult to turn, stop and check the installation. Excessive force can indicate over-tightening.
Periodic inspection and maintenance of compression fittings are essential to ensure their continued performance and prevent potential issues. Regular maintenance involves:
Visual Inspections: Routinely check the fittings and tubing for signs of wear, corrosion, or damage. Look for any indications of leaks, such as moisture or discoloration around the fittings.
Tightness Check: Periodically check the tightness of the compression nuts. Over time, temperature fluctuations and vibrations can cause fittings to loosen. Re-tighten the nuts if necessary, following the recommended procedures to avoid over-tightening.
Replace Worn Components: If any components, such as the ferrule or tubing, show signs of wear or damage, replace them promptly. Using worn or damaged parts can compromise the integrity of the connection.
Thread seal tape, also known as PTFE tape or plumber’s tape, is commonly used to ensure a tight seal in threaded connections. While compression fittings typically do not require thread seal tape because the ferrule creates the seal, there are instances where it can be beneficial:
When to Use: Use thread seal tape on the male threads of the compression fitting if you are connecting it to a threaded component, such as a valve or adapter, to prevent leaks at the threaded connection point.
How to Use: Wrap the tape around the male threads in the direction of the thread spiral (usually clockwise). Apply 2-3 layers of tape, ensuring it covers the threads evenly without overlapping too much. Smooth the tape with your fingers to ensure it adheres well to the threads before screwing the fitting into place.
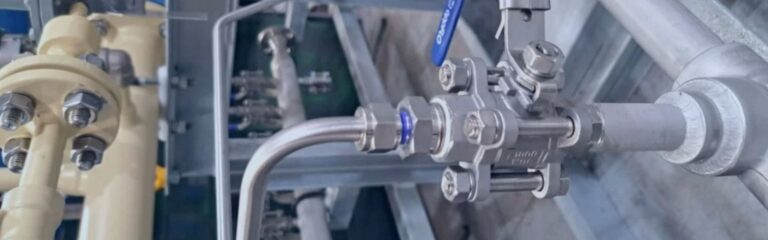
When installing and aligning multiple fittings in a hydraulic system, maintaining proper alignment and avoiding cross-threading are crucial for system integrity:
Planning the Layout: Plan the layout of the system to ensure that all tubing runs are as straight and direct as possible, minimizing bends and turns.
Sequential Installation: Install fittings sequentially, starting from one end of the system and working towards the other. This helps in maintaining alignment and prevents any misalignment issues.
Alignment Tools: Use alignment tools or fixtures to hold the fittings and tubing in place during installation. This ensures that all components are aligned correctly before tightening the nuts.
Different types of plastic tubing have unique characteristics that require specific handling during installation:
PVC Tubing: PVC is rigid and can be prone to cracking if not cut and deburred properly. Use a sharp pipe cutter and ensure the edges are smooth. Avoid excessive bending, which can stress the material.
PEX Tubing: PEX is flexible and can be bent around corners without the need for elbows or fittings. Ensure the tubing is straightened out where it connects to the fittings. PEX can be expanded or compressed, so use the appropriate tools for the type of PEX you are using.
PE Tubing: PE tubing is lightweight and flexible, suitable for low-pressure applications. Ensure that PE tubing is properly supported to prevent sagging. Cut the tubing cleanly and use a deburring tool to smooth the edges.
In summary, installing compression fittings on plastic tubing involves careful preparation, precise cutting, proper alignment, and thorough testing to ensure a secure and leak-free connection. By following the step-by-step guide, including the selection of the right tubing, correct placement of the nut and ferrule, and mindful tightening of the nut, you can achieve reliable and durable fittings. Feel free to leave comments or reach out for further clarification and assistance.
Compression fittings are compatible with various types of plastic tubing, including PVC (polyvinyl chloride), PEX (cross-linked polyethylene), and PE (polyethylene). Always ensure the tubing type matches the specifications of the fitting.
Thread seal tape is generally not required for the compression part of the fitting. However, it can be used on the male threads if the compression fitting is being connected to another threaded component to ensure a tight seal.
After hand-tightening the nut, use a wrench to give it an additional one-half to three-quarters of a turn. Be careful not to over-tighten, as this can damage the ferrule or tubing.
If you notice a leak, first try tightening the compression nut slightly more. If the leak persists, disassemble the fitting, inspect for damage, and ensure the tubing is cut cleanly and properly deburred before reassembling.
Make sure the tubing is straight and fully seated in the fitting body. Hold the fitting body steady with a wrench while tightening the nut to maintain proper alignment and prevent misalignment.
Regular maintenance is important. Perform visual inspections periodically, checking for signs of wear, corrosion, or leaks. Ensure that the fittings remain tight and replace any components showing signs of damage or wear.


