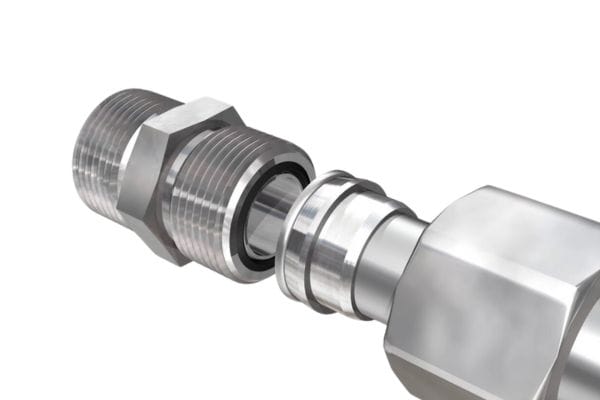
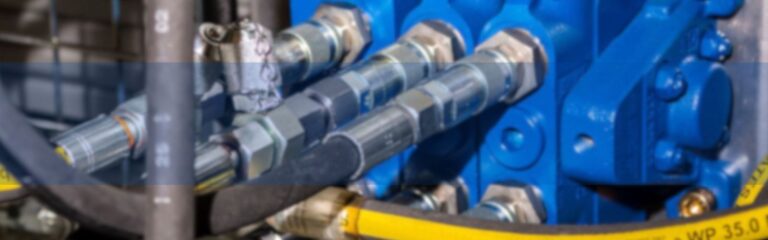
O-Ring Face Seal hydraulic fittings are a type of connection used in hydraulic systems to ensure a leak-free seal. They feature an O-ring in the face of the fitting that, when compressed, provides a secure seal. This design makes ORFS fittings particularly reliable in high-pressure environments, offering superior leak resistance compared to other types of fittings. The primary purpose of this post is to offer a comprehensive guide on the installation methods for ORFS hydraulic fittings. By providing step-by-step instructions, this post aims to equip technicians and engineers with the knowledge needed to install these fittings correctly, ensuring a secure and reliable connection in their hydraulic systems.
ORFS hydraulic fittings are designed to provide a robust, leak-free connection in hydraulic systems. These fittings consist of a flat face with a groove that holds an O-ring, which is compressed against a mating surface when the fitting is tightened. This design ensures a secure seal that can withstand high pressures. The fittings are typically made from durable materials such as stainless steel, brass, or carbon steel, which enhance their longevity and resistance to corrosion. The precise engineering of the O-ring groove and the use of high-quality O-rings are crucial for maintaining the integrity of the seal under various operating conditions.
ORFS fittings are distinct from other types of hydraulic fittings due to their unique sealing mechanism. Unlike flare fittings, which rely on metal-to-metal contact, ORFS fittings use an elastomeric O-ring to create the seal. This difference allows ORFS fittings to provide a more reliable and leak-proof connection, especially in high-pressure applications. Additionally, ORFS fittings are easier to install and do not require precise torque settings, unlike compression fittings, which need exact installation procedures to avoid leaks. The versatility and ease of use make ORFS fittings a popular choice for many hydraulic applications.
Leak Prevention
One of the primary advantages of ORFS hydraulic fittings is their exceptional ability to prevent leaks. The O-ring seal effectively blocks any potential escape paths for hydraulic fluid, ensuring a tight and secure connection. This feature is particularly beneficial in applications where even minor leaks can lead to significant performance issues or safety hazards. By minimizing the risk of leaks, ORFS fittings help maintain system efficiency and reduce maintenance costs.
High-Pressure Handling
ORFS fittings are designed to handle high-pressure environments, making them suitable for demanding hydraulic applications. The O-ring face seal is capable of maintaining its integrity under extreme pressure, preventing blowouts, and ensuring reliable performance. This capability is crucial in industries where hydraulic systems operate under intense pressure, such as in heavy machinery, industrial equipment, and aerospace applications. The high-pressure handling characteristic of ORFS fittings contributes to their widespread adoption in these sectors.
Durability and Reliability
The materials and design of ORFS fittings contribute to their durability and long-term reliability. Constructed from high-strength metals, these fittings can withstand harsh operating conditions, including exposure to corrosive fluids and extreme temperatures. The O-ring, typically made from resilient materials like Viton or nitrile rubber, ensures a lasting seal that remains effective over time. This durability reduces the need for frequent replacements and repairs, providing a cost-effective solution for maintaining hydraulic systems.
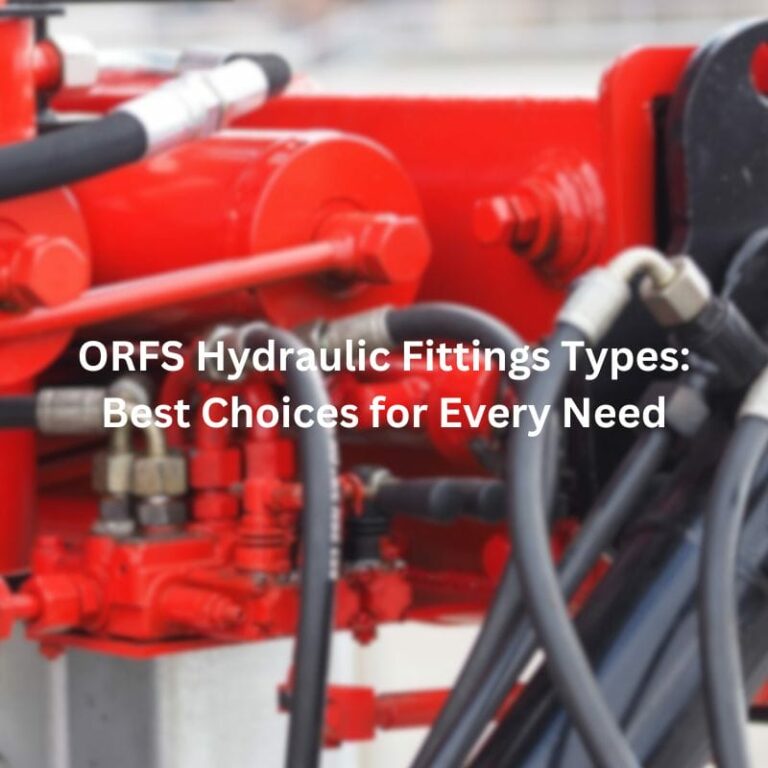
ORFS hydraulic fittings come in various types to suit different application requirements. The most common types include:
Male ORFS Fittings: These fittings have an external thread and an O-ring face, designed to mate with female fittings.
Female ORFS Fittings: These fittings have an internal thread and a flat sealing face with an O-ring groove, designed to mate with male fittings.
Adjustable ORFS Fittings: These fittings allow for flexibility in alignment, making them ideal for applications where precise positioning is required. They typically feature a swivel nut that enables easy adjustment without compromising the seal.
Size Standards and Selection Criteria
ORFS fittings are available in a range of sizes to accommodate various hydraulic system requirements. The sizes are typically standardized according to industry norms, such as SAE (Society of Automotive Engineers) or ISO (International Organization for Standardization) specifications. When selecting ORFS fittings, it is essential to consider factors such as the system’s pressure rating, fluid type, and temperature range. Proper sizing ensures compatibility and optimal performance, preventing issues such as over-tightening or insufficient sealing. Consulting manufacturer guidelines and industry standards can help in choosing the right ORFS fittings for specific applications, ensuring a secure and efficient hydraulic system.
The effectiveness of ORFS fittings is based on their unique sealing mechanism, which relies on an elastomeric O-ring compressed between two flat surfaces. This engineering approach provides superior leak prevention compared to traditional metal-to-metal seals.
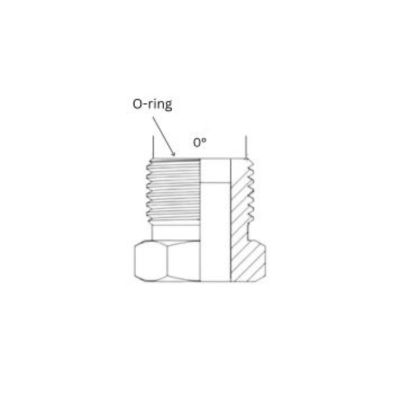
Flat Face Design
Unlike flare fittings, which depend on a metal-to-metal contact for sealing, ORFS fittings feature a flat face on both the male and female ends. The male end has a recessed groove that holds the O-ring, ensuring it remains in place during installation and operation.
Compression Sealing Mechanism
When the ORFS fitting is tightened, the O-ring is compressed between the flat surfaces, creating a secure and uniform seal. This compression ensures that the sealing integrity remains intact even under extreme pressure variations and mechanical vibrations.
High Resistance to Vibration and Pressure
Traditional hydraulic fittings often fail due to vibrations causing loosening or fatigue cracks. ORFS fittings, however, provide a more stable connection because the O-ring absorbs vibrations and maintains the seal without relying on excessive tightening. This makes them highly suitable for applications in heavy-duty machinery, mobile hydraulic systems, and industrial equipment.
Reduced Risk of Over-Tightening
Unlike metal-to-metal seals, which require high torque for proper sealing, ORFS fittings achieve optimal sealing with controlled compression. This reduces the risk of over-tightening, which can lead to thread damage or deformation of sealing surfaces.
The choice of O-ring material is crucial in ORFS fittings, as it determines the fitting’s resistance to temperature, pressure, and chemical exposure. Different applications require specific O-ring materials to ensure compatibility with hydraulic fluids, environmental conditions, and operational stress.
O-Ring Material | Temperature | Key Features | Best Suited Applications |
Nitrile(NBR) | -40 to 120 | Good resistance to oil and fuel, cost-effective | General hydraulic systems, automotive,industrial machinery |
Fluorocarbon (VitonR) | -20 to 200 | Excellent chemical and heat resistance | Aerospace,high-temperature hydraulic systems, aggressive fluids |
Ethylene Propylene | -50 to 150 | Good resistance to water, steam, and brake fluids | Water-based hydraulic systems, automotive brake systems |
Silicone | -60 to 230 | Excellent flexibility in extreme temperatures | Medical equipment, food-grade applications |
Polytetrafluoroethylene | -200 to 250 | Chemically inert,high-temperature resistant | Chemical processing, aerospace, corrosive fluid handling |
Implications of O-Ring Material Selection
Temperature Resistance: Choosing the wrong O-ring material for a high-temperature environment can cause premature degradation and leaks. For example, Nitrile (NBR) may harden and crack under extreme heat, whereas Fluorocarbon (Viton®) would be more suitable.
Chemical Compatibility: Hydraulic fluids vary in composition, and some may degrade standard rubber O-rings. EPDM, for example, is ideal for water-based fluids but is incompatible with petroleum-based oils.
Seal Longevity and Maintenance: Proper material selection can significantly extend the service life of the fitting, reducing maintenance costs and downtime. Using an incompatible O-ring material can lead to frequent replacements and system failures.
Choosing the right O-Ring Face Seal (ORFS) fitting is crucial for ensuring a reliable, leak-free hydraulic system. Several key factors must be considered when selecting ORFS fittings, including adjustability, material, size, and thread type.
Adjustable and Fixed Face Seal Fittings
ORFS fittings come in two main types: adjustable and fixed face seal fittings. Understanding their differences is essential for proper selection based on the application.
Adjustable ORFS Fittings:
Feature a locknut and washer that allow rotational adjustment before final tightening.
Ideal for applications requiring precise alignment, such as multi-hose hydraulic systems.
Commonly used in environments where space constraints make fixed fittings difficult to install.
Fixed ORFS Fittings:
Have a solid, non-rotating connection between the fitting and the hose or pipe.
Provide superior strength and durability in high-pressure applications.
Best suited for systems where alignment is predetermined, and flexibility in positioning is not required.
To ensure a successful installation of ORFS hydraulic fittings, having the right tools is crucial. The following tools are commonly required:
Wrenches: Adjustable wrenches and specific-sized wrenches suitable for the fittings being installed.
Torque Wrenches: Essential for applying the correct torque to ensure proper sealing without over-tightening.
Pipe Cutters: For cutting hydraulic hoses or pipes to the required lengths.
Deburring Tools: To smooth out any rough edges on cut pipes or hoses.
Calipers or Micrometers: For precise measurement of fitting dimensions to ensure compatibility.
Hose Crimping Tools: For fittings that require crimping onto hydraulic hoses.
Hydraulic Pressure Test Kits: To test the system after installation and ensure there are no leaks.
In addition to tools, specific materials are necessary to facilitate the installation process and ensure a secure connection:
Sealants: Thread sealants or pipe dope to ensure a tight seal on threaded connections.
Lubricants: Hydraulic oil or specific lubricants to ease the fitting installation and prevent O-ring damage.
O-rings: Spare O-rings of the correct size and material (e.g., Viton, nitrile) in case replacements are needed.
Cleaning Solvents: Isopropyl alcohol or other suitable solvents for cleaning components before installation.
Protective Caps: To keep the fittings clean and free from contaminants until they are installed.
The first step in installing an ORFS hydraulic fitting is positioning the fitting correctly. Begin by identifying the exact location where the fitting will be installed. Ensure that the hydraulic hose or pipe is cut to the appropriate length and that the ends are clean and free of burrs. Position the fitting so that it aligns correctly with the hose or pipe, ensuring that the O-ring face will mate properly with the corresponding surface. Correct positioning is crucial for avoiding misalignment, which can lead to leaks or system inefficiencies.
Proper lubrication of ORFS fittings is essential to prevent O-ring damage and ensure smooth assembly.
Select the Right Lubricant
Use a compatible hydraulic oil or manufacturer-recommended O-ring lubricant.
Avoid petroleum-based lubricants if the O-ring material is not resistant to them.
Apply Lubricant Evenly
Lightly coat the O-ring with lubricant to reduce friction and prevent pinching during installation.
Ensure the lubricant is evenly distributed without excessive buildup.
Lubricate Threaded Components (If Required)
Apply a small lubricant to the threads to ease tightening and reduce wear.
Do not over-lubricate, as excess oil can attract contaminants.
Proper alignment is essential for creating a secure and leak-free connection. Align the fitting so that the O-ring face is perpendicular to the mating surface. Use visual inspection and measuring tools such as calipers to ensure that the fitting is centered and aligned correctly. For hoses, make sure they are not twisted or kinked, as this can affect the alignment and the integrity of the seal. Correct alignment minimizes stress on the fitting and the O-ring, ensuring a durable connection.
Once the fitting is positioned and aligned, begin the installation by hand-tightening the nut. This step ensures that the fitting is correctly aligned before applying torque. Hand-tightening allows you to feel if the threads are engaging properly and help prevent cross-threading. Rotate the nut by hand until it is snug but not overly tight. At this stage, check the alignment again to ensure that it has not shifted during hand-tightening.
The final tightening step involves using a torque wrench to apply the correct amount of torque to the fitting. Refer to the manufacturer’s specifications for the recommended torque values. Using a torque wrench, tighten the nut to the specified torque, ensuring that the O-ring is properly compressed to create a secure seal. Avoid over-tightening, as this can damage the O-ring and the fitting. Apply the torque gradually, checking alignment and fit as you go. Once the correct torque is reached, the installation is complete.
Use of Sealants and Lubricants
Using sealants and lubricants can enhance the sealing capability and ease the installation process. Apply a small amount of hydraulic oil or a compatible lubricant to the O-ring and the threads of the fitting. This reduces friction and prevents damage to the O-ring during tightening. For threaded connections, use an appropriate thread sealant or pipe dope to ensure a leak-free connection. Ensure that the sealant is compatible with the hydraulic fluid used in the system.
Checking for Leaks and Making Adjustments
After completing the installation, it is essential to check for leaks. Pressurize the hydraulic system and inspect the fitting for any signs of fluid leakage. If a leak is detected, depressurize the system and make the necessary adjustments. This may involve re-tightening the fitting, adjusting the alignment, or replacing the O-ring. Ensure that all adjustments are made carefully to avoid damaging the components. A leak-free installation is crucial for the reliability and safety of the hydraulic system.
After installation, a final inspection ensures the fitting is secure and ready for operation.
Check for Leaks
Perform a visual inspection to confirm no hydraulic fluid is seeping around the fitting.
If available, use a leak detection solution for more precise checking.
Conduct a Pressure Test
Gradually pressurize the system while monitoring the fitting for leaks.
If a leak is detected, relieve the pressure, inspect the O-ring, and re-tighten the fitting if necessary.
Confirm Proper Hose Routing
Ensure the connected hose has no excessive bends or twists.
Verify that the hose is properly supported to prevent vibration-induced loosening.
Even with careful preparation and attention to detail, mistakes can happen when connecting brass pipe fittings. Understanding common errors and knowing how to troubleshoot them can help ensure a secure and leak-free installation. Here are some common mistakes and troubleshooting tips:
Causes and Prevention
Misalignment of ORFS hydraulic fittings can lead to leaks, premature wear, and system inefficiencies. Common causes of misalignment include improper positioning of components, twisting or bending of hoses during installation, and incorrect alignment of mating surfaces. To prevent misalignment:
Ensure that all components are correctly positioned before beginning the installation.
Avoid twisting or kinking hoses; use hose supports or clamps to maintain proper alignment.
Use alignment tools and visual inspection to confirm that fittings are perpendicular to mating surfaces.
Corrective Measures
If misalignment occurs, it can be corrected through several methods:
Loosen the fitting and realign the components carefully, ensuring they are properly positioned.
Use alignment tools or jigs to hold components in place during tightening.
Replace hoses or pipes that are twisted or bent beyond repair.
For severe misalignment, consider redesigning the system layout to improve alignment and reduce stress on fittings.
Recognizing the Signs
Over-tightening and under-tightening can both cause significant issues in hydraulic systems. Signs of over-tightening include:
Crushed or damaged O-rings
Proper Torque Application Techniques
Applying the correct torque is crucial for ensuring a secure and leak-free connection:
Leaks in hydraulic systems can originate from several sources:
To identify leak sources:
Effective Repair Methods
Problem:
Hydraulic systems, especially those in mobile or heavy machinery, experience constant vibrations. Over time, these vibrations can cause ORFS fittings to loosen, leading to leaks and potential system failure.
Causes:
Insufficient tightening during installation.
Continuous mechanical vibrations cause gradual loosening.
Misaligned hose routing puts excessive strain on fittings.
Solutions:
Ensure Proper Torque Application – Use a torque wrench and follow manufacturer specifications when tightening ORFS fittings. Under-tightening can allow fittings to loosen, while over-tightening can damage threads and O-rings.
Use Locking Mechanisms – Consider using hydraulic thread-locking compounds or locknuts to prevent fittings from loosening due to vibration.
Improve Hose Routing – Ensure hoses are correctly routed with enough flexibility to absorb movement. Avoid sharp bends or excessive tension on the fittings.
Install Vibration Dampeners – If vibrations are excessive, adding dampeners or flexible hose supports can minimize movement and reduce the risk of fittings loosening.
Problem:
Exposure to high temperatures can cause O-rings to harden, crack, or lose their elasticity, leading to seal failure and leaks.
Causes:
Continuous exposure to elevated fluid or ambient temperatures.
Using O-rings made from materials with low heat resistance.
High-pressure operation increases internal temperature and accelerates O-ring degradation.
Solutions:
Use High-Temperature O-Rings – Choose materials designed for extreme temperatures:
Viton (FKM): Works well up to 200°C (392°F), making it ideal for high-heat applications.
PTFE (Teflon): Provides superior resistance to both high temperatures and aggressive chemicals.
Install Heat Shields or Insulation – In environments with excessive external heat (e.g., near engines or exhaust systems), use protective insulation or heat shields to reduce temperature exposure.
Monitor System Temperature – Use temperature sensors to track heat levels and prevent exceeding the O-ring’s operating limits.
Implement Fluid Cooling Solutions – If hydraulic fluid temperatures are too high, consider installing additional cooling components, such as heat exchangers or cooling fans.
Regular inspections are crucial for detecting early signs of wear, misalignment, or improper sealing. A structured inspection routine can help identify potential issues before they lead to leaks or system failures.
Inspection Frequency
Daily or Weekly:
Check for visible leaks around ORFS fittings.
Inspect for loose connections due to system vibrations.
Look for signs of fluid residue near fittings, which may indicate a slow leak.
Monthly or Quarterly:
Examine O-rings for any signs of wear, deformation, or cracking.
Verify proper hose routing to ensure fittings are not under excessive strain.
Ensure fittings are properly tightened according to manufacturer specifications.
Annually:
Conduct a full system check, including pressure testing, to identify any weak seals.
Replace all O-rings as part of preventive maintenance, even if no leaks are detected.
Inspection Tip: Use a flashlight and mirror to inspect hard-to-reach fittings. If leaks are suspected, apply a leak detection solution to confirm.
O-rings are critical to the sealing performance of ORFS fittings, and their deterioration is a common cause of leaks. Regular replacement ensures continued leak-free operation.
When to Replace O-Rings
Visible Damage: If an O-ring appears cracked, flattened, or deformed.
Frequent Adjustments: If a fitting has been loosened and retightened multiple times.
System Leaks: If hydraulic fluid is detected around the fitting, and re-tightening does not resolve the issue.
Time-Based Replacement: Even if no leaks are present, replacing O-rings annually as a preventive measure is recommended.
How to Replace an O-Ring Properly
Depressurize the System – Ensure all pressure is released before disassembling the fitting.
Remove the Old O-Ring – Use a plastic pick or non-metallic tool to avoid scratching the sealing surface.
Clean the Groove and Fitting – Remove dirt and debris using a lint-free cloth and an approved hydraulic cleaner.
Lubricate the New O-Ring – Apply a thin layer of compatible hydraulic oil or manufacturer-approved lubricant.
Install the New O-Ring – Ensure it is seated evenly in the groove without twisting or stretching.
Replacement Tip: Always use O-rings made from materials compatible with the hydraulic fluid in your system (e.g., Nitrile for petroleum-based fluids, Viton for high-temperature applications).
Over-tightening ORFS fittings is a common mistake that can damage the O-ring, deform the sealing face, and lead to leaks.
Consequences of Over-Tightening
O-Ring Compression Damage: Excessive pressure can cause the O-ring to extrude beyond its sealing groove, reducing its effectiveness.
Thread Galling or Stripping: High torque can damage the fitting threads, making it difficult to reassemble or replace components.
Surface Deformation: The sealing face may warp, preventing a proper seal even after O-ring replacement.
Proper Tightening Procedure
Hand-Tighten First – Align the fitting and tighten it by hand to ensure correct seating.
Use a Torque Wrench – Follow manufacturer torque specifications rather than relying on force.
Tighten in Increments – Apply gradual torque, stopping to check for proper sealing.
Check for Leaks – If a fitting still leaks after proper tightening, inspect the O-ring and contact surfaces instead of applying excessive force.
This guide provides detailed methods and tips that emphasize the importance of meticulous installation practices, from positioning and alignment to proper torque application and leak prevention. By adhering to these best practices, you can greatly reduce the risk of leaks and system failures and ensure that your hydraulic system is built to last. We invite you to share your experiences, feedback, and any questions you may have, Topa is always at your service.
ORFS (O-Ring Face Seal) hydraulic fittings use an O-ring seated in a groove on the fitting’s face to create a leak-free seal, ideal for high-pressure applications.
Use visual inspection and alignment tools to ensure the fitting faces are perpendicular and properly aligned before tightening. Avoid twisting or kinking hoses during installation.
Refer to the manufacturer’s specifications for the correct torque values. Always use a calibrated torque wrench to apply the specified torque to prevent over-tightening or under-tightening.
You will need wrenches, torque wrenches, lubricants, sealants, and O-rings. Ensure you have all necessary tools and materials before starting the installation process.
Ensure proper alignment, use the correct torque, and apply appropriate sealants and lubricants. Regularly inspect O-rings and sealing surfaces for damage or contaminants.
Depressurize the system, inspect and replace damaged O-rings, clean the sealing surfaces, and retighten the fitting to the specified torque. If the leak persists, check for alignment issues or replace faulty components.