Pinhole leaks in brass fittings are a common but often overlooked issue in plumbing systems. These tiny, yet potentially damaging leaks can cause significant water waste and lead to long-term damage if not addressed promptly.
Signs of a Pinhole Leak in Brass Fitting
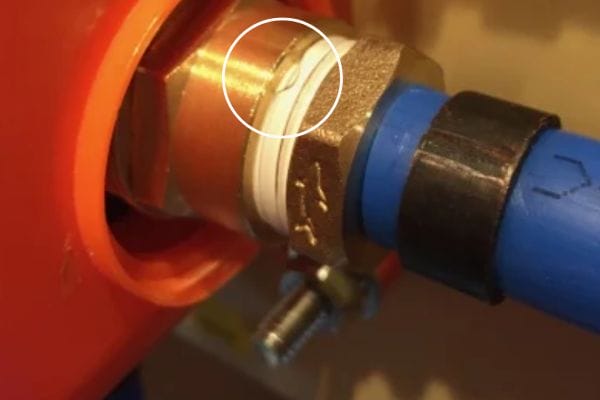
Detecting a pinhole leak in a brass fitting can be tricky, as the hole is often very small. However, there are certain signs and symptoms that can help you identify whether your brass fittings are leaking. Catching the issue early can prevent further damage to your plumbing system and save you money in the long run.
How to Detect a Pinhole Leak in Your Brass Fittings
The first step in detecting a pinhole leak is regular inspection of your plumbing system. If you notice any sudden drop in water pressure, unusual wet spots on the floor, or a rise in your water bills, it could indicate a hidden leak. To find a pinhole leak, carefully check the fittings and pipes for any signs of moisture or corrosion, especially around joints or connections. Sometimes, the leak may not be visible, but you can detect it by feeling for dampness or listening for a faint hissing sound near the fitting.

Symptoms of Brass Fitting Leaks You Shouldn’t Ignore
Pinhole leaks in brass fittings may not always be immediately obvious, but there are some common symptoms you shouldn’t ignore:
- Water stains or discoloration on surrounding surfaces, like walls or floors
- Unexplained increase in water bills, which can indicate a slow, ongoing leak
- Dampness or pooling water around the brass fittings, especially in areas that are not directly exposed to water
Mold or mildew growth in the vicinity of the leak due to prolonged moisture exposure If you notice any of these signs, it’s crucial to inspect the fitting as soon as possible to prevent further damage.
Visual Indicators of a Pinhole Leak vs. Other Leaks
While other types of leaks can be more obvious, such as those caused by cracked pipes or loose fittings, pinhole leaks can be more elusive. Here are a few visual indicators to help you distinguish a pinhole leak in brass fittings:
- Tiny, localized corrosion: Pinhole leaks often appear in areas where the brass has corroded, causing small pockmarks or dimples on the surface.
- Steady, consistent dripping: Unlike larger leaks, pinhole leaks often result in a slow, steady drip rather than a forceful stream of water.
- Faint discoloration around the fitting, where moisture has seeped through the brass and stained the surrounding area. By closely examining the fitting for these signs, you can better identify whether the issue is a pinhole leak or another type of plumbing problem.
Common Causes of Pinhole Leaks in Brass Fittings
Pinhole leaks in brass fittings can be caused by a variety of factors, with corrosion and pressure being the most prominent culprits. Understanding these causes can help you prevent future leaks and ensure your plumbing system remains in top condition.
Brass Fitting Corrosion: How It Leads to Pinhole Leaks
Corrosion is one of the leading causes of pinhole leaks in brass fittings. Over time, exposure to moisture, oxygen, and other chemicals in the water causes brass to degrade. This process weakens the integrity of the metal, eventually leading to the formation of small holes. Factors such as acidic water, high humidity, and exposure to harsh chemicals can accelerate corrosion. Once corrosion begins, it’s only a matter of time before a small pinhole leak forms. This is why regular inspection and maintenance of brass fittings are crucial for avoiding these issues.

Pressure Leaks in Brass Fittings: What You Need to Know
Another major factor contributing to pinhole leaks in brass fittings is pressure buildup. Brass fittings, when exposed to excessive water pressure, can develop tiny cracks or holes that result in leaks. This is especially common in older plumbing systems or when pressure regulators aren’t properly set. When pressure exceeds the rated limits for the brass fittings, even a small crack can evolve into a pinhole leak over time. It’s important to monitor your system’s water pressure and ensure that it’s within the recommended range for your fittings and pipes to avoid unnecessary wear and tear.
The Role of Water Quality in Brass Pipe Leak Repair
Water quality plays a significant role in the lifespan of your brass fittings and the likelihood of pinhole leaks. Hard water, which contains high levels of minerals such as calcium and magnesium, can contribute to the buildup of scale inside the pipes, increasing the risk of corrosion. On the other hand, water that is too acidic or contains high levels of chlorine can cause brass fittings to corrode more quickly, leading to pinhole leaks. Proper water treatment, such as installing water softeners or using pH-balancing systems, can help protect your brass fittings from corrosion and extend the life of your plumbing system. If you’re unsure about the water quality in your area, it’s a good idea to get it tested to identify any potential issues that could be affecting your plumbing.
Tools and Materials You Need to Fix a Pinhole Leak in Brass Fitting
Fixing a pinhole leak in a brass fitting requires the right tools and materials to ensure a successful repair. Whether you’re tackling the issue yourself or preparing to hire a professional, knowing what you need for the job can make all the difference.
Essential Tools for Brass Fitting Leak Repair
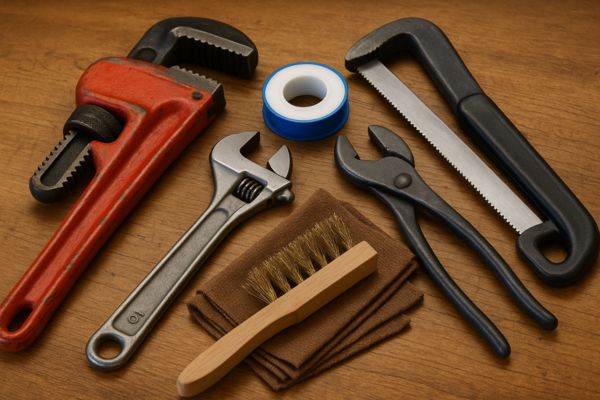
To begin your repair, you’ll need a few basic tools to safely and efficiently fix a pinhole leak in brass fittings. These include:
- Pipe Wrenches or Adjustable Wrenches: To loosen or tighten fittings and disconnect the affected pipes.
- Plumber’s Tape (Teflon Tape): For temporary sealing of small leaks and to create a tighter seal.
- Pliers: Useful for gripping and manipulating small parts when needed.
- Hacksaw: In case the damaged section of pipe or fitting needs to be cut out and replaced.
- Wire Brush or Sandpaper: To clean the area around the leak and remove corrosion before applying any sealant or adhesive.
- Rags or Towels: To dry the affected area and wipe away excess moisture before starting the repair.
These tools will ensure you have everything you need to safely tackle the pinhole leak and prepare the brass fitting for sealing or replacement.
Materials for Sealing Pinhole Leaks in Brass Pipes
When it comes to materials, there are several options available to effectively seal a pinhole leak in a brass fitting. Depending on the severity of the leak and the type of repair you plan to perform, consider the following:
- Epoxy Putty or Sealant: Epoxy is a versatile and durable material that can be applied directly to the leak. It forms a strong bond that can withstand high pressure and water flow.
- Plumbing Putty: Used for temporary fixes, plumbing putty can fill in small leaks but is not as durable as epoxy for long-term solutions.
- Brass Fitting Inserts: If the damage is extensive, you might need a brass insert to repair or replace the damaged fitting section.
- Silicone Sealant: A flexible sealant that can be applied around the leak for a watertight seal, particularly useful for minor leaks.
- Soldering Kit: If you prefer a more permanent, professional repair, a soldering kit can help you fuse the brass material back together and seal the leak.
Having these materials on hand ensures that you can choose the right option based on the type of repair you need.
Choosing the Right Brass Fitting Tools for the Job
Choosing the right tools and materials depends largely on the nature of the pinhole leak and your comfort level with DIY repairs. Here’s what to consider:
- Size of the Leak: For small leaks, a plumber’s tape or epoxy sealant may be enough. For larger leaks or extensive corrosion, you may need to cut and replace the damaged section with new brass fittings.
- Experience Level: If you’re new to plumbing repairs, opting for simpler tools like epoxy putty and plumbing tape is a good place to start. However, if you have experience and feel confident, you may want to use a soldering kit or brass fitting inserts for a more permanent solution.
- Pressure Requirements: If the brass fitting is part of a high-pressure system, it’s important to use materials that can handle that pressure. Epoxy sealants designed for high-pressure applications or soldering may be necessary for a secure, long-lasting fix.
Step-by-Step Guide to Fixing a Pinhole Leak in Brass Fitting
Fixing a pinhole leak in a brass fitting doesn’t have to be complicated if you follow the right steps. With proper preparation and tools, you can restore your plumbing system to working order in no time.
Preparing the Area and Shutting Off Water Supply
Before you begin any repairs, the first thing you should do is turn off the water supply to the affected area. This will prevent any more water from flowing through the pipes while you’re working on the repair. Here’s what you need to do:
- Locate the main water shutoff valve and turn it off to stop the water flow to your plumbing system.
- If the leak is localized, you can shut off the individual valve to the specific area or pipe if accessible.
- Drain the system by opening a faucet to release any remaining water in the pipes. This will prevent water from spilling during the repair process.
- Once the water is shut off and the pipes are dry, you can safely proceed with the repair.
Cleaning the Brass Fitting Before Repair
Properly cleaning the brass fitting is essential to ensure that the sealant or adhesive adheres well to the surface. Follow these steps to clean the area effectively:
- Use a wire brush or sandpaper to remove any corrosion, dirt, or mineral buildup around the leak. This will expose the clean brass surface, allowing better bonding for the sealant.
- Once the area is cleaned, wipe it down with a damp rag to remove any debris or dust. Make sure the surface is as dry as possible before applying any materials.
- If the fitting is especially corroded or dirty, consider using a mild cleaning solution specifically designed for brass or metal surfaces to ensure complete cleanliness.
- Cleaning the brass fitting thoroughly will improve the effectiveness of your repair materials and create a smooth surface for the sealant to bond to.
How to Apply a Leak Sealant to Fix Brass Leaks
Applying a leak sealant is often the quickest and easiest way to seal a pinhole leak in a brass fitting. Follow these steps for a successful application:
- Choose the right sealant: Depending on the size and severity of the leak, you can use epoxy, silicone sealant, or a specialized plumbing leak repair compound.
- Apply the sealant: Using a putty knife or gloved hands, apply the sealant directly over the pinhole leak. Make sure to cover the entire area where the leak is located.
- Smooth the sealant: Once applied, use the putty knife or your finger (wear gloves) to smooth the sealant evenly over the surface, ensuring the leak is completely sealed.
- Allow curing time: Most sealants need time to cure. Check the manufacturer’s instructions for recommended curing times—usually between 30 minutes to an hour.
Sealants are a great temporary fix and work well for small, non-pressurized leaks. However, if the leak is significant, you may need to use more advanced materials.
Using Epoxy and Other Adhesives for Sealing Pinhole Leaks
For a more durable, long-lasting fix, epoxy or other adhesive-based materials are ideal. Epoxy creates a strong, waterproof bond that can withstand pressure and is perfect for fixing brass pipe leaks. Here’s how to use it:
- Prepare the epoxy: Follow the manufacturer’s instructions to mix the epoxy resin and hardener in the correct proportions. Typically, this involves combining equal parts of the two components.
- Apply the epoxy: Once mixed, apply the epoxy over the pinhole leak, making sure to cover the entire affected area. You may want to use a spatula or small brush to apply the epoxy smoothly and evenly.
- Shape and smooth: Press the epoxy into the leak, ensuring that it fills the hole completely. You can use a tool or your fingers (wearing gloves) to shape and smooth the surface.
- Let the epoxy cure: Allow the epoxy to set for the recommended time, usually between 1 to 4 hours. Make sure the repair has hardened completely before turning the water supply back on.
How to Stop a Leak in Brass Fitting with Plumber Tape
Plumber’s tape, also known as Teflon tape, is a simple yet effective solution for sealing leaks in brass fittings. When applied properly, it can temporarily stop leaks and help prevent future issues.
When to Use Plumber Tape for Brass Pipe Leak Repair
Plumber’s tape is best used for minor leaks or to improve the seal between threaded connections in your brass fittings. It is ideal for:
- Small pinhole leaks around the threads of brass fittings.
- Loosely threaded connections where water is seeping out due to insufficient sealing.
Temporary fixes until you can replace the fitting or apply a more permanent solution, such as epoxy or soldering. However, plumber’s tape is not suitable for large cracks or holes in the brass fitting itself. If the brass fitting is severely corroded or damaged, it’s better to replace the fitting entirely or use stronger repair methods.
The Right Way to Wrap Plumbers Tape Around Brass Fittings
Proper application of plumber’s tape is key to stopping leaks effectively. Follow these steps to ensure a secure and tight seal:
- Clean the Brass Fitting: Before applying the tape, clean the threads of the brass fitting using a wire brush or cloth to remove any dirt, grime, or corrosion. This will allow the tape to adhere better to the surface.
- Start Wrapping: Begin wrapping the tape around the male threads of the brass fitting. Hold the tape flat against the threads and wrap it in the direction of the threads (clockwise). Be sure to overlap each layer slightly as you go.
- Apply 2-3 Layers: Generally, 2 to 3 layers of plumber’s tape are sufficient to create a tight seal. If you’re dealing with a larger or more damaged fitting, you may need to add an extra layer for a better seal.
- Finish Wrapping: Once you’ve covered the threads, press the tape down firmly to make sure it sticks. Avoid stretching the tape too tight, as this can cause it to tear or bunch up, reducing its effectiveness.
Tips for Ensuring a Tight Seal with Plumber Tape
To ensure your plumber’s tape forms a proper seal, here are a few tips:
- Don’t Overwrap: Too much tape can create an uneven seal, making it harder to tighten the fitting properly. Stick to 2-3 layers for most standard applications.
- Ensure Proper Thread Alignment: When reconnecting the fittings, make sure the threads align correctly. Misalignment can cause the tape to slip or bunch, leading to leaks.
- Tighten the Fitting Gently: After applying the plumber’s tape, reassemble the fittings and tighten them gently with a wrench. Over-tightening can cause the tape to tear or become ineffective.
- Check for Leaks: Once everything is tightened and in place, turn the water supply back on and check for leaks. If the leak persists, you may need to apply another layer of tape or consider using a more permanent fix.
Sealing Pinhole Leaks in Brass Fittings: Advanced Techniques
When a pinhole leak in a brass fitting requires more than a temporary fix, advanced repair techniques such as soldering, using brass inserts, or addressing pressure leaks can provide a more permanent solution. These methods are particularly useful when plumber’s tape or epoxy isn’t sufficient for the job.
How to Use Soldering to Repair Brass Pipe Leaks
Soldering is one of the most effective ways to permanently repair pinhole leaks in brass fittings. It’s especially beneficial for leaks caused by corrosion or pressure issues. Here’s how to do it:
- Prepare the Area: Turn off the water supply and drain the pipes. Use a wire brush to clean the area around the leak thoroughly, removing any corrosion or dirt. You may also want to file down rough edges if necessary.
- Heat the Brass Fitting: Using a propane torch or butane torch, heat the brass fitting around the leak. Hold the flame about 1-2 inches from the fitting and move it back and forth to ensure even heating. Be careful not to overheat the brass, as this can cause damage to the fitting.
- Apply Solder: Once the brass is hot enough (you can test by touching the solder to the fitting—if it melts, it’s ready), feed the solder into the joint or leak. The solder should flow into the crack or hole, filling the pinhole and creating a watertight seal.
- Cool and Clean: Let the soldered fitting cool for several minutes. After it’s cooled, wipe away any excess flux or residue with a damp cloth. Finally, inspect the repair to make sure the leak is sealed properly.
Soldering provides a long-lasting fix for leaks in brass fittings and ensures the fitting maintains its integrity under pressure.

The Benefits of Using Brass Fitting Inserts for Leak Prevention
In some cases, pinhole leaks in brass fittings may require replacement of the damaged section rather than a patch. Brass fitting inserts offer an excellent solution for this. Here’s how they help:
- What Are Brass Fitting Inserts?: Brass fitting inserts are small, cylindrical connectors designed to fit inside or over the damaged brass pipe. They are ideal for repairing threaded fittings or pipes with severe corrosion or wear that can’t be sealed with tape or putty.
- Ease of Use: Installing a brass fitting insert is relatively simple. After cleaning and preparing the fitting, the insert is inserted into the pipe or fitting. It can then be tightened, creating a secure, leak-free connection.
- Durability: Brass inserts are highly durable and designed to withstand the pressure and temperature of the system. They’re a perfect choice for a more permanent, robust solution to leaks, especially in high-pressure systems.
- Cost-Effectiveness: Brass inserts are often more affordable than replacing an entire pipe or fitting. They provide an efficient way to extend the life of the plumbing system without costly replacements.
Using brass fitting inserts can not only repair pinhole leaks but also prevent future leaks by reinforcing weakened or corroded areas.
Sealing Pressure Leaks in Brass Fittings: Best Practices
Pressure leaks in brass fittings are often more challenging to seal than typical pinhole leaks, but there are effective methods for addressing them:
- Identify Pressure-Leak Areas: Pressure leaks typically occur in fittings or connections exposed to high water pressure. Inspect the fittings for any visible cracks, warping, or damage that could result from excess pressure.
- Release Pressure: Before starting the repair, ensure the system’s pressure is safely relieved. Turn off the water supply and open a faucet to drain any residual pressure in the system.
- Use Pressure-Resistant Materials: For high-pressure systems, consider using materials designed specifically for pressure applications, such as high-strength epoxy or pressure-sealing gaskets. These materials are capable of withstanding the force of high water pressure without degrading over time.
- Reinforce with Additional Support: If the brass fitting is still in good shape, but there are signs of stress or pressure buildup, you may want to reinforce the area with a brace or clamp. This will distribute pressure more evenly and reduce the risk of future leaks.
- Check System Pressure: After making the repair, it’s essential to check the system pressure and ensure it is within safe operating limits. Installing a pressure regulator may help prevent future pressure-related leaks.
Conclusion
Fixing pinhole leaks in brass fittings requires attention to detail, the right tools, and an understanding of the underlying causes. Whether you’re using simple techniques like plumber’s tape or more advanced methods like soldering, taking action early can prevent further damage and costly repairs.
FAQ
What causes a pinhole leak in a brass fitting?
A pinhole leak in a brass fitting is typically caused by corrosion, which can occur due to high water pressure, poor water quality, or prolonged exposure to moisture. Over time, these factors weaken the brass, creating small holes where water can escape.
Can a plumber’s tape fix a pinhole leak in brass fittings?
Plumber’s tape can temporarily seal small leaks in threaded brass fittings, but it’s not a long-term solution for pinhole leaks. It’s best used for minor leaks or as a temporary fix until a more permanent repair can be made.
How do I know if my brass fitting has a pinhole leak?
Signs of a pinhole leak include visible water drips, wet spots around the fitting, or corrosion buildup on the brass. In some cases, you may also hear a hissing sound or notice a decrease in water pressure.
Is soldering a good option for repairing a pinhole leak in brass fittings?
Yes, soldering is an effective and permanent method for repairing pinhole leaks in brass fittings. It involves heating the brass and applying solder to fill the hole, creating a watertight seal.
Can I use epoxy to fix a pinhole leak in a brass fitting?
Epoxy is a good option for temporary or small leaks in brass fittings. It creates a strong bond that can withstand pressure and water flow, but for larger or more critical leaks, it’s better to consider more permanent solutions like soldering or replacing the fitting.
How can I prevent pinhole leaks in my brass fittings?
To prevent pinhole leaks, regularly check for signs of corrosion, ensure your water pressure is within normal levels, and clean fittings to remove mineral buildup. Using high-quality brass fittings and applying protective coatings can also help extend their lifespan.