Cross-threading is particularly problematic in hydraulic systems because if not addressed promptly, it can lead to leaks, pressure loss, and even catastrophic failures. Proper threading is crucial for maintaining the integrity and efficiency of these systems, as even minor misalignments can result in significant operational issues. Therefore, understanding and preventing cross-threading is essential for ensuring the reliability and safety of hydraulic and mechanical systems.
Understanding Cross Threading
What is Cross-Threading?
Cross threading is a mechanical issue where the threads of a fastener or fitting do not align correctly with the threads of the component it is meant to engage. This misalignment occurs when the fastener is forced or improperly guided into the threaded component, causing the threads to become damaged. In technical terms, cross-threading disrupts the alignment and engagement of the threads, leading to a condition where the male and female threads do not mesh properly. This often results in stripped threads, which compromise the integrity of the connection.
Cross-threading commonly occurs during assembly when a fastener is inserted at an angle or when excessive force is applied. This misalignment can be due to operator error, using the wrong size or type of fastener, or poor-quality threads on the components. The result is a weakened connection that fails to seal properly or maintain the required strength.
How Cross-Threading Affects Components
Cross-threading has several detrimental effects on components and systems. Firstly, it damages the thread integrity, which weakens the connection between the fastener and the component. This can lead to incomplete or improper sealing, resulting in leaks in hydraulic systems or other pressurized applications. The damaged threads can also affect the component’s ability to hold together under stress, leading to potential mechanical failures.
The impact on component performance is significant. In hydraulic systems, for example, cross-threading can cause pressure loss, reduce operational efficiency, and increase the risk of system breakdowns. The damaged threads may not engage fully, causing instability and compromising the system’s overall reliability. Additionally, the compromised threads can lead to higher maintenance costs due to the need for repairs or replacements, and in severe cases, it might necessitate complete system overhauls.
Common Examples of Cross-Threading
Real-Life Scenarios:
Hydraulic Systems: In hydraulic systems, cross-threading often occurs when assembling fittings or connections. For instance, a hydraulic hose may be improperly threaded onto a fitting, leading to leaks and pressure drops that can disrupt machinery operations.
Automotive Applications: Cross-threading is also common in automotive maintenance, where engine bolts or other threaded components are misaligned during assembly. This can lead to engine performance issues or mechanical failures.
Industrial Equipment: In industrial settings, cross-threading can occur in various machinery and equipment, causing operational inefficiencies and requiring costly repairs. An example might be a poorly threaded connection on a conveyor system, leading to misalignment and malfunctions.
Causes of Cross-Threading
Improper Tool Use
One of the primary causes of cross-threading is the improper use of tools during assembly. The use of incorrect tools or techniques can easily lead to thread misalignment and subsequent damage. For example, using a wrench that is too large or too small for the fastener can cause uneven pressure on the threads, leading to cross-threading. Similarly, using a power tool with excessive speed or torque can force the fastener into the component at an incorrect angle, damaging the threads.
Incorrect techniques also play a significant role. For instance, when starting to thread a fastener by applying power tools immediately instead of first engaging the threads by hand, it increases the risk of cross-threading. Hand-starting ensures that the threads are properly aligned before any significant force is applied. Skipping this step often results in threads being misaligned from the outset.
Examples of Improper Tool Use:
Using a power drill to drive in a bolt without first aligning the threads by hand.
Applying a wrench at an angle instead of perpendicular to the fastener, causing uneven pressure.
Using a mismatched tool size, such as a socket that doesn’t fit snugly over the fastener, leads to slippage and misalignment.
Misalignment of Threads
Misalignment is another significant cause of cross-threading. When the male and female threads are not aligned properly, the fastener is likely to cut across the existing threads rather than engage them smoothly. This misalignment can occur during the initial engagement of the threads, where even a slight angle can lead to cross-threading.
Several factors contribute to misalignment, including poor visibility during assembly, awkward positioning of components, or the use of components with slightly mismatched thread profiles. For example, if a fitting is difficult to reach, it may be challenging to maintain a straight alignment while threading, increasing the likelihood of cross-threading. Additionally, dirt, debris, or damage to the threads can also cause misalignment, as the threads may not engage correctly.
Factors Contributing to Misalignment:
Poor visibility: When the assembler cannot see the threads, it becomes challenging to ensure proper alignment.
Component positioning: Awkward angles or positions of components can make it difficult to thread properly, leading to misalignment.
Thread contamination: Dirt or debris in the threads can prevent smooth engagement, causing misalignment and cross-threading.
Excessive Force
Applying too much force during assembly is another common cause of cross-threading. When a fastener or fitting is forced into place without proper alignment, the threads can easily become damaged. Excessive force often results from an attempt to overcome resistance when the threads are not properly engaged. This resistance might be due to misalignment, debris in the threads, or using a fastener with the wrong thread pitch.
Over-torquing is a specific issue where excessive force is applied after the fastener has been partially threaded. This can strip the threads or deform them, making it difficult to achieve a proper seal or connection. Once the threads are damaged, the fastener may not hold properly, leading to further issues down the line, such as leaks or mechanical failures.
Signs That Indicate Over-Torquing:
Increased resistance: If you feel increased resistance early in the threading process, it’s a sign that the threads may be misaligned, and applying more force can lead to cross-threading.
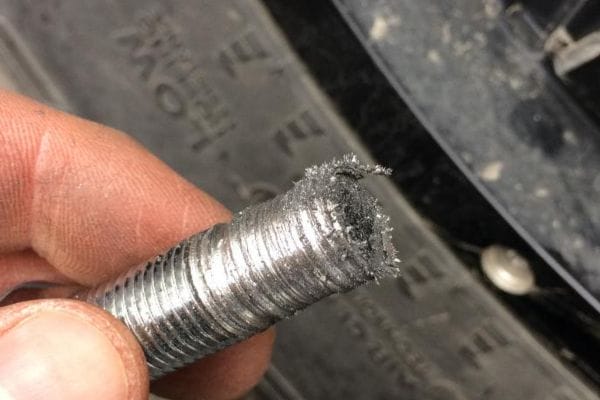
Stripped threads: Visible damage or deformation of the threads after assembly is a clear indicator of over-torquing.
Difficulty in turning: If the fastener becomes increasingly difficult to turn without significant progress in threading, it’s a sign that excessive force is being applied.
Thread Quality Issues
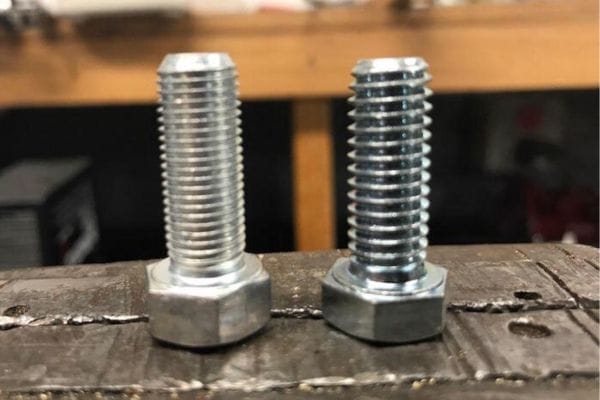
The quality of the threads themselves is a crucial factor in preventing cross-threading. Poorly manufactured threads that are rough, uneven, or have imperfections can easily cause cross-threading. This is because low-quality threads do not engage as smoothly as high-quality ones, making them more susceptible to misalignment and damage during assembly.
Thread quality issues can arise from manufacturing defects, wear and tear, or damage from previous use. For instance, if a thread is slightly deformed from a previous assembly or has been worn down over time, it may not align properly with a new fastener, leading to cross-threading. Ensuring the use of high-quality components with precision-machined threads is essential to avoiding these problems.
Importance of Using High-Quality Components:
Precision machining: High-quality threads are typically machined to precise standards, ensuring smooth engagement and reducing the risk of cross-threading.
Durability: High-quality threads are more durable and less likely to suffer from wear or deformation, maintaining their integrity over multiple assemblies.
Consistency: Using components from reputable manufacturers ensures consistency in thread quality, which is critical for preventing cross-threading.
Consequences of Cross-Threading
Mechanical Damage
Cross-threading results in significant mechanical damage to both the threads and the components involved. When threads are misaligned and forced together, they can become stripped, deformed, or even destroyed. This damage compromises the integrity of the connection, making it difficult or impossible to achieve a proper seal. Once the threads are damaged, the fastener or fitting may no longer hold securely, leading to additional issues such as loosening under load or failure during operation.
The long-term effects of mechanical damage due to cross-threading are particularly concerning for system reliability. Damaged threads weaken the overall structure, increasing the likelihood of failure under stress. This can lead to repeated breakdowns, especially in systems that rely on high-pressure or critical connections, such as hydraulic systems. Over time, the cumulative effect of multiple cross-threaded connections can severely compromise the entire system, leading to costly repairs, replacements, and potential safety risks.
Leaking and Pressure Loss
One of the most immediate and noticeable consequences of cross-threading is the occurrence of leaks and pressure loss. In systems where a tight seal is essential—such as hydraulic systems, plumbing, or pneumatic systems—cross-threaded connections often fail to provide an adequate seal. The damaged threads do not fit together correctly, allowing fluids or gases to escape through gaps in the connection.
Leaking fluids or gases can lead to a range of safety hazards, including the risk of slips, falls, or exposure to harmful substances. In hydraulic systems, pressure loss due to leaks can lead to a significant reduction in system performance, causing machinery to operate inefficiently or fail altogether. Additionally, pressure loss can make it challenging to maintain consistent operations, leading to interruptions and potential damage to other components in the system.
Increased Maintenance Costs
Dealing with the aftermath of cross-threading inevitably leads to increased maintenance costs. The financial implications include the cost of repairing or replacing damaged components, as well as the labor involved in disassembling and reassembling parts of the system. If cross-threading occurs frequently, these costs can accumulate quickly, straining maintenance budgets and resources.
Moreover, cross-threading can disrupt maintenance schedules and operations. Unplanned repairs may require taking systems offline, leading to delays in production or service. In industries where uptime is critical, such as manufacturing or energy, these delays can result in significant financial losses. Furthermore, recurring cross-threading issues may necessitate more frequent inspections and maintenance, further increasing costs and reducing operational efficiency.
System Downtime
System downtime is one of the most significant consequences of cross-threading, particularly in industries that rely on continuous operation. When cross-threading leads to mechanical failures, leaks, or pressure loss, systems may need to be shut down for repairs. This downtime can be particularly costly in environments where every minute of operation counts, such as in manufacturing, transportation, or energy production.
Examples of downtime caused by thread issues include the temporary shutdown of a production line due to a cross-threaded hydraulic fitting that resulted in a leak. The time required to diagnose the problem, source replacement parts, and perform the repair can lead to hours or even days of lost productivity. In some cases, the downtime may also impact other parts of the system, leading to a cascading effect that further exacerbates the situation.
The overall impact of system downtime extends beyond the immediate repair costs; it can also affect customer satisfaction, contractual obligations, and a company’s reputation for reliability. Therefore, preventing cross-threading is not only essential for maintaining system integrity but also for ensuring that operations run smoothly and efficiently, without costly interruptions.
Preventing Cross-Threading
How to Avoid Cross-Threading
Cross-threading is a frustrating and often costly mistake that can damage threads and lead to leaks, breakage, or mechanical failure. Here are some easy, proven ways to prevent it:
1. Use the “Reverse-to-Click” Trick
What it is:
Before tightening, gently turn the bolt or screw counterclockwise (left) until you hear or feel a soft “click”.
Why it helps:
That click means the threads have aligned properly. Now you can turn clockwise to tighten without forcing or misaligning them.
2. Use a Thread Gauge or Fit Check Tool
What it is:
A thread gauge or fit check plug confirms whether your male and female threads match in pitch, diameter, and angle.
Why it helps:
Using mismatched threads (e.g., mixing metric and imperial) is a leading cause of cross-threading. Gauges prevent that.
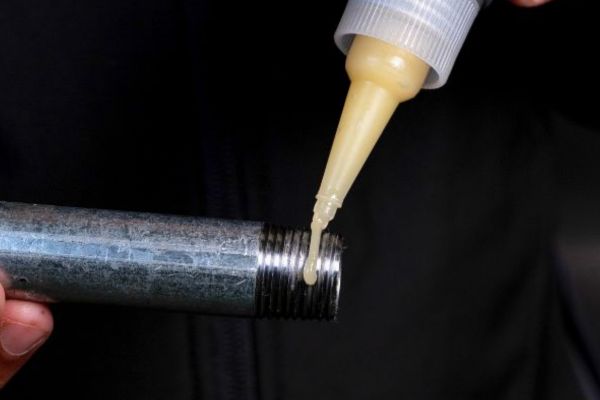
3. Apply Thread Lubricant or Anti-Seize Compound
What it is:
Use grease, oil, or anti-seize paste on threads before assembly.
Why it helps:
Lubrication reduces friction, prevents thread galling (metal-on-metal sticking), and allows smoother alignment.
4. Choose Coarse Threads for Soft or Low-Tolerance Materials
What it is:
Use coarse-thread fasteners where possible, especially in soft metals or plastics.
Why it helps:
Coarse threads are more forgiving and less likely to cross-thread than fine threads due to their wider spacing and stronger engagement.
5. Visually Inspect and Clean Threads
What it is:
Before assembly, check for dirt, rust, metal shavings, or damage on both male and female threads.
Why it helps:
Contaminants can misalign threads, causing forced entry and cross-threading.
Tip: Use a brush or compressed air to clean; avoid forcing a screw into a damaged or dirty hole.
6. Start Every Thread by Hand
What it is:
Always begin threading manually without using a wrench, ratchet, or drill.
Tip: Hand-tighten the first 2–3 full turns before switching to tools for final tightening.
Choosing the Right Tools
The selection of the right tools is crucial in preventing cross-threading. The use of incorrect or low-quality tools can lead to misalignment, over-torquing, and damaged threads.
Importance of Selecting the Appropriate Tools for Threading:
Tool Fit: Ensure that the tool fits the fastener or fitting snugly. A poorly fitting tool can slip, causing the fastener to misalign or the threads to strip.
Torque Control: Use torque wrenches or other torque-limiting tools to apply the correct amount of force. This is particularly important in applications where precise torque specifications are critical, such as in hydraulic systems.
Recommendations for High-Quality Tools:
Torque Wrenches: Invest in a high-quality torque wrench that allows you to set and control the amount of force applied during assembly.
Thread Taps and Dies: Use quality thread taps and dies to repair or clean threads before assembly. This ensures that threads are in optimal condition and reduces the risk of cross-threading.
Socket Sets: Choose socket sets that are designed to fit the fasteners you are working with. Opt for sets with a variety of sizes to ensure a precise fit.
Quality Control and Inspection
Implementing rigorous quality control and inspection procedures is essential for preventing cross-threading. Regular inspections help identify potential issues before they lead to costly damage or system failures.
Methods for Inspecting Threads and Components Before Assembly:
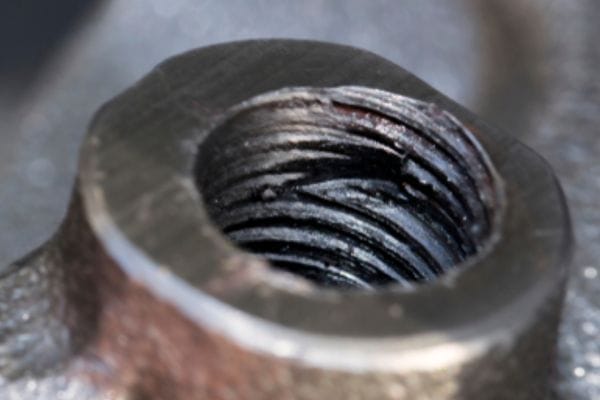
Visual Inspection: Before assembly, visually inspect the threads of both the fastener and the component for any signs of wear, damage, or contamination. Look for burrs, nicks, or other imperfections that could cause misalignment.
Thread Gauges: Use thread gauges to check the size and pitch of the threads. This ensures that the fastener and component are compatible and that the threads are in good condition.
Inspection Tools: In addition to thread gauges, use calipers, micrometers, and other precision tools to measure thread dimensions and ensure they meet specifications.
Using Thread Gauges and Other Inspection Tools:
Thread Plug Gauges: Use thread plug gauges to check the internal threads of a component. These gauges ensure that the threads are correctly sized and shaped for proper engagement.
Ring Gauges: Use ring gauges to inspect external threads on fasteners. This helps verify that the threads will properly engage with the corresponding internal threads.
Go/No-Go Gauges: Go/No-Go gauges provide a quick and effective way to check thread fit. If the thread passes the “Go” side and fails the “No-Go” side, it meets the required tolerances.
Thread Lubrication
Thread lubrication plays a vital role in preventing cross-threading by reducing friction and ensuring smooth engagement of the threads.
Benefits of Using Lubricants to Prevent Cross-Threading:
Reduced Friction: Lubricants reduce the friction between the threads, making it easier to align and engage them correctly. This is particularly important in high-torque applications where the risk of cross-threading is higher.
Ease of Assembly: Lubricated threads are easier to turn, reducing the amount of force required during assembly. This helps prevent over-torquing and the associated risk of thread damage.
Corrosion Protection: Many lubricants also provide corrosion protection, which helps maintain the integrity of the threads over time and reduces the risk of cross-threading due to rust or oxidation.
Types of Lubricants Suitable for Different Applications:
Anti-Seize Compounds: Anti-seize lubricants are ideal for applications where components are exposed to high temperatures or harsh environments. They provide long-lasting lubrication and help prevent galling and seizing of the threads.
Thread Sealants: Thread sealants not only lubricate the threads but also help create a leak-proof seal in fluid and gas systems. These are commonly used in hydraulic and pneumatic applications to ensure both smooth assembly and reliable sealing.
Dry Lubricants: Dry lubricants, such as PTFE (Teflon), are suitable for applications where traditional wet lubricants may attract dirt or contaminants. These lubricants provide a slick surface that reduces friction without leaving a residue.
Fixing Cross-Threading Issues
Identifying Cross-Threading Problems
Properly diagnosing cross-threading issues is the first step in fixing them. Early identification can prevent further damage and reduce the need for costly repairs or replacements.
Techniques for Diagnosing Cross-Threading Issues:
Visual Inspection: Start by visually inspecting the threads for signs of cross-threading. Look for misaligned threads, uneven spacing, or threads that appear flattened or stripped. Use a magnifying glass if necessary to get a closer look at the fine details of the threads.
Hand-Testing: Attempt to thread the fastener or fitting by hand. If you feel unusual resistance or the fastener does not thread smoothly after the initial engagement, it is likely cross-threaded. Proper threading should feel smooth and consistent.
Torque Testing: Use a torque wrench to check if the fastener tightens to the correct torque specification. If the torque increases rapidly without much thread engagement or if the fastener suddenly stops tightening, cross-threading may be the cause.
Thread Alignment Tools: Employ thread alignment tools or gauges to check if the threads are properly aligned. These tools can help identify slight misalignments that are not easily visible but could lead to cross-threading.
Visual and Functional Indicators:
Stripped or Damaged Threads: Threads that appear worn, flattened, or stripped are common indicators of cross-threading.
Uneven Thread Engagement: If the fastener or fitting engages only partially or at an angle, this is a clear sign of cross-threading.
Unusual Resistance: If the fastener requires excessive force to turn or seems to bind partway through the threading process, cross-threading is likely the culprit.
How to Fix Cross-Threaded Threads
Cross-threaded parts can often be repaired — but the right solution depends on how badly the threads are damaged. Here are four common and effective methods to fix cross-threading issues:
1. Use a Thread Tap (Re-Tapping)
What it is:
A tap is a precision tool that cuts or cleans the internal threads inside a hole.
How it works:
Insert the matching tap into the damaged hole and carefully rotate it to realign or reshape the threads.
When to use it:
✔ For mild to moderate cross-threading
✔ When the threads are only slightly deformed, not completely stripped
Tip: Use cutting oil to reduce friction, and turn slowly to avoid cutting too much metal.
2. Install a Helicoil or Thread Insert
What it is:
A Helicoil (or similar thread insert) is a metal coil that restores stripped threads to their original size.
How it works:
Drill out the damaged threads
Tap new threads for the insert
Screw in the Helicoil
Install your bolt or screw into the new insert
When to use it:
✔ For heavily stripped or irreparable threads
✔ Commonly used in automotive, aerospace, or aluminum parts
Tip: Helicoils are stronger than original threads in many cases — a good long-term fix.
3. Replace the Damaged Component
What it is:
If the damaged thread is on a removable part (like a bolt, bike pedal, or fitting), replacement may be the fastest fix.
When to use it:
✔ When tapping or inserting won’t restore full strength
✔ When time and cost of repair are higher than replacement
Tip: Always inspect the mating part — both sides of a cross-threaded pair may be damaged.
4. Use Threadlocker or Epoxy (For Minor Damage Only)
What it is:
Threadlocker (like Loctite) or metal-filled epoxy glue can help hold a screw in place when threads are loose or lightly damaged.
How it works:
Clean the area thoroughly
Apply a small amount of adhesive
Insert and hold the fastener until cured
When to use it:
✔ For light-duty, non-critical applications
✔ When the fastener does not require frequent removal
Caution: This is a temporary or low-strength fix. Not suitable for high-load or safety-critical components.
Conclusion
Addressing cross-threading is crucial for maintaining system integrity and ensuring reliable performance. Effective prevention and prompt resolution of cross-threading problems not only enhance the longevity of components but also contribute to overall system safety and efficiency. Implementing best practices and staying vigilant during assembly and maintenance can significantly reduce the risk of cross-threading.
FAQ
What is cross-threading?
Cross-threading occurs when the threads of a fastener or fitting are not aligned correctly with the threads of the component it is being screwed into, leading to thread damage and improper connections.
What causes cross-threading?
Common causes of cross-threading include improper tool use, misalignment of threads, applying excessive force during assembly, and using low-quality or damaged components.
How can I prevent cross-threading?
To prevent cross-threading, always start threading by hand, ensure proper alignment, use the correct tools, apply the appropriate amount of force, and regularly inspect threads for damage or debris.
What are the signs of cross-threading?
Signs of cross-threading include increased resistance when tightening, threads that appear stripped or damaged, and fittings or fasteners that do not fully engage or align properly.
Can cross-threaded components be repaired?
Yes, cross-threaded components can often be repaired using thread repair kits, re-tapping, or thread chasers. However, if the damage is severe, it may be necessary to replace the component.
What should I do if I suspect cross-threading has occurred?
If you suspect cross-threading, stop the assembly process immediately, inspect the threads, and attempt to realign or repair them. If the damage is significant, consider replacing the affected parts to ensure a secure connection.