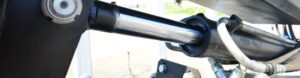
A one-piece fitting seal mismatch should be found before crimping by identifying where the connection is designed to seal, then verifying the thread form, seat angle, sealing face, and any O-ring against the mating port or adapter. A fitting can thread into another component and still have the wrong sealing method. Once it has been crimped onto a hose, the shop may have to scrap the assembly, rebuild it, or risk sending a connection into service that can leak under pressure.
Understand What a Seal Mismatch Actually Means
Thread engagement does not prove sealing compatibility
A seal mismatch exists when the selected connection cannot create the intended seal with its mating component, even if the threads appear to start or tighten. Hydraulic connections may seal on metal seats, an O-ring, a bonded seal, a flare, a cone, a flat face, or properly specified pipe threads, depending on the connection design; the thread may provide mechanical retention while a different surface contains the fluid, so thread diameter alone cannot identify the sealing method. For example, two straight-thread fittings can use different seats or seals, while two tapered thread forms that appear close may differ in form or intended interference.
One-piece construction solves a different matching problem
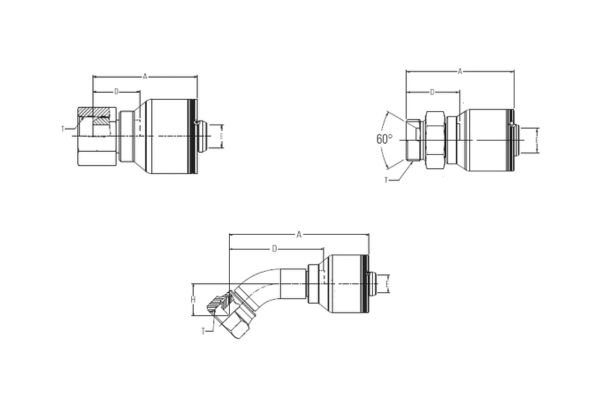
In a one-piece hydraulic hose fitting, the fitting body or stem and ferrule are preassembled or fixed as one assembly component; the precise construction depends on the series. This format can reduce errors caused by selecting a separate ferrule that does not belong with the stem, but it does not verify the connection end, mating port, hose series, or crimp settings. One-piece does not mean reusable, field attachable, universally compatible, or automatically leak free; a shop still has two independent decisions: whether the fitting seals to the equipment connection and whether its hose tail and ferrule match the hose construction and approved assembly procedure. Keeping those decisions separate prevents a correct hose-side selection from hiding a wrong port-side seal.
Identify Where the Connection Is Designed to Seal
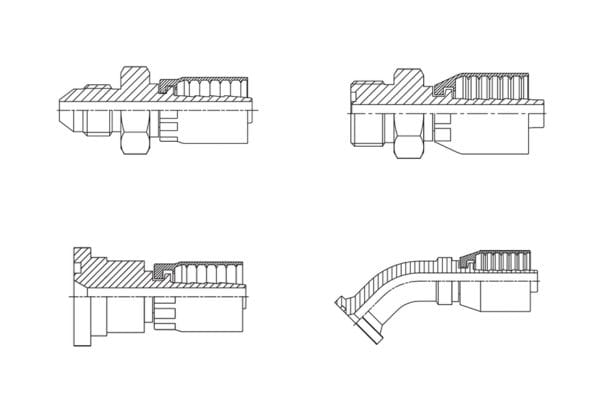
Compare the common sealing locations
The fastest reliable check begins at the sealing surface rather than the hex or general fitting shape. Clean the removed part using the approved maintenance procedure, then inspect the nose, internal cone, external flare, flat face, O-ring groove, washer location, and thread profile without altering them; a JIC connection uses a different seat concept from an SAE 45-degree flare; ORFS, ORB, BSPP arrangements, tapered pipe threads, Metric cone systems, DIN forms, and JIS connections also require their own identification evidence. These names describe different combinations of connection standard, thread form, seat geometry, and sealing method. They must not be treated as visually interchangeable groups.
| Sealing location | Evidence to inspect | Common reason for a wrong conclusion |
|---|---|---|
| Metal flare or cone | Seat location, included angle, contact width, damage | Similar thread size hides a different seat angle |
| Flat face with O-ring | Face geometry, groove, O-ring position and condition | Flat appearance is assumed to be any face-seal type |
| Port O-ring or bonded seal | Groove or spotface, seal position, port specification | Straight thread is mistaken for the sealing element |
| Tapered thread interface | Thread form, taper, pitch/TPI, specified sealing practice | Thread engagement is treated as proof of the correct form |
| Washer or soft seal at a face | Shoulder, washer location, mating surface | Missing seal is replaced without confirming the design |
Read witness marks without letting them overrule dimensions
Contact marks on an old seat can show where two parts touched, but they cannot by themselves prove that the original connection was correct. A narrow, off-center, incomplete, or damaged witness mark may indicate a seat-angle mismatch, misalignment, contamination, over-tightening, or a previously incorrect replacement. Inspect the mating adapter or port as well as the hose fitting because damage can exist on either side; do not use thread sealant to compensate for a metal-seat mismatch, missing O-ring, damaged face, or incorrect thread; sealant cannot create the required geometry. If the seat is deformed, the original profile may no longer be measurable, so part-number or equipment documentation becomes more important than visual comparison.
Collect the Right Evidence From the Old Assembly
Photograph and measure before discarding the failed part
An old assembly should be treated as evidence, not automatically as a correct specification. Before disposal, photograph the complete fitting, connection end, thread profile, sealing face, O-ring location, hose layline, and orientation of any elbow relative to the hose; measure the relevant outside or inside thread diameter and determine pitch or threads per inch with appropriate gauges; also note whether the thread appears straight or tapered. Record the sex of the connection, seat location, apparent seat angle using the proper inspection method, and any part number that remains readable.
Check the mating port instead of copying the removed fitting
The removed fitting may already be a mismatched substitute, which makes copying it a repeat of the earlier error. Inspect or identify the equipment port, adapter, tube end, or manifold connection that the new hose assembly must join. Look for an equipment parts listing, port designation, adapter marking, controlled drawing, or previous verified service record, then compare that evidence with the physical measurements; where the port is difficult to access, clear photographs should show the full connection and sealing surface, not just the opening. If documentation and the removed part disagree, stop and resolve the conflict before crimping; the equipment, port, or component manufacturer’ current data should take priority over an undocumented visual match.
Bring the following evidence to the bench:
- the complete old assembly and mating component when safe and practical;
- close, well-lit photos of the thread, seat, face, groove, and any seal;
- measured thread diameter, pitch or TPI, and straight/tapered assessment;
- hose layline, manufacturer, series, ID or dash size, and readable part numbers; and
- equipment identification plus the location and function of the connection.
Use a Step-by-Step Pre-Crimp Seal Check
Identify thread, seat, and seal as separate attributes
Start by confirming whether the connection is male or female, then identify the thread form from diameter, pitch or TPI, flank characteristics where applicable, and straight or tapered geometry. Next, locate the intended sealing surface and determine whether it relies on a flare, cone, face seal, port O-ring, washer, or specified pipe-thread interface; compare the seat angle and geometry using appropriate gauges or documented dimensions rather than estimating by eye. Finally, confirm that the mating component provides the corresponding surface and that an O-ring or other seal is present only where the design calls for it. This sequence prevents a familiar thread label from becoming a shortcut for assumptions about the seat and seal.
Perform a dry comparison without forcing the parts
A controlled, unpressurized comparison can reveal obvious problems, but it is not a substitute for specification verification. Threads should start correctly without cross-threading or abnormal resistance, yet easy engagement still does not confirm that the seats meet; inspect the relationship between the two sealing surfaces, required seal position, available thread engagement, shoulder clearance, and orientation before applying any assembly torque. Do not force mismatched parts together to create a witness mark, modify a seat, stack seals, or add sealant as a diagnostic method. If the fitting cannot be identified from documented geometry and the mating specification, quarantine it until the connection manufacturer information or a verified sample resolves the uncertainty.
Use this decision order before approving the connection end:
- Identify the thread form and size from measurements.
- Locate the designed sealing surface on both components.
- Confirm seat angle, face geometry, groove, and seal type.
- Check the applicable component or equipment specification.
- Reject or quarantine any combination with conflicting evidence.
Confirm the Hose Side Before Crimping
Match the fitting series to the exact hose construction
Correct port sealing does not make the hose side compatible; confirm the hose manufacturer and series, reinforcement construction, hose ID or dash size, and the one-piece fitting series intended for that hose. The same nominal hose size can appear across products with different cover, reinforcement, wall, and fitting requirements. The fitting stem, ferrule, and hose must belong to a documented assembly system or an otherwise validated combination supported by applicable technical data. A one-piece format reduces the need to choose a loose ferrule, but it cannot prevent selection of the wrong preassembled fitting series.

Use current crimp data for the actual combination
Crimp diameter, die selection, insertion depth, skive or no-skive preparation, and inspection criteria must come from current data applicable to the hose, fitting, and crimping equipment. Do not copy a crimp value from a fitting that shares the same dash size or resembles the replacement; mark insertion depth as required by the documented procedure, verify full insertion before crimping, and inspect the completed assembly according to that system instructions. The complete assembly pressure suitability depends on its lowest-rated component or interface and on fluid, temperature, impulse, routing, and installation conditions.
Know What a Missed Mismatch Can Cause
Leakage may appear immediately or after service begins
A wrong seat or sealing face can leak during initial testing, but some mismatches create partial contact that appears tight before pressure, temperature, impulse, or vibration exposes the problem. Over-tightening may temporarily reduce visible seepage while deforming a seat, damaging a thread, extruding an O-ring, or transferring load into the wrong surface; the result can include fluid loss, contamination entry, rework, damaged adapters, and an unplanned shutdown. A connection that needs unusual force to stop leaking should not be accepted as proof of compatibility. Shut the equipment down, release hydraulic pressure and stored energy, and follow the equipment and component manufacturers safety procedures before inspection.
A wrong diagnosis can damage more than the fitting
If a leak is blamed on crimping when the actual fault is a connection-end mismatch, the shop may recrimp or replace the hose without correcting the seal. If the leak is blamed on a missing seal when the design uses a metal seat, an added O-ring or washer can prevent proper engagement and introduce another failure point; cross-threading, poor alignment, damaged sealing faces, incorrect hose routing, and incompatible fluids can also resemble a seal problem, so diagnosis must consider the complete assembly. Never search for a pinhole leak with a hand, disconnect a pressurized line, or install an unverified fitting as a temporary repair. Suspected injection injuries require immediate medical attention even when the external wound appears small.
Make the Crimp-or-Stop Decision Explicit
Use a neutral pre-crimp release checklist
Release the fitting for crimping only when the evidence forms one consistent specification. The work record should identify the hose manufacturer and series, hose size, fitting style and orientation, connection sex, measured thread diameter, pitch or TPI, straight or tapered form, seat angle, sealing method, and existing part number where available; attach clear photos of the complete fitting, thread, and sealing face, plus the relevant equipment or port information. Record the fluid, working pressure, temperature, application, and any material or finish requirement that affects suitability. Finally, identify the crimping machine and the current crimp specification for the exact hose-and-fitting combination; if any safety-critical field is unresolved, the correct decision is to stop rather than guess.
Correct matching is the final acceptance criterion
Finding a one-piece fitting seal mismatch before crimping protects the hose assembly from avoidable scrap, leakage, damaged ports, and repeat downtime. The decisive question is not whether two fittings look alike or whether the threads can be started; it is whether the measured thread, seat, sealing method, hose series, and documented crimp procedure agree with the mating connection and application. Prepare the old part, mating-port evidence, thread measurements, sealing-face photos, hose layline, operating conditions, and current assembly data before releasing the job; when identification remains uncertain, consult the equipment, hose, fitting, port, or crimp-equipment manufacturer applicable information. Correct compatibility carries more weight than speed, unit price, or a visual cross-reference.
Frequently Asked Questions
Seal Identification Questions From the Assembly Bench
Can two fittings with the same thread size use different seals?
Yes. A thread designation does not always define the seat angle, sealing face, O-ring arrangement, or mating geometry. Confirm the complete connection standard and sealing method before treating two fittings as substitutes.
Can an O-ring be added to stop a metal-seat connection from leaking?
No, not unless the documented connection design specifically requires that O-ring in that location. An added seal can obstruct engagement, become cut or extruded, and hide a damaged or mismatched metal seat.
Does a successful low-pressure check prove the seal is correct?
No. A partial contact or deformed seal may appear acceptable initially but respond differently to working pressure, impulse, temperature, or vibration. Follow the applicable inspection and test procedure for the verified hose assembly and connection.
Should a damaged old fitting be used to measure the seat angle?
Only with caution. Wear, deformation, corrosion, or earlier over-tightening can change the surface you are trying to identify. Use undamaged features, mating-component evidence, part numbers, and manufacturer dimensions to resolve the specification.
Is thread sealant acceptable on every tapered hydraulic connection?
No. The connection specification determines whether a sealant is permitted, which type is suitable, and how it should be applied. Sealant must never be used to repair the wrong thread form, damaged threads, or a mismatched sealing design.