Precise measurements are crucial for the proper functioning of banjo fittings in various applications, from automotive systems to hydraulic machinery. This post aims to provide a comprehensive guide on how to measure banjo fittings accurately, ensuring optimal performance and compatibility. We’ll cover the basics of banjo fittings, the tools required, a step-by-step measurement guide, common challenges, and advanced techniques to help you achieve precise results.
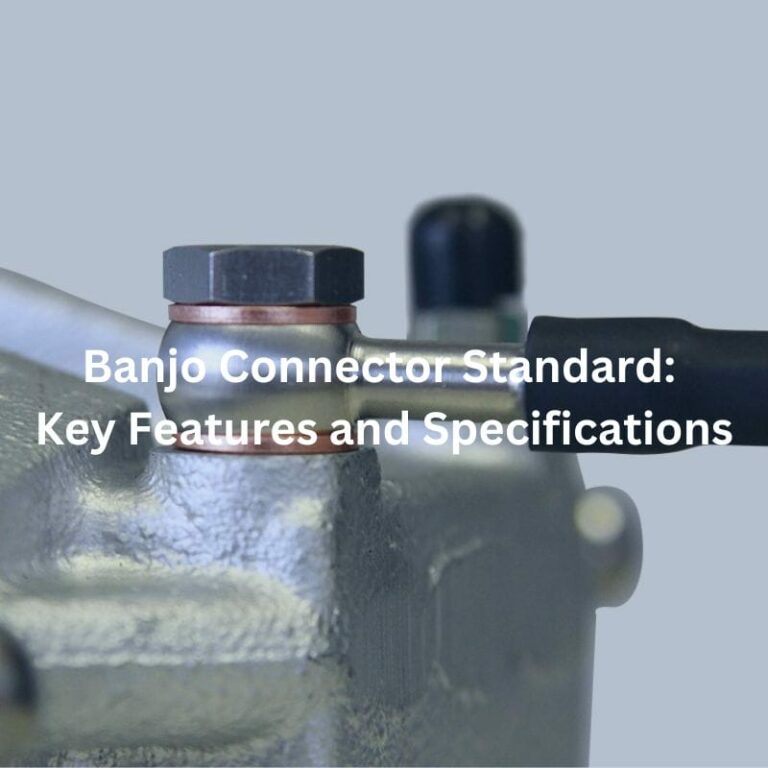
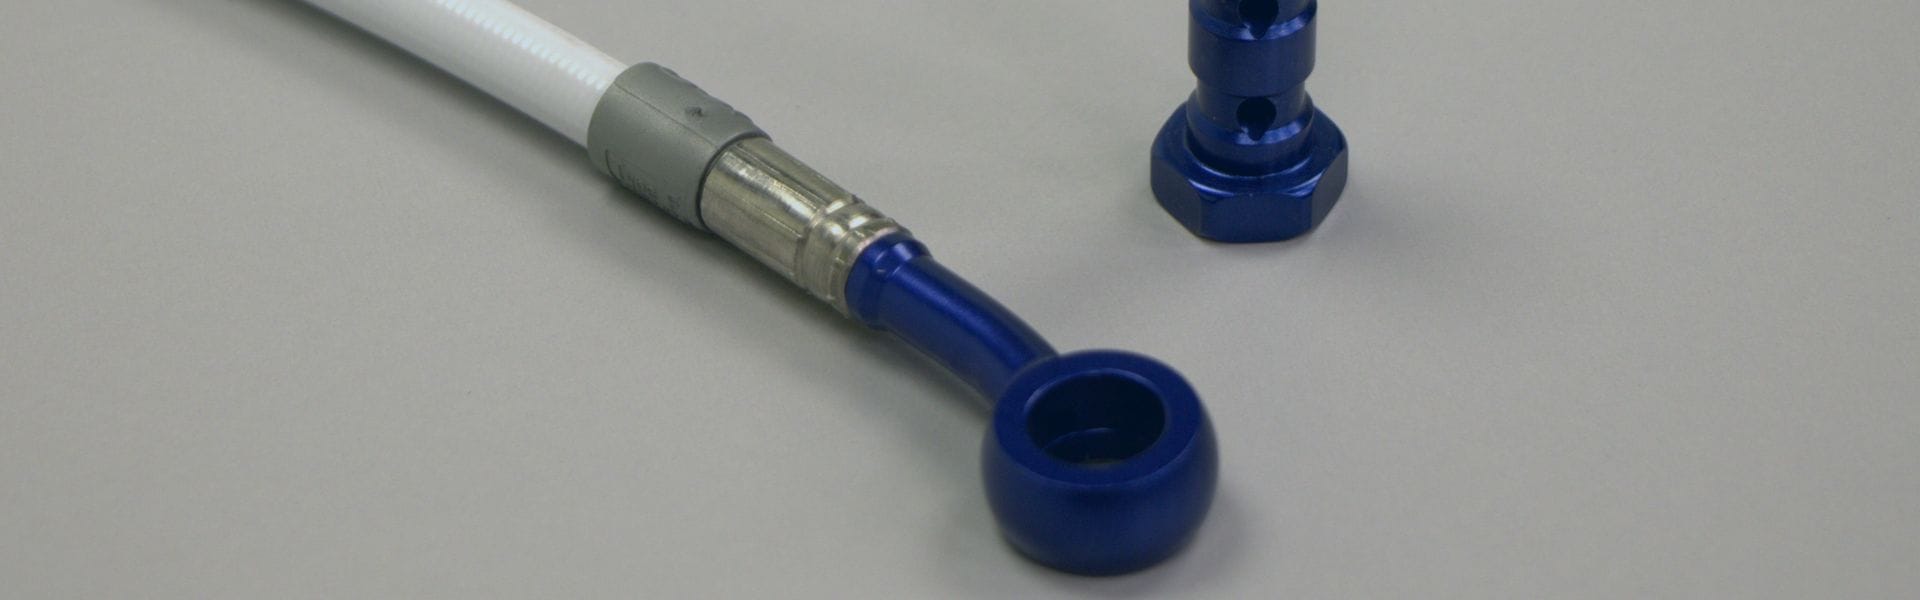
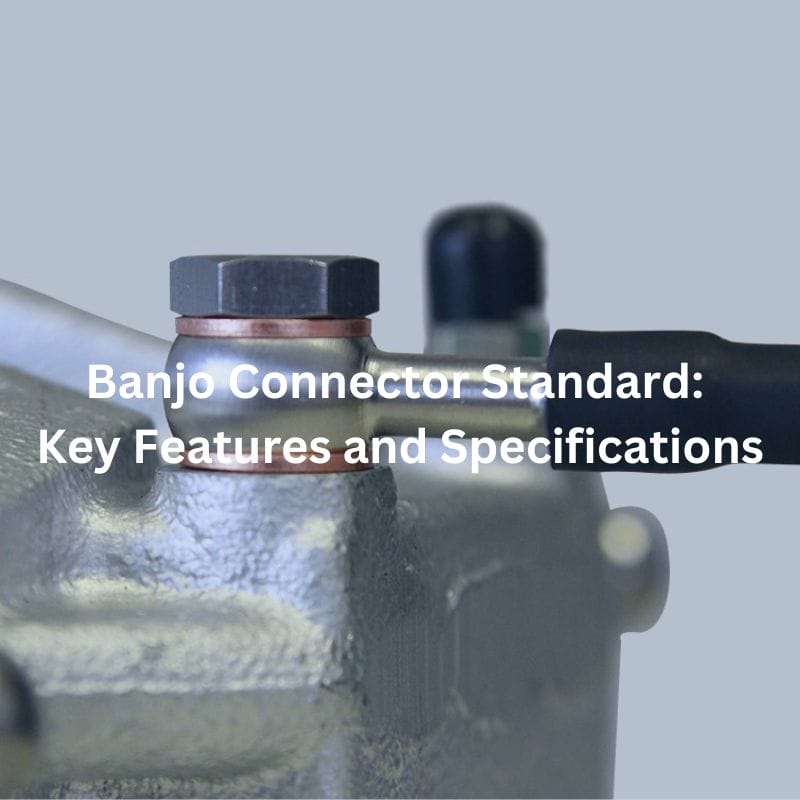
Banjo fittings are specialized connectors used in hydraulic systems to join pipes or hoses to a component while allowing fluid to flow through a hollow bolt. They derive their name from their circular “banjo” shape, resembling the musical instrument. These fittings are crucial in applications where space constraints and the need for fluid transfer efficiency are significant concerns. Banjo fittings provide a compact and secure connection, ensuring reliable performance in various demanding environments.

The main components of a banjo fitting include:
Bolt: The central component through which fluid flows. This hollow bolt is designed to allow the passage of hydraulic fluid, ensuring a smooth and uninterrupted flow within the system. The bolt’s diameter and length are critical measurements that determine its compatibility with other components.
Washer: The washer provides a seal between the bolt and the component to which the fitting is attached. It is typically made of a durable material capable of withstanding high pressures and temperatures, ensuring no leaks occur at the connection points.
Eye: The eye is the circular part of the banjo fitting that connects to the hose or pipe. It features an opening through which the bolt passes, and its dimensions are vital for ensuring a secure and leak-free connection. The eye’s inner and outer diameters, as well as its thickness, are essential measurements for fitting compatibility.
Banjo fittings are commonly used in various industries and scenarios where efficient fluid transfer in tight spaces is required. Some of the primary applications include:
Automotive Industry: In vehicles, banjo fittings are often used in braking systems, fuel lines, and hydraulic clutch systems. Their compact design allows for efficient fluid transfer even in confined spaces, ensuring optimal performance and safety.
Aerospace Industry: Aircraft systems rely on banjo fittings for hydraulic fluid transfer in flight control systems, landing gear, and other critical components. The fittings’ reliability and space-saving design are essential for maintaining the aircraft’s functionality and safety.
Industrial Machinery: Banjo fittings are used in various industrial machines for hydraulic fluid transfer, including construction equipment, manufacturing machinery, and agricultural vehicles. Their ability to provide secure and efficient connections in tight spaces makes them invaluable in these applications.
Marine Industry: In boats and ships, banjo fittings are utilized in hydraulic systems for steering, lifting, and other essential functions. The fittings’ durability and efficiency are crucial for ensuring reliable operation in marine environments.
Medical Equipment: Banjo fittings are also found in medical devices and equipment where precise fluid transfer is necessary. Their compact design allows for integration into intricate systems, ensuring accurate and reliable performance.
How to Measure:
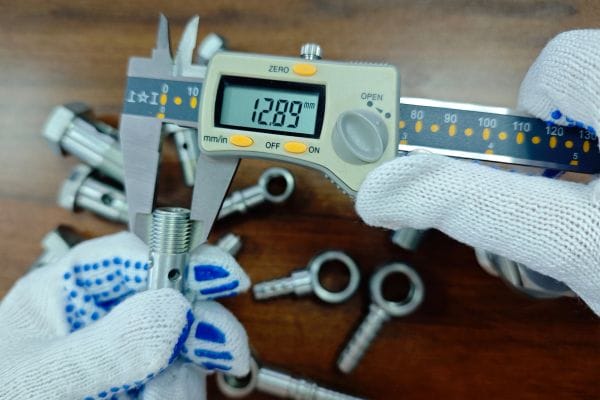
Select the Right Tool: Use a pair of calipers for accurate measurement. Digital calipers are recommended for their ease of use and precision.
Prepare the Bolt: Ensure the bolt is clean and free of any debris. This will prevent any obstruction during measurement.
Measure the Diameter:
Open the calipers and place the jaws around the bolt’s diameter.
Close the jaws until they touch the bolt’s surface without compressing it.
Read the measurement displayed on the calipers.
Importance:
Measuring the bolt diameter is crucial for fitting compatibility. An accurate measurement ensures that the bolt will fit correctly with other components, preventing leaks and ensuring the hydraulic system’s efficiency.
How to Measure:
Inner Diameter:
Use the inside jaws of the calipers.
Insert the calipers into the eye of the banjo fitting.
Open the jaws until they touch the inner sides of the eye.
Read the measurements on the calipers.
Outer Diameter:
Use the outside jaws of the calipers.
Place the jaws around the outer edge of the eye.
Close the jaws until they touch the outer surface of the eye.
Read the measurements on the calipers.
Tips for Ensuring Precision:
Stabilize the Fitting: Place the fitting on a stable surface to prevent movement during measurement.
Consistent Pressure: Apply consistent pressure when closing the caliper jaws to avoid compressing the material and obtaining inaccurate measurements.
How to Measure:
Select the Right Tool: Use a micrometer for measuring the thickness of the eye. Micrometers provide highly accurate measurements, especially for smaller dimensions.
Prepare the Eye: Ensure the eye is clean and free of any debris.
Measure the Thickness:
Open the micrometer and place the anvil and spindle around the eye.
Close the micrometer until the anvil and spindle lightly touch the eye’s surfaces.
Read the measurement displayed on the micrometer.
Significance:
Measuring the thickness of the eye is essential for fitting performance. The thickness affects the strength and durability of the fitting, ensuring it can withstand the pressures and forces in the hydraulic system.

How to Measure:
Select the Right Tool: Use a ruler or a measuring tape for this measurement.
Prepare the Fitting: Place the banjo fitting on a flat, stable surface.
Measure the Length:
Align the zero point of the ruler with one end of the fitting.
Extend the ruler along the length of the fitting to the opposite end.
Read the measurement from the ruler.
Importance:
Measuring the overall length of the banjo fitting is critical for installation. This measurement ensures that the fitting will fit within the allocated space and align correctly with other components in the system. Accurate length measurement is crucial for proper assembly and optimal performance of the hydraulic system.
Common Causes of Inaccurate Measurements:
Incorrect Tool Usage: Using the wrong tool or using a tool incorrectly can lead to inaccurate measurements. For example, using calipers instead of a micrometer for measuring thickness may not provide the needed precision.
Dirty Fittings: Dirt, debris, or oil on the fittings can interfere with the measurement process, leading to erroneous readings.
Environmental Factors: Temperature fluctuations, humidity, and lighting can affect the accuracy of measurements. For instance, metals expand and contract with temperature changes, which can alter the dimensions slightly.
How to Avoid Them:
Correct Tool Usage:
Ensure you are using the appropriate tool for each specific measurement.
Familiarize yourself with the correct operation of each tool. Refer to the user manuals or seek training if necessary.
Regularly calibrate your tools to ensure they provide accurate readings.
Clean Fittings:
Before taking measurements, thoroughly clean the fittings to remove any dirt, debris, or oil.
Use a clean, lint-free cloth and, if necessary, a suitable cleaning solvent to ensure all contaminants are removed.
Control Environmental Factors:
Conduct measurements in a controlled environment where temperature and humidity are stable.
Ensure good lighting conditions to improve visibility and accuracy.
Allow metal fittings to acclimate to room temperature before measuring to avoid expansion or contraction errors.
Potential Limitations of Measurement Tools:
Accuracy Range: Some tools may not be precise enough for very small or very large measurements. For example, a standard ruler might not provide the precision needed for small diameter measurements.
Wear and Tear: Over time, tools can wear out or become damaged, leading to inaccuracies.
Manual Reading Errors: Human error in reading measurements, especially on analog tools, can lead to inaccuracies.
How to Overcome Them:
Use Appropriate Tools:
Select tools that are designed for the specific measurements you need. For small, precise measurements, use micrometers or digital calipers instead of standard rulers.
Invest in high-quality tools known for their accuracy and durability.
Regular Maintenance and Calibration:
Regularly inspect tools for wear and tear. Replace any tools that show signs of damage.
Calibrate tools periodically to ensure they provide accurate readings. Calibration should be done according to the manufacturer’s guidelines or standards.
Minimize Manual Errors:
Use digital tools where possible to minimize human reading errors.
Take multiple measurements and average them to reduce the impact of any single inaccurate reading.
Effects of Environmental Factors on Measurements
Temperature: Temperature changes can cause materials to expand or contract, affecting measurements. For example, a metal fitting may be slightly larger in a warmer environment due to thermal expansion.
Dirt and Debris: Particles on the fittings or measurement tools can interfere with accurate measurements. Even small amounts of dirt can skew readings.
Humidity and Moisture: High humidity or moisture can affect both the materials being measured and the tools, potentially leading to rust or other damage that affects accuracy.
Solutions to Environmental Challenges
Controlled Environment:
Perform measurements in a temperature-controlled environment to minimize the effects of thermal expansion or contraction.
Maintain a consistent humidity level to prevent rust or other moisture-related issues.
Cleanliness:
Ensure all fittings and tools are thoroughly cleaned before measurements.
Use clean, dry hands or gloves to handle both fittings and tools to avoid transferring oils or dirt.
Stabilize the Environment:
Allow fittings and tools to acclimate to the measurement environment for a period before taking measurements.
Use clean, dry storage solutions to keep tools and fittings free from environmental contaminants when not in use.
Customizing a banjo fitting to meet specific needs and applications involves several key steps. Here’s a detailed guide on how to customize your banjo fitting effectively:
Identify the Application:
Understand the specific application for which the banjo fitting will be used. This includes the type of hydraulic system, the pressure levels, and the environmental conditions.
Define the Specifications:
List the exact specifications required for the fitting, such as the diameter of the bolt, the size of the eye, the material, and any special coatings or treatments needed for corrosion resistance or other environmental factors.
Material Selection:
Select the appropriate material based on the application. Common materials include stainless steel, brass, and aluminum. Each material has its own benefits; for example, stainless steel offers excellent corrosion resistance, while brass is known for its machinability and durability.
Consider Coatings and Treatments:
Depending on the application, you might need additional coatings or treatments. For example, anodizing aluminum can enhance its resistance to wear and corrosion.
Length:
Start by identifying the specific length needed for your application. This involves measuring the distance between the components that the banjo fitting will connect.
Consider any space constraints and ensure the length will allow for proper installation and operation within the system.
Custom Length Specifications:
Provide the manufacturer with detailed specifications of the required length. This includes the overall length of the banjo fitting as well as the length of individual components such as the bolt and the eye.
Ensure that the length specifications include tolerances to account for any slight variations during manufacturing.
Thread Type and Size:
Determine the appropriate thread type (e.g., metric, UNF, BSP) and size based on your system requirements. The thread type and size must match the mating components to ensure a secure connection.
Specify the thread pitch and diameter accurately to the manufacturer. For example, you might need an M10x1.0 thread, where M10 represents the diameter in millimeters, and 1.0 represents the pitch in millimeters.
Thread Length:
Specify the length of the threaded portion of the banjo bolt. This is crucial to ensure that the bolt can be properly tightened without bottoming out or being too short to secure the connection.
Include any special requirements, such as left-hand threading or fine/coarse threading, depending on the application.

Inner Diameter (ID) and Outer Diameter (OD):
Measure and specify the inner diameter of the banjo eye, which must match the hose or pipe it connects to. Ensure this measurement is precise to avoid leaks or connection issues.
Specify the outer diameter of the banjo eye to ensure it fits within the system’s spatial constraints and provides the necessary strength.
Custom Hole Sizes:
If the application requires a non-standard hole size, provide detailed specifications to the manufacturer. This might include specific tolerances to ensure a precise fit.
Consider the material thickness around the hole to maintain the integrity and strength of the banjo fitting.
Connecting Methods:
Threaded Connection:
For threaded connections, specify the type and size of the threads on the mating components.
Ensure that the threads are compatible with the banjo bolt’s threads to avoid cross-threading or connection issues.
Push Lock Connection:
If using a push-lock connection, provide specifications for the push-lock fittings, including the size and type of connection.
Ensure that the push-lock connection is compatible with the hose and can withstand the system’s pressure requirements.
Other Connection Methods:
If other types of connections are required, such as quick disconnects or flange fittings, provide detailed specifications to the manufacturer.
Ensure that the selected connection method is suitable for the application and provides a secure and reliable connection.
By carefully specifying each of these elements, you can customize banjo fittings to meet the precise requirements of your hydraulic system. Clear and detailed communication with your manufacturer is essential to ensure that all specifications are accurately met, resulting in a fitting that performs reliably and efficiently in your application.
In this article, we cover all the measurement details as well as customization requirements for banjo fittings. You can apply these techniques to your projects and share this article to help others in the industry. For more information on banana fitting and measurement techniques, contact Topa and we’ll get back to you as soon as possible.
For most plumbing applications involving water, Teflon tape is commonly used due to its ease of application and effectiveness. For gas lines, it’s recommended to use pipe dope rated specifically for gas applications. For oil and other specific fluids, ensure you use a sealant compatible with the fluid.
Tighten the fittings until they are snug and secure. Use a wrench to finish tightening after hand-tightening, but be cautious not to over-tighten, as this can damage the threads and cause leaks. The connection should feel firm without excessive force.
After assembling the fittings, test the connections by running water, gas, or air through the system and inspecting for leaks. If any leaks are detected, disassemble the connection, clean the threads, reapply the sealant, and reassemble the fittings. Regular maintenance and inspections also help ensure leak-free connections.
Yes, brass fittings can be used for both indoor and outdoor installations. However, for outdoor applications, it’s advisable to use brass fittings with corrosion-resistant coatings to protect the connections from extreme weather conditions.
If you over-tighten a fitting and damage the threads, you may need to replace the damaged fitting or pipe section. Disassemble the connection, inspect the threads for damage, and replace any parts as necessary. Reassemble the connection with the appropriate sealant and tighten it carefully to avoid over-tightening again.
It’s recommended to inspect your brass pipe fittings regularly, at least every few months, to check for signs of leaks, corrosion, or wear. Regular maintenance helps identify and address any issues early, ensuring the longevity and reliability of your piping system.


