Proper Assembly of 37° Flare Fittings Using the Flats Method

Introduction

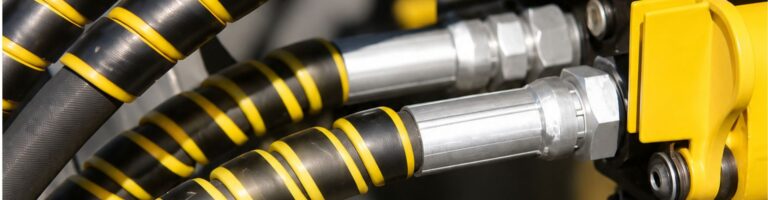
37° flare fittings are crucial components in hydraulic systems, known for their high-pressure tolerance, leak resistance, and reusability. These fittings connect tubes and hoses, ensuring fluid integrity and system reliability. Proper assembly of these fittings is essential to prevent leaks and maintain system performance. The Flats Method is a precise technique used to achieve the correct torque when assembling 37° flare cone fittings. By tightening the fitting to a specific number of flats, this method ensures consistent and reliable connections.

Understanding 37° Flare Cone Fittings

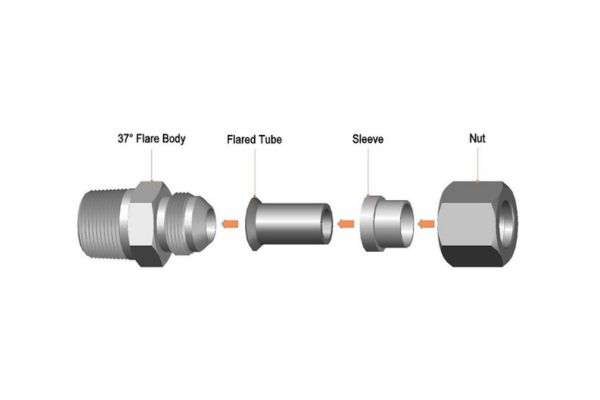
37° fittings, also known as JIC (Joint Industry Council) fittings, are a type of compression fitting used in high-pressure hydraulic systems. These fittings consist of a nut, a sleeve (or ferrule), and a body. The tube end is flared to a 37° angle, which mates with the fitting’s conical seat, creating a tight seal. The main components include:

Nut: Tightens the connection.

Sleeve: Supports the tube and ensures alignment.

Body: Contains the 37° seat and threads.

An and JIC Fittings

Common Applications in Hydraulic Systems

37° flare cone fittings are widely used in various industries due to their robust design and high-pressure capability.

Common applications include:

Automotive: Brake lines and fuel systems.

Industrial Machinery: Hydraulic circuits in heavy equipment.

Marine: Hydraulic systems in ships and boats.

Agriculture: Machinery and equipment requiring durable hydraulic connections.

Advantages

37° flare cone fittings offer several benefits that make them a preferred choice in many hydraulic applications:

High-Pressure Tolerance: These fittings can handle high-pressure environments, making them ideal for demanding hydraulic systems. Their robust construction ensures that they can withstand the stress and pressure without failure.

Leak Resistance: The precise 37° flare angle provides a reliable seal, reducing the risk of leaks. This is crucial for maintaining system integrity and preventing fluid loss, which can lead to inefficiencies and potential hazards.

Reusability: 37° flare cone fittings are designed to be disassembled and reassembled multiple times without losing their sealing capability. This reusability makes them cost-effective and convenient for maintenance and repairs.

Flaring the Tube

Step-by-Step Guide to Flaring the Tube End

Cutting the Tube to the Desired Length

Measure and Mark: Begin by measuring the tube to the required length and marking it with a marker or scribe. Ensure accuracy to avoid cutting too short or too long.

Secure the Tube: Place the tube in a tube cutter, ensuring it is securely positioned. Tighten the cutter just enough to hold the tube without crushing it.

Rotate and Tighten: Rotate the cutter around the tube, gradually tightening the cutter with each rotation until the tube is cut through. Avoid over-tightening, as this can deform the tube.

Deburring the Inside and Outside of the Tube

Deburring Tool Selection: Choose an appropriate deburring tool designed for both the inside and outside of the tube.

Inside Deburring: Insert the deburring tool into the tube end and rotate it to remove any sharp edges or burrs. This step is crucial for preventing damage to the fitting during assembly.

Outside Deburring: Use the deburring tool on the outer edge of the tube to smooth out any rough spots. A clean, smooth edge ensures a better flare and seal.

Using the Flaring Tool to Create the Flare

Select the Flaring Tool: Choose a flaring tool compatible with the tube size and material. Ensure the tool is clean and in good condition.

Insert the Tube: Place the tube into the flaring tool’s clamp. The tube should extend slightly above the clamp to create the flare.

Tighten the Clamp: Secure the tube in place by tightening the clamp. Ensure the tube is centered and aligned correctly.

Create the Flare: Rotate the flaring tool’s handle to press the tube end into the flaring cone. Apply steady pressure to form a 37° flare.

Inspect the Flare: Remove the tube from the tool and inspect the flare. It should be even, smooth, and free of cracks or distortions.

Common Mistakes to Avoid During Flaring

Improper Tube Cutting: Cutting the tube unevenly can result in a poor flare and an unreliable connection. Always use a tube cutter for a clean cut.

Skipping Deburring: Failing to deburr the tube can cause damage to the fitting and compromise the seal. Always deburr both the inside and outside edges.

Incorrect Tool Selection: Using the wrong size or type of flaring tool can result in an improper flare. Ensure the tool matches the tube specifications.

Over-tightening the Clamp: Over-tightening can deform the tube while under-tightening can lead to slippage. Tighten the clamp just enough to hold the tube securely.

Inconsistent Pressure: Applying inconsistent pressure while flaring can lead to an uneven flare. Maintain steady, even pressure throughout the process.

Ensuring a Proper Flare for Optimal Connection

Even and Smooth Flare: A proper flare should be even and smooth, without any cracks, splits, or rough edges. This ensures a tight seal and reliable connection.

Correct Angle: The flare should be precisely at a 37° angle to match the fitting. Use a flaring tool designed for 37° flares to achieve this.

Clean Surface: Ensure the flared surface is clean and free of debris. Any dirt or particles can compromise the seal and lead to leaks.

Proper Alignment: When assembling the fitting, ensure the flare is properly aligned with the fitting’s nose. Misalignment can cause uneven pressure and potential leaks.

Tightening with Flats Method: Use the Flats Method to achieve the correct torque. This involves tightening the fitting to a specific number of flats (e.g., 1.5 or 2 flats) beyond hand-tightening to ensure a consistent and reliable connection.

The Flats Method Explained

Definition and Importance of the Flats Method

The Flats Method is a precise technique used to achieve the correct torque when assembling 37° flare cone fittings. By tightening the fitting by a specific number of flats beyond hand-tightening, this method ensures consistent and reliable connections. The flats refer to the flat sides of the hex nut on the fitting.

The importance of the Flats Method lies in its ability to provide a standardized approach to tightening, reducing the risk of under- or over-tightening. Proper torque is crucial in hydraulic systems to maintain leak-free connections and ensure the longevity of the fittings and tubes.

install 37° Flare Fitting

Step-by-Step Process for Using the Flats Method

Initial Hand-Tightening of Fittings

Position the Tube and Fitting: Align the flared tube end with the fitting nose. Ensure the flare seats are properly against the fitting’s conical surface.

Hand-Tighten the Nut: Begin by threading the nut onto the fitting body by hand. Turn the nut until it is snug and cannot be tightened further by hand. This ensures that the flare is properly seated and aligned.

Marking the Flats of the Fitting

Identify a Flat: Choose one of the flat sides of the hex nut as your starting point.

Mark the Flat: Use a permanent marker or scribe to mark this flat. This mark will serve as a reference point for the subsequent tightening process.

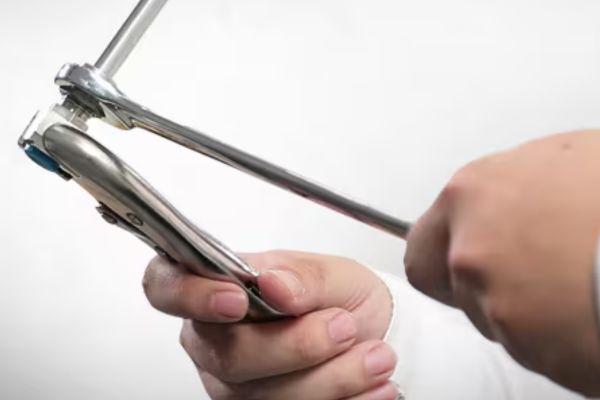
Tightening the Fitting by the Specified Number of Flats

Determine the Required Flats: Consult the manufacturer’s specifications to determine the correct number of flats to tighten beyond hand-tightening. This is typically expressed as a fraction or whole number (e.g., 1.5 flats or 2 flats).

Tighten Using a Wrench: Using a wrench, begin to tighten the nut. Count the flats as you turn the wrench, using your mark as a reference. For example, if the specification calls for 1.5 flats, you will turn the nut until your mark passes the 1.5 flat sides of the hex nut.

Ensure Consistent Pressure: Apply steady, consistent pressure while tightening to avoid any sudden movements that could result in uneven torque.

Benefits of Using the Flats Method Over Other Methods

Precision and Consistency: The Flats Method provides a precise and consistent way to achieve the correct torque, reducing variability that can occur with other methods.

Reduced Risk of Over-Tightening: Over-tightening can damage the fitting and tube, leading to potential leaks and failures. The Flats Method helps prevent this by providing a clear stopping point.

Ease of Use: The method is straightforward to implement, even for those new to assembling hydraulic fittings.

Reliability: By ensuring proper torque, the Flats Method enhances the reliability of the connection, contributing to the overall performance and safety of the hydraulic system.

Standardization: This method allows for standardization across different assemblies, making it easier to train personnel and maintain consistency in assembly processes.

Assembling the 37° Flare Cone Fittings

Positioning the Flare Against the Fitting Nose

Preparation: Begin by ensuring the tube is properly flared and deburred. The flare should be smooth and even, with no cracks or distortions.

Align the Tube: Position the flared tube end against the fitting nose. Make sure the flare sits perfectly on the conical seat of the fitting. This alignment is crucial for a proper seal.

Hold in Place: Hold the tube and fitting in place, ensuring they are aligned and the flare is seated correctly on the fitting nose.

Hand-Tightening the Fitting

Start Threading: Begin by threading the nut onto the fitting body by hand. This initial hand-tightening ensures that the threads engage correctly and the flare remains seated.

Snug Fit: Continue to turn the nut by hand until it is snug and cannot be tightened further without tools. This hand-tightening step is essential to maintain the alignment and ensure the flare is properly seated.

install ferrule fitting

Using the Flats Method to Achieve Proper Torque

Mark the Flats: Identify one of the flat sides of the hex nut and mark it with a permanent marker or scribe. This mark will help you track the number of flats turned during tightening.

Determine Flats to Tighten: Refer to the manufacturer’s specifications to determine the number of flats required for proper torque. This is usually indicated in the fitting’s assembly instructions.

Tighten the Nut: Using a wrench, begin to tighten the nut. Turn the nut by the specified number of flats (e.g., 1.5 flats or 2 flats) beyond the initial hand-tightened position. Use your mark as a reference point to ensure accuracy.

Apply Steady Pressure: Maintain steady, even pressure while turning the wrench to avoid any sudden movements that could cause uneven torque or damage the fitting.

Checking for Proper Alignment and Fit

Inspect the Connection: After tightening the nut using the Flats Method, inspect the connection to ensure the flare is properly seated and aligned with the fitting nose.

Check for Gaps: Look for any gaps between the flare and the fitting nose. There should be no visible gaps, as this could indicate misalignment or improper seating.

Verify Tightness: Ensure the nut is tightened to the specified torque by checking the number of flats turned. If necessary, adjust slightly to achieve the correct torque.

Tips for Ensuring a Leak-Free Connection

Proper Preparation: Always start with properly cut, deburred, and flared tubes. This preparation is critical for a good seal.

Use Quality Fittings: Ensure that you use high-quality fittings that match the specifications of your hydraulic system. Inferior fittings can lead to leaks and system failures.

Avoid Over-Tightening: Over-tightening can damage the fitting and the flare, leading to leaks. The Flats Method helps prevent this by providing a clear and standardized approach to tightening.

Regular Inspection: Periodically inspect the fittings for signs of wear, corrosion, or damage. Early detection of issues can prevent leaks and extend the life of your hydraulic system.

Consistent Maintenance: Follow a regular maintenance schedule to check the condition of all fittings and connections. This proactive approach ensures long-term reliability and performance.

Troubleshooting and Common Issues

Identifying and Fixing Leaks

Check for Fluid: Look for visible signs of fluid around the fitting. Leaks often present as wet spots or drips.

Tighten the Nut: If a leak is detected, attempt to tighten the fitting slightly more, following the Flats Method guidelines.

Replace Damaged Components: If tightening doesn’t resolve the leak, inspect the flare and fitting for damage and replace as necessary.

Inspecting the Flare and Fitting Surfaces

Visual Inspection: Examine the flare for cracks, irregularities, or deformation.

Surface Cleanliness: Ensure the fitting surfaces are clean and free of debris that could affect the seal.

Correcting Misalignment

Reposition the Tube: If the flare isn’t seated properly, loosen the fitting and reposition the tube to ensure proper alignment.

Re-tighten Carefully: Hand-tighten again, followed by the Flats Method to achieve the correct torque.

Addressing Under- or Over-Tightening

Under-Tightening: Identify by feeling a loose connection. Tighten the fitting to the correct specification using the Flats Method.

Over-Tightening: Look for signs such as distorted flares or cracked fittings. If over-tightened, replace the damaged components and reassemble correctly.

Preventing Damage to Fittings and Tubes

Use Proper Tools: Always use the right size wrench to avoid rounding off the nut or damaging the tube.

Follow Specifications: Adhere to manufacturer guidelines for torque and the number of flats to ensure consistent and damage-free assembly.

Regular Maintenance: Periodically inspect fittings for signs of wear or corrosion, replacing parts as needed to maintain system integrity.

Conclusion

Proper assembly of 37° flare fittings is crucial for ensuring leak-free and reliable hydraulic connections. By following the Flats Method, you achieve precise and consistent torque, which enhances the durability and performance of your system. This method standardizes the assembly process, reducing the risk of under- or over-tightening, and helps in maintaining optimal system integrity. We encourage you to adhere to the best practices outlined in this guide, including regular inspections and maintenance, to prolong the life of your fittings and tubes.

FAQ

37° flare cone fittings, also known as JIC fittings, are used in high-pressure hydraulic systems to connect tubes and hoses securely.

The Flats Method is a technique for tightening fittings by a specific number of flats beyond hand-tightening to ensure proper torque and a reliable seal.

Proper assembly prevents leaks, ensures system integrity, and extends the lifespan of hydraulic components.

Hand-tighten the fitting, mark one flat side, then tighten by the specified number of flats using a wrench.

Inspect the fitting and flare for damage, ensure proper alignment, and re-tighten or replace components as necessary.

Regular inspections should be conducted periodically to check for signs of wear, corrosion, or loosening to maintain system performance.

Contact Topa

Looking for unbeatable prices, top-tier quality, or custom solutions that fit your exact needs? Contact Topa Now!