Useful pre-shipment one piece fitting photos must identify each order line and show the product, connection details, hose end, protection, labels, packaging, and shipment context clearly enough for comparison. General images of cartons or mixed fittings cannot confirm which TP43-style model, quantity, label, or protective method is represented. Photos can reveal obvious mismatches and unanswered questions before ocean shipment, but they cannot prove dimensions, material, pressure capability, hose compatibility, or complete conformity.
General Shipment Photos Leave the Main Questions Unanswered
A wide warehouse image may show that goods exist, yet it rarely proves that the correct SKUs are separated, protected, labeled, and ready for the specified order. The value of a photo comes from traceable content, not visual volume.
Context without identity creates ambiguity
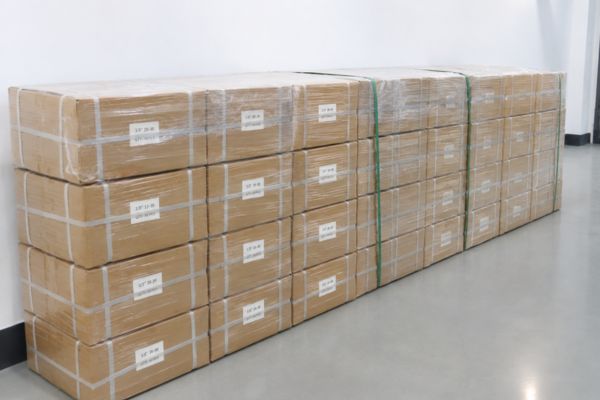
Rows of cartons do not reveal the connection standard, fitting angle, port dash, hose dash, sealing face, or model inside. A pile of similar fittings may include several order lines whose bodies differ only at the thread, seat, O-ring, nut, or hose stem. If the viewer cannot map the image to the purchase order, the photo provides atmosphere rather than verification.
Mixed parts create additional uncertainty. A correct component in the foreground can distract from an incorrect label or different model behind it, and the buyer cannot tell whether every visible piece belongs to one SKU. Separate photo groups should preserve identity from the individual fitting through inner packaging, carton, and shipment unit.
Photos answer visual questions only
Images can support checks of overall structure, angle, visible connection features, marking, cap presence, label wording, SKU separation, package condition, and some quantity references. They cannot establish an exact dimension without a controlled measurement record, and a ruler placed loosely beside a part is not equivalent to a dimensional report. Lighting and perspective can also distort color, proportions, and surface appearance.
A photograph cannot identify material grade, internal cleanliness, pressure rating, or compatibility with a particular hose and crimp system. Continue using approved drawings, inspection reports, material evidence, product specifications, and application data for those characteristics. The photo request should complement those controls, not compete with them.
Photograph the Whole Product From Useful Angles
Each SKU needs enough overall views to show its structure and orientation. There is no universal fixed number because a straight fitting, elbow, female swivel, flange, and complex multi-angle component expose different decision points.
Establish an identifiable overview
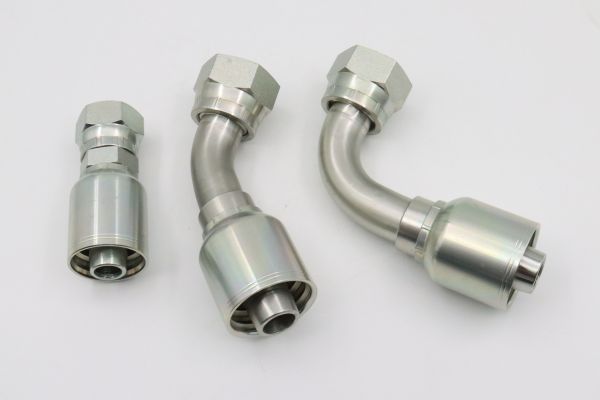
Begin the photo group with the complete fitting beside its SKU or order-line identifier. Show the connection end, hose end, body or stem, ferrule, nut if present, and general orientation. For a 45-degree or 90-degree fitting, include a view that makes the angle and relative direction clear instead of relying on a top view that visually flattens the bend.
Use a clean, contrasting background and adequate focus. The part should fill enough of the frame to support review without cropping either end. When several pieces demonstrate batch appearance, arrange only like-for-like units and keep the model label visible in the same frame or an immediately linked image.
Add views that expose hidden geometry
Rotate the fitting deliberately to show features obscured in the overview. A female swivel may need a view into the nut and seat, while a male connection may need a view of the thread end and sealing feature. An elbow may need both side and end views so the connection orientation is not confused.
Do not disassemble a retained nut, remove an O-ring, force a component, or alter protective features merely to create a photograph. If the approved inspection method permits removal of a cap, re-protect the item afterward. Photography must not damage or contaminate the product being documented.
Useful product views may include:
- Full fitting with order-line or SKU identifier
- Side profile showing straight, 45-degree, or 90-degree form
- Connection-end view aligned with the thread or face
- Hose-side view showing stem and ferrule relationship
- Opposite-side view for nuts, bends, or asymmetric features
- Marking close-up linked to the same identified piece
Connection and Sealing Details Need Close-Ups
Close-ups should make visible features reviewable without implying that appearance proves the connection’s technical identity. The exact thread standard, pitch, seat geometry, and sealing requirement still come from controlled technical data.
Thread and connection views
For a male connection, show the thread profile, entry, end, and any visible cone, O-ring, or flat face. For a female connection, show the nut or body opening, thread entry, seat, and retention condition where accessible. Focus should be sharp enough to screen for obvious impact, contamination, corrosion, damaged protection, or a visibly wrong structure.
Perspective matters. A diagonal photo can make a straight thread look tapered or conceal damaged first threads. A face-on view supports end-feature review, while a side view supports thread and profile review. Use both when they answer different questions, but do not demand redundant images that add no decision value.
Sealing and hose-side views
Photograph flare seats, ORFS faces, O-ring grooves, flange faces, or other sealing areas with lighting that reveals surface condition. If an O-ring is installed, show its presence and position without claiming the image identifies its size or material. Include the protective cap or plug arrangement in a separate view when it is part of the agreed shipment condition.
The hose side should show the stem, ferrule, orientation, and any visible assembly relationship. A matching dash label or similar appearance does not prove compatibility with a hose manufacturer, construction, series, crimp machine, die, or crimp specification. Use the photo to confirm that the intended physical style appears present, then rely on approved technical references for assembly suitability.
| Photo type | Main purpose | Important limitation |
| Identified full-product view | Connects overall structure and angle to an SKU | Does not prove exact dimensions |
| Connection-end close-up | Screens thread entry, seat, face, or O-ring location | Does not identify standard or material alone |
| Hose-end view | Shows stem, ferrule, and assembly presentation | Does not approve hose or crimp compatibility |
| Marking and label view | Supports model and batch identity | Does not prove the item inside is conforming |
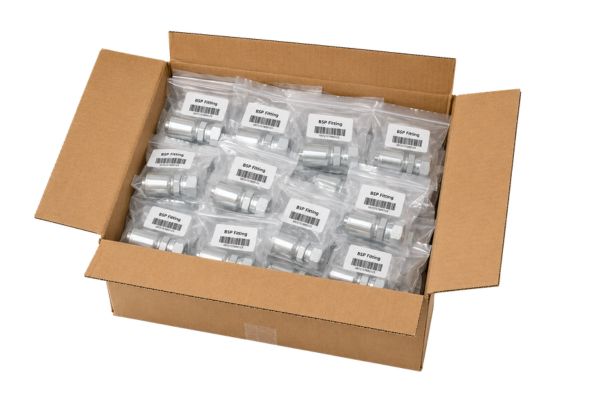
| Inner-pack and protection view | Shows separation, caps, bags, or dividers | Does not prove every piece is undamaged |
| Carton or pallet overview | Links shipping units and marks | Does not establish item-level quantity by itself |
Labels and SKU Separation Must Appear in the Evidence
Multi-SKU orders fail visual review when product images cannot be reconciled with labels. The photo sequence should preserve the chain from purchase-order description to unit, inner pack, carton, and packing list.
Capture readable identifiers
Photograph product markings where required, inner labels, carton labels, batch or lot identifiers, carton numbers, and shipping marks. Text should be in focus and not hidden by tape, glare, folds, or hands. The recorded model description, port and hose dash, angle, quantity, and batch should match the approved order and packing records.
A readable label is evidence about the label, not automatic proof about every part inside. Pair label images with a representative identified product group and package opening where appropriate. If different SKUs share a carton, the image set should show how each inner pack remains separated and identified.
Prevent model mixing in the photo process
Photograph one SKU group at a time in a controlled area, then return it to the correct package before beginning the next group. Avoid arranging many similar models for an impressive group shot, because the handling itself can create mixing. Use temporary order-line cards that do not replace or obscure the permanent label.
When one SKU has multiple batches, make that distinction visible. Do not combine images from separate batches under a single generic filename. The buyer may need different evidence if a batch uses a different approved change, protection method, or inspection record.
Packaging Photos Should Show Protection and Structure
Packaging images matter because a technically correct fitting can arrive damaged, contaminated, or mixed. The buyer needs evidence of how critical surfaces are protected and how the packaging system maintains identity during transport.
Move from inner pack to outer shipment
Show caps or plugs on exposed connections, separation between heavy parts, inner bags or trays where used, inner labels, carton arrangement, carton closure, and external marks. For elbows, flanges, or swivel fittings, capture how protruding faces, nuts, edges, and threads are kept from striking adjacent parts. No single packaging material is mandatory for every design; the image should demonstrate the agreed condition.
Photograph a representative carton before closure and the same carton after closure, using its carton number as the link. If damage prevention depends on dividers or supports, show their placement. An image taken before parts are rearranged for shipping does not prove the final pack retained that structure.
Include shipment-level context
Carton counts, pallet arrangement, wrapping, straps, and shipping marks may support the logistics review when relevant. Images should show labels without exposing unrelated sensitive information. A pallet photo is useful only when it can be reconciled with carton numbers and the packing list.
Packaging photographs cannot guarantee arrival condition. They establish a pre-shipment reference that can later be compared with carrier, receiving, and unpacking evidence. Preserve original files and timestamps where the process relies on them, without assuming metadata alone proves authenticity.
Connect Every Image Group to Order Lines and Quantities
An orderly naming system turns photographs into reviewable records. The goal is to let a person who did not attend the inspection find the relevant SKU, batch, package, and view without guessing.
Use a simple reference structure
Create a photo index or folder structure based on purchase-order line, SKU, batch, and carton. File names can add view descriptions such as overall, connection, hose-end, label, inner-pack, or carton. Keep the structure short enough that staff will actually use it and consistent enough to prevent files from being overwritten.
For example, the naming pattern—not a fabricated order result—might follow order-line_SKU_batch_view. This explains the relationship without prescribing one universal software system. If a photo shows a measured feature, link it to the controlled inspection report rather than encoding an unverified measurement in the filename.
Reconcile quantity evidence carefully
A photograph is rarely a reliable way to count hundreds of small, overlapping fittings. Use piece counts, package quantities, carton labels, packing lists, and inspection records as the primary quantity controls. Photos can show labeled bundles, rows, layers, or sealed inner packs that support the record, but should not replace reconciliation.
Before shipment, compare:
- Purchase-order line and approved product description
- SKU, angle, port dash, hose dash, and batch
- Inner-pack quantity and label
- Carton number, carton quantity, and total cartons
- Packing-list quantity and shipment total
- Photo-group index and missing required views
- Approved deviations or open questions
Avoid Common Pre-Shipment Photo Mistakes
Poor evidence often results from unclear intent rather than too few images. Each photograph should answer a defined confirmation question and remain linked to the product it represents.
Images that create false confidence
Avoid blurred label photos, distant pallet images, fittings held in a hand with the ends covered, mixed-model group shots, repeated views of the same easy surface, and screenshots compressed until threads are unreadable. Do not photograph only the cleanest sample if the request concerns batch protection or separation. Do not reuse a previous order’s images without identifying them as historical references.
Another mistake is accepting a ruler photo as full dimensional verification. Camera angle, reference alignment, scale placement, and hidden datums can make the apparent value unreliable. Use a current drawing and dimensional report with defined characteristics, tools, units, and batch identity.
Neutral photo-request checklist
Before closing the review, confirm:
- Every selected order line has an identifiable photo group
- Overall, angle, connection-end, and hose-end views are sufficient for that geometry
- Threads, seats, faces, O-rings, grooves, and markings are visible where relevant
- Product, inner-pack, carton, batch, and shipping labels are readable
- SKU separation and critical-surface protection are shown
- Carton and pallet images reconcile with packing references
- File names or the photo index link images to order lines and batches
- Dimensions, materials, compatibility, and conformity remain supported by separate evidence
- Unanswered questions are recorded before shipment authorization
Conclusion
Effective one-piece fitting pre-shipment photos form a traceable visual chain from each purchase-order line to the complete product, connection details, hose side, marking, inner package, carton, and shipment unit. General warehouse pictures and mixed-model arrangements may look reassuring while leaving the main verification questions unresolved. Build a proportionate image list around product geometry and order risk, use readable SKU and batch references, and connect every file group to labels and packing records. Review critical surfaces and protective measures without forcing or altering the fittings. Before authorizing shipment, reconcile images with drawings, inspection reports, quantities, and approved deviations. Photographs can expose visible mismatches and improve later receiving comparisons, but they cannot prove material, dimensions, pressure suitability, hose compatibility, or complete conformity.
FAQ
How many photos are required for each fitting SKU?
There is no universal number. Request only the views needed to identify the product, expose its critical visible features, and show its labels and protection for the specific geometry and order risk.
Should every piece in a bulk order be photographed?
Usually photographs support the approved inspection plan rather than documenting every individual piece. The required scope depends on risk, agreement, batch structure, and the evidence needed for the purchasing decision.
Can a close-up prove the thread standard?
No, a close-up can screen visible form and damage but cannot reliably establish the complete thread standard. Use drawings, dimensions, pitch or TPI checks, taper confirmation, and suitable gauges.
Are carton photos enough to verify shipment quantity?
No, they support but do not replace quantity records. Reconcile purchase-order lines, inner-pack counts, carton labels, carton totals, packing lists, and receiving records.
What should happen when the photo set shows mixed models?
Pause confirmation for the affected group and request separated, identified evidence. Verify labels, packing records, quantities, and product features before accepting the shipment presentation.