Everything You Should Know About the Banjo Bolt Standard banner

Everything You Should Know About the Banjo Bolt Standard

A Banjo bolt is a key component in hydraulic systems, providing a unique method of connecting and securing hydraulic hoses to components such as valves, pumps, and cylinders. These bolts feature a hollow center, allowing fluid to pass through them efficiently, and they are often used in applications where space is limited or where conventional fittings might be too bulky.

The Basics of a Banjo Bolt: Anatomy and Function

A Banjo bolt is a specialized fastener used primarily in fluid systems to provide secure, leak-free connections. It features a unique design that sets it apart from traditional bolts, making it ideal for applications that require fluid flow through the bolt itself. Understanding the anatomy and function of a banjo bolt is key to selecting the right fitting for your hydraulic or fluid transfer system.

Key Components of a Banjo Bolt

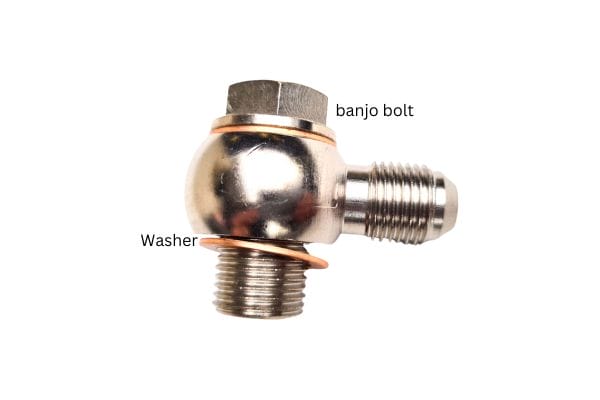
The Banjo bolt is composed of a few key parts that give it its distinctive design and functionality:

The Bolt Shaft: This is the main body of the bolt, typically threaded on both ends. It’s used to fasten the bolt securely into the receiving component or fitting.

The Hollow Center: The most notable feature of a Banjo bolt is its hollow center, which allows fluid to pass through it. This is essential for transferring fluid from one part of the system to another, while still maintaining a secure connection.

The Banjo Fitting: The bolt is usually paired with a Banjo fitting, which has a circular shape with a hole in the center. The bolt passes through this fitting, creating a fluid-tight connection.

The Seal: To ensure no leakage, Banjo bolts typically use sealing washers or O-rings placed on either side of the Banjo fitting. These seals help to prevent fluid from leaking around the connection point.

The Banjo bolt’s unique design allows it to accommodate high-flow fluid systems in a compact space, making it a go-to choice for a wide range of industries.

Banjo Bolt Standard component

How Banjo Bolts Work in Fluid Transfer Systems

In hydraulic and fluid systems, Banjo bolts provide a critical function by enabling fluid to pass through various components while maintaining a secure and reliable connection. The bolt is threaded into the hydraulic component, and the Banjo fitting, which is mounted on the hose or tubing, is secured around the bolt. The hollow center of the Banjo bolt acts as a passageway for the fluid, directing it from one part of the system to another.

The Banjo bolt design allows for efficient fluid flow, even under high-pressure conditions. When used correctly, the bolt ensures that the system operates without leaks, minimizing potential damage or system inefficiencies. The flexibility in design makes it especially effective in compact or high-pressure systems where traditional fittings might not work as efficiently.

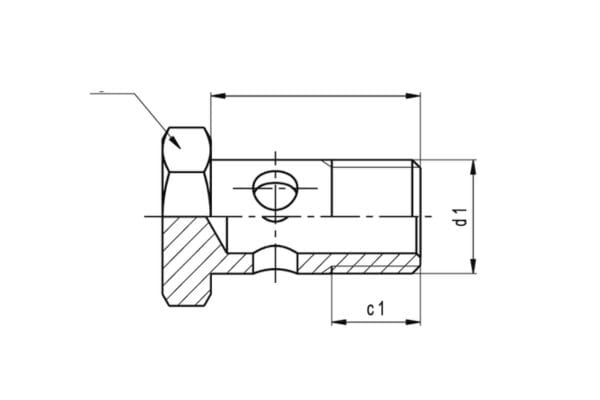
Common Dimensions and Thread Types

Banjo bolts come in various sizes and thread types, depending on the requirements of the hydraulic system. The dimensions of the Banjo bolt are crucial because they must match the corresponding Banjo fitting to ensure a proper seal and prevent leaks.

Common Diameters: Banjo bolts typically come in diameters ranging from 1/8 inch to 1 inch (or larger, depending on the application). The exact size needed will depend on the specific flow rate and pressure requirements of the system.

Thread Types: Banjo bolts can feature different thread types, including:

NPT (National Pipe Thread): Common in North America, used for tapered thread connections.

BSP (British StandardPipe): Often used in European and international systems, featuring a parallel thread design.

Metric Threads: Used in global applications, with measurements based on the metric system.

Choosing the right size and thread type ensures a proper fit and function, reducing the risk of leaks and performance issues.

Understanding Pressure Ratings and Load Capacities

When selecting Banjo bolts, it’s essential to consider the pressure ratings and load capacities, as these factors determine the strength and durability of the connection. The pressure rating refers to the maximum pressure that the Banjo bolt and fitting can withstand without failure, while the load capacity indicates the maximum force the bolt can handle before it deforms or breaks.

Pressure Ratings: Banjo bolts are available in various pressure ratings, from low-pressure applications (around 150 PSI) to high-pressure systems that can exceed 10,000 PSI. It’s crucial to match the Banjo bolt’s pressure rating with the pressure requirements of your system to ensure safe and efficient operation.

Load Capacities: Load capacity depends on the material of the Banjo bolt (e.g., steel, aluminum, brass) and the overall design. Typically, Banjo bolts made of steel will have a higher load capacity than those made of softer materials like aluminum or brass.

The Role of the Banjo Bolt in Fluid Power Systems

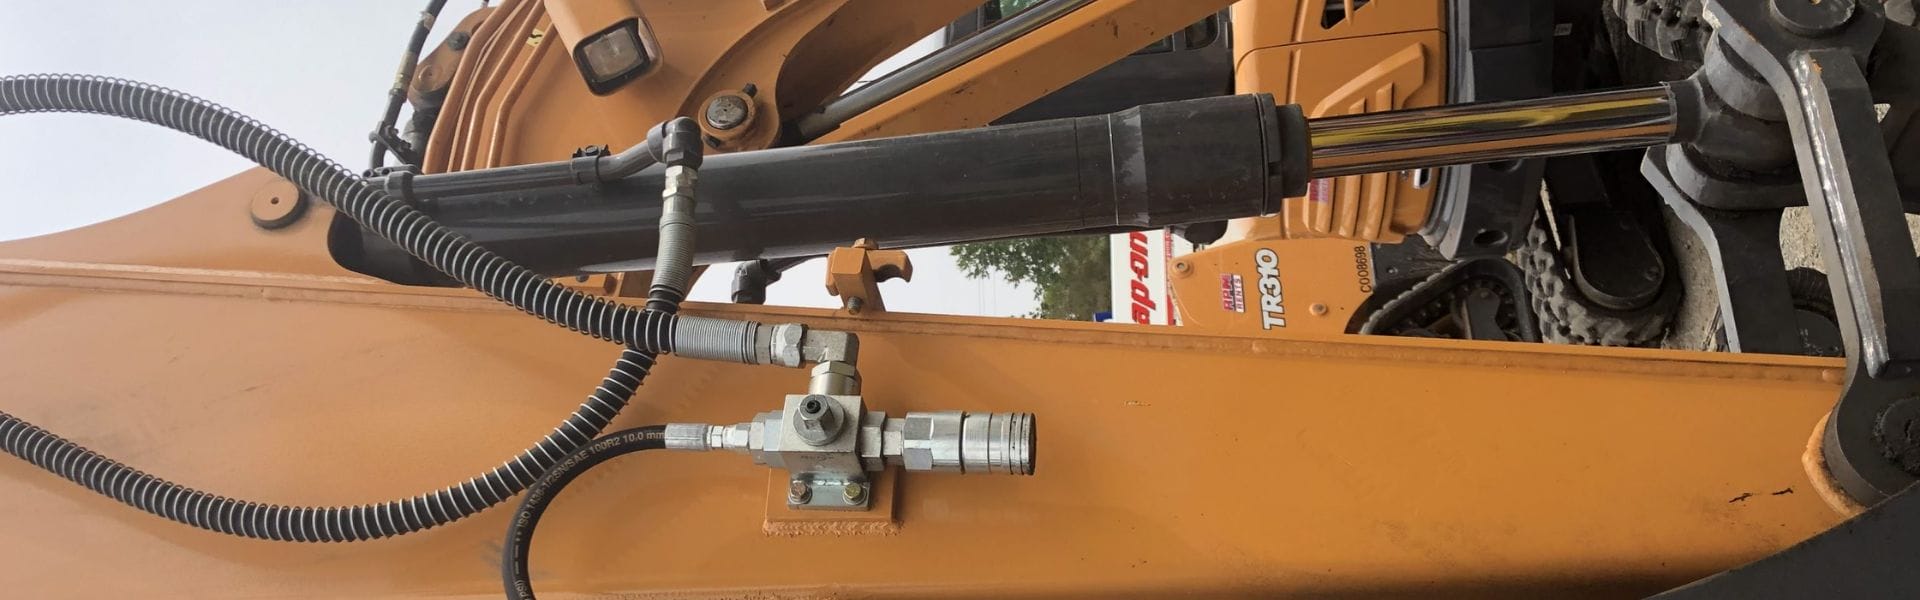
In fluid power systems, where the movement of liquids or gases is harnessed to do work, Banjo bolts play a crucial role in maintaining efficient flow while preventing leaks. These systems, which include hydraulic presses, automotive braking systems, and aerospace machinery, rely on the Banjo bolt’s unique ability to transfer fluids in confined spaces.

Ensuring Proper Fluid Flow: In fluid power systems, maintaining a steady flow of fluid is essential for smooth operation. Banjo bolts allow for this by facilitating uninterrupted fluid transfer through their hollow center, which ensures that the system operates at optimal pressure and flow rates.

Minimizing System Failures: Because Banjo bolts are designed to provide a secure and reliable seal, they help prevent fluid leakage, which could lead to system inefficiency or failure. This is particularly important in high-stakes industries like aerospace, automotive, and industrial manufacturing, where even minor leaks can result in catastrophic failures.

Different Banjo Bolt Sizes: Finding the Right Fit for Your Application

Choosing the correct Banjo bolt size is crucial to the performance and safety of any hydraulic or fluid transfer system. An improperly sized bolt can lead to leaks, system inefficiencies, or even catastrophic failures in high-pressure applications. The right size ensures that the connection is secure, the fluid flows correctly, and the system operates optimally. In this section, we will explore standard sizes, custom options, and how to choose the right size for your specific needs.

Standard Sizes vs. Custom Sizes

Banjo bolts are available in a range of standard sizes designed to fit the most common applications in hydraulic, automotive, and industrial systems. Standard sizing ensures compatibility and ease of replacement, making maintenance and repairs more straightforward. However, there are situations where custom sizes may be necessary to meet specific system requirements.

Standard Sizes: Banjo bolts come in various standard sizes, often defined by their thread size, bolt diameter, and overall length. These sizes are commonly used in many industrial, automotive, and hydraulic systems.

Custom Sizes: In some cases, a hydraulic system may require Banjo bolts of non-standard sizes. This might happen when working with unique system designs, custom machinery, or specialized pressure requirements. Custom Banjo bolts can be made to specific diameters, lengths, and thread configurations to fit the unique needs of a project.

Banjo Bolt Standard

How to Choose the Right Size for Your System

Selecting the right Banjo bolt size for your system requires careful consideration of several factors. An improper size can lead to poor performance or even system failure. Here are the key elements to keep in mind when determining the appropriate size for your Banjo bolt:

System Flow Rate and Pressure: The size of the Banjo bolt must match the flow rate and pressure specifications of your system. Larger bolts with bigger diameters allow for higher fluid flow and are better suited for high-flow systems. On the other hand, smaller bolts may be more appropriate for lower-flow systems or applications with limited space. It’s crucial to consider the pressure rating of the Banjo bolt and fitting to ensure it can handle the demands of the system without leaking or failing.

Compatibility with Banjo Fittings: The Banjo bolt and Banjo fitting work together to create a secure, leak-proof connection. Therefore, the size of the bolt must be compatible with the Banjo fitting. This means matching thread types (NPT, BSP, Metric, etc.) and bolt diameters with the corresponding fittings. The inner diameter of the Banjo fitting should allow for the fluid to pass through the bolt without restrictions. Ensuring that both the bolt and fitting are of the correct size will optimize fluid flow and minimize the risk of leaks.

Material and Strength Considerations: The material of the Banjo bolt (steel, brass, aluminum, etc.) also plays a role in its suitability for different sizes. For example, larger bolts made of steel may be needed for high-pressure systems where strength and durability are essential, whereas smaller aluminum or brass bolts might be sufficient for low-pressure or non-corrosive applications. Ensure the material is selected based on the pressure, environment, and fluid being transported.

The Banjo Fitting Standard: Key Considerations for Engineers

The Banjo fitting standard is a critical set of guidelines for engineers involved in designing and manufacturing fluid transfer systems. These standards ensure that Banjo bolts and fittings meet specific requirements for size, material, pressure ratings, and sealing methods, ultimately guaranteeing optimal performance and safety. Understanding these standards is essential for creating reliable and efficient hydraulic and fluid systems. Below are the key considerations engineers should keep in mind when working with Banjo fittings.

Industry Standards and Certifications for Banjo Bolts

Banjo bolts and fittings are subject to various industry standards and certifications to ensure that they perform consistently and safely across different applications.

ISO (International Organization for Standardization): ISO 8434-2 is the main international standard for hydraulic fluid power systems, including Banjo fittings. It sets the guidelines for the dimensions, design, and pressure ratings of hydraulic connectors. ISO standards are widely adopted and help ensure global compatibility.

SAE (Society of Automotive Engineers): SAE J514 is a key standard for hydraulic hose fittings and includes guidelines for Banjo fittings in automotive applications, particularly in fluid systems in vehicles, heavy equipment, and machinery.

DIN (Deutsches Institut für Normung): DIN 2353 is a German standard that applies to Banjo bolts and other hydraulic components. It establishes the specifications for thread types, material grades, and pressure tolerances.

ANSI (American National Standards Institute): ANSI B31.3 provides guidelines for pipe and tubing fittings used in process systems. While not exclusively for Banjo fittings, it offers useful information on material standards and pressure tolerances for fluid systems.

How Standards Impact Performance and Longevity

In addition to enhancing safety, adhering to Banjo fitting standards also has a significant impact on the performance and longevity of hydraulic systems. By ensuring that the right materials, dimensions, and pressure ratings are used, engineers can design systems that perform efficiently over the long term, reducing maintenance costs and downtime. Here’s how standards contribute to better system performance:

Consistency in Performance: Banjo bolts and fittings that meet industry standards are designed to deliver consistent performance, ensuring that fluid flow is uninterrupted, pressure is maintained, and no leaks occur. This helps the overall system work smoothly without unexpected breakdowns, which can reduce operational efficiency.

Improved Durability: When components are designed and manufactured according to established standards, they are built to last longer under harsh conditions. For example, using the correct material for the Banjo bolt (e.g., stainless steel for corrosion resistance) and ensuring it meets the necessary pressure rating extends the life of the fitting. Properly adhering to standards ensures that the fitting can withstand wear and tear over time, reducing the frequency of replacement and system failures.

Maximizing Efficiency: Properly sized Banjo bolts and fittings allow fluid to flow efficiently through the system, reducing energy consumption and increasing the overall efficiency of the fluid transfer process. When the right size and materials are selected based on industry standards, the system operates more efficiently, lowering the operational costs and enhancing system output.

Reduced Maintenance and Downtime: Systems that use standardized Banjo bolts are more likely to experience fewer failures, requiring less maintenance and reducing downtime. Standardization allows engineers to predict performance accurately and quickly source replacement parts, keeping the system running smoothly and avoiding costly repairs.

Lower Total Cost of Ownership: By following the Banjo fitting standard, engineers can design systems that are more durable and efficient, reducing the total cost of ownership (TCO). This is especially important in industries where uptime is critical, such as aerospace, automotive, and industrial manufacturing. Ensuring that components meet standards upfront helps avoid expensive repairs or replacements later.

Banjo Bolt Torque: Getting It Just Right

When installing a Banjo bolt, getting the torque value just right is crucial for ensuring a secure, leak-proof connection and preventing damage to both the bolt and the surrounding components. Torque refers to the amount of rotational force applied to a bolt to tighten it. Improper torque can cause a variety of issues, including leaks, stripped threads, or even complete system failure.

What Is Torque and Why Does It Matter?

Torque is the measure of the rotational force applied to a fastener like a Banjo bolt. It is typically measured in units like foot-pounds (ft-lbs) or Newton-meters (Nm). When installing a Banjo bolt, applying the correct amount of torque ensures that the fitting is tightly secured, but without over-tightening it, which could damage the components.

Ensures Leak-Free Connections: A proper torque value is necessary to create a tight, leak-free seal between the Banjo bolt, fitting, and surrounding parts. Too little torque can leave gaps or spaces in the seal, while excessive torque can crush gaskets or O-rings, compromising the integrity of the connection.

Prevents Over-Stretching or Damage: Correct torque prevents the Banjo bolt from being stretched or deformed, which could weaken the bolt and lead to premature failure. Torque is critical for ensuring that the bolt functions effectively without damaging the surrounding components, such as the Banjo fitting or the hose.

Maintains System Pressure: Hydraulic and fluid power systems often operate under high pressure, and a properly torqued Banjo bolt ensures that the connection can withstand these forces without leaking or coming loose. Without the correct torque, there is a risk of pressure loss and system inefficiency.

Calculating the Correct Torque for Your Banjo Bolt

Calculating the correct torque value is essential to ensure the Banjo bolt is properly installed. The appropriate torque depends on several factors, including the size and material of the bolt, the type of seal used, and the specific application. Here’s how to determine the correct torque for your Banjo bolt:

Consider the Bolt Size and Material: The torque required to secure a Banjo bolt depends on the size and material of the bolt. Larger bolts typically require more torque, while smaller bolts require less. For example:

A 1/4-inch Banjo bolt might require around 8-12 ft-lbs (11-16 Nm) of torque.

A 1/2-inch Banjo bolt may need approximately 20-30 ft-lbs (27-40 Nm).

Additionally, the material of the bolt plays a role in the torque value. Stainless steel bolts generally require more torque compared to aluminum bolts due to their higher strength and friction characteristics.

Consider the Type of Seal: Banjo bolts are often used with washers or O-rings to ensure a tight seal. The material of the sealing component (e.g., copper, rubber, or elastomeric seals) may affect the torque value. Soft seals typically require lower torque to avoid crushing, while harder seals can withstand more force.

Use a Torque Wrench: To achieve the correct torque, a torque wrench should be used. This tool allows you to apply a precise amount of torque, reducing the risk of under- or over-tightening. When using a torque wrench, it’s important to apply the torque in stages and in a crisscross pattern (especially for multiple bolts) to ensure even pressure distribution.

Temperature and Environmental Factors: Temperature fluctuations can affect the torque values, particularly in extreme conditions. As temperatures increase, materials expand, potentially altering the fitting’s tightness. Always account for temperature differences when installing Banjo bolts in environments with significant temperature variation.

Conclusion

As we’ve explored throughout this guide, understanding the banjo bolt standard is key to optimizing the performance, safety, and longevity of fluid power systems. Whether you’re designing hydraulic systems or maintaining existing ones, ensuring that your Banjo bolts meet the correct specifications is critical for efficient operation. By adhering to the Banjo bolt standard, you can prevent issues such as leaks, pressure loss, and equipment failure, ultimately leading to a more reliable system.


FAQ

What is a banjo bolt?

A banjo bolt is a fastener used in hydraulic and fluid systems to connect hoses or pipes to other components. It has a hole in the center that allows fluid to flow while securing the connection.

How do I know which size banjo bolt to use?

The correct banjo bolt size depends on your system specifications. Always refer to the manufacturer’s guidelines for sizes and pressure ratings and consider the size of the hose or pipe you are using.

Can Banjo bolts be made from any material?

Banjo bolts are available in a variety of materials, such as stainless steel, brass and aluminum. Please choose your material based on factors such as corrosion resistance, pressure resistance and environmental conditions.

What happens if a banjo bolt is overtightened or overtightened?

Over-tightening can damage the bolt, seals or surrounding components, leading to leaks or system failure. Under-tightening can lead to loose connections and fluid leaks, reducing system performance and safety.

How do I install a banjo bolt correctly?

When installing banjo bolts, make sure you use the correct size and material, check the seals, and apply the correct torque with a torque wrench. Follow the manufacturer’s specifications to ensure a secure leak-free connection.

What are some common applications for banjo bolts?

Universal bolts are commonly used in hydraulic systems, automotive applications, fuel lines and fluid transfer systems where compact connections are required for efficient fluid flow.

How to Remove Rubber Hose from Barbed Fitting banner

How to Remove Rubber Hose from Barbed Fitting

Properly removing a rubber hose from a barbed fitting is crucial for preserving equipment integrity, extending the lifespan of both the hose and fitting, and avoiding costly downtime. Careful hose removal prevents damage such as tears or cuts to the hose, as well as deformation of the barb, which can compromise the seal and lead to leaks. By using the correct techniques, you avoid the need for frequent replacements, reduce repair time, and minimize long-term maintenance costs.

Understanding Barbed Fittings

What is a Barbed Fitting?

Definition and Design: A barbed fitting is a connector used to attach flexible tubing, such as rubber hoses, to various equipment or machinery. The fitting features barbs—protruding ridges or spikes that grip the hose inside to create a tight, leak-resistant seal.

How It Works: When a hose is pushed onto the barbed portion of the fitting, the ridges help secure the hose, preventing it from slipping off even under pressure. Typically, a hose clamp is used to further secure the connection and avoid leakage.

Common Uses: Barbed fittings are widely used in plumbing, hydraulic systems, automotive industries, and other applications where hoses need to be securely connected to pipes or equipment.

Different Types of Barbed Fittings

Standard Barbed Fittings: These are the most common type of barbed fittings, with a simple cylindrical design and evenly spaced barbs for gripping hoses. They come in various sizes to fit different hose diameters.

Reducer Barbed Fittings: These fittings have a tapered design to allow for a transition between hoses of different sizes. One end of the fitting has a larger diameter, while the other end is smaller, helping connect hoses with varying internal diameters.

Elbow Barbed Fittings: Used when hoses need to change direction, elbow barbed fittings typically come in 90-degree or 45-degree angles. They allow the hose to bend smoothly while maintaining a secure connection.

Tee and Y Barbed Fittings: These fittings are shaped like the letter “T” or “Y” and are used to branch hoses into multiple directions. They are essential for systems that require hose splitting.

Straight Barbed Fittings: A basic design, straight barbed fittings are used when two sections of hose need to be connected directly, without changing direction or size.

Swivel Barbed Fittings: Featuring a rotating mechanism, these barbed fittings allow the hose to rotate without causing stress on the connection, often used in automotive or high-mobility applications.

Material Variations: Barbed fittings come in different materials such as brass, stainless steel, plastic, and nylon, each offering distinct benefits such as corrosion resistance or cost-effectiveness, depending on the application.

Common Problems When Removing Rubber Hose from Barbed Fittings

Stuck Hoses: Causes and Solutions

Cause 1: Tight Fit: Over time, hoses can become tightly bonded to barbed fittings due to the pressure, heat, or the natural expansion of rubber. This tight fit can make it difficult to remove the hose without causing damage.

Solution: Apply heat (using a heat gun or warm water) to soften the rubber, making it easier to slide off the barb. Be cautious not to overheat and damage the hose or fitting.

Cause 2: Age and Wear: Older hoses tend to become brittle or hardened, making them prone to cracking or breaking when you try to remove them from barbed fittings.

Solution: Use lubrication like silicone spray or soapy water to reduce friction and make removal easier. A gentle twisting motion may also help in loosening the hose.

Cause 3: Over-tightened Hose Clamp: If the hose clamp is too tight, it can make the hose difficult to remove from the fitting.

Solution: Loosen the hose clamp first using the correct tool, such as a screwdriver or wrench, and ensure the clamp is not obstructing the removal process.

Rubber Hose from stuck Barbed Fitting

Risk of Damaging the Hose and Barb

Risk 1: Hose Tears or Cracks: Forcing a hose off without care can cause the rubber to tear, which can render the hose unusable.

Solution: Always use gentle pressure and proper tools to avoid unnecessary force. If the hose is stuck, apply heat or lubrication first before attempting to remove it.

Risk 2: Barb Deformation: Barbed fittings are designed with ridges to grip the hose. If too much force is applied during removal, the barb can bend, break, or lose its gripping ability.

Solution: Avoid using excessive force when removing the hose. If the barb is made of metal, consider using a tool like pliers to grip the hose and rotate it off slowly, applying consistent, controlled pressure.

Risk 3: Losing the Seal: If the hose is removed improperly, it can disturb the seal between the hose and barb, leading to leaks when reinstalled.

Solution: After removal, inspect both the hose and fitting for any signs of wear or damage. If the seal is compromised, replace the hose or fitting as necessary.

Overcoming Corrosion or Debris Buildup

Cause 1: Rust and Corrosion: Corrosion from water, chemicals, or prolonged exposure to the elements can cause the hose to bond tightly to the barb.

Solution: Apply a penetrating lubricant like WD-40 to the joint, allowing it to soak for a few minutes before attempting removal. In extreme cases, a wire brush can be used to clean off rust or corrosion from the barb.

Cause 2: Debris or Dirt: Dirt, dust, or other particles trapped between the hose and barb can make removal difficult.

Solution: Clean both the hose and barb fitting thoroughly before attempting to remove the hose. Use a small brush or air compressor to remove debris from the barb area. If necessary, flush the area with water to dislodge any buildup.

Cause 3: Mineral Deposits: In some cases, mineral deposits from hard water can accumulate, creating a “cement-like” bond between the hose and barb.

Solution: Soak the hose and fitting in a vinegar or citric acid solution to dissolve the mineral buildup. After soaking for a few hours, attempt removal gently, ensuring that any residue is removed from the connection.

Rubber Hose Removal Techniques

Using Hose Pliers for a Secure Grip

How Hose Pliers Help: Hose pliers are specially designed tools that provide a strong, secure grip on rubber hoses without damaging the material. Their unique shape allows for firm but controlled pressure, making it easier to remove hoses from barbed fittings.

When to Use: Hose pliers are ideal when the hose is stubborn and difficult to remove by hand. They help you apply even pressure to the hose without causing damage to the barb or the hose itself.

How to Use:

Place the jaws of the pliers around the rubber hose as close to the barb as possible.

Gently squeeze the handles to create a firm grip, then twist the pliers back and forth to loosen the hose from the barb.

Once the hose begins to loosen, you can carefully pull it off the fitting.

The Heat Method: When and How to Apply Heat

Why Heat Works: Applying heat to the hose softens the rubber, making it more pliable and easier to remove from the barbed fitting. Heat can help expand the hose slightly, reducing friction between the hose and barb.

When to Apply Heat:

Use heat when the hose is stiff, brittle, or tightly stuck to the fitting.

Ideal for older hoses that have hardened over time or are stuck due to pressure or weather conditions.

How to Apply Heat:

Heat Gun: Set the heat gun to a moderate temperature (around 150°F–200°F, or 65°C–93°C), and hold it a few inches away from the hose. Move the heat gun around the hose to heat it evenly, making sure not to overheat and damage the hose or the fitting.

Boiling Water: For a gentler approach, you can soak the hose end in hot water (boiling) for 5-10 minutes. The heat will soften the rubber, making it easier to pull off.

Caution: Always test the hose’s flexibility after heating. Do not use heat if the hose is too close to flammable materials.

Using Lubrication to Break the Seal

Why Lubrication Helps: Lubricants reduce friction, making it easier to slide the hose off the barbed fitting without causing damage. Lubrication helps break the seal between the hose and barb, especially when dirt, corrosion, or mineral deposits are involved.

Types of Lubrication:

Silicone Spray: Safe for most hose materials and fittings, silicone spray is ideal for creating a slippery surface that helps loosen the hose.

WD-40 or Penetrating Oils: These can be effective in loosening a tight hose, especially if corrosion or debris is a factor.

Soap Solution: A mild soap solution (water and dish soap) can also work as a gentle lubricant.

How to Apply:

Spray the lubricant around the connection between the hose and barb.

Allow it to soak in for a few minutes to loosen any dirt, corrosion, or buildup.

After lubricating, use hose pliers or simply pull the hose off, as the lubricant will make it easier to remove.

Gentle Twisting: How to Avoid Damaging the Hose

Why Twisting Works: Twisting the hose helps to break the initial grip of the barbs without applying too much force, reducing the risk of damaging the hose or the barb. A gentle back-and-forth motion can help loosen the hose without tearing or stretching it.

When to Twist:

Use gentle twisting when the hose is stuck but hasn’t hardened or become brittle.

Twisting is ideal if you’re dealing with a mild seal between the hose and fitting, where heat or lubrication might not be necessary.

How to Twist:

Grab the hose firmly with both hands or use hose pliers to secure it.

Slowly rotate the hose back and forth while pulling gently.

Be sure not to use excessive force—if the hose resists, stop and consider applying heat or lubrication before attempting further twisting.

Step-by-Step Guide: How to Remove Rubber Hose from Barbed Fitting

Step 1: Inspect the Hose and Fitting

Before attempting to remove the rubber hose from the barbed fitting, take a moment to inspect both the hose and the fitting carefully. This helps you understand the condition of the components and plan the best approach for removal.

Check for Damage: Look for any visible cracks, tears, or signs of wear on the hose. A damaged hose may be more difficult to remove or could break during the process.

Examine the Fitting: Inspect the barbed fitting for signs of corrosion, debris buildup, or deformation. A damaged barb may make removal more challenging and may require replacement.

Assess the Hose Clamp: If the hose is secured with a hose clamp, check the condition of the clamp. Ensure it is not rusted or overly tight, which could complicate removal.

Evaluate the Situation: Based on your inspection, decide whether you need to apply lubrication, heat, or simply use gentle twisting to remove the hose.

Step 2: Loosening the Hose Clamp (if applicable)

If the hose is secured with a hose clamp, the first step is to loosen it to free the hose.

Identify the Clamp Type: Determine if the clamp is a screw-type or spring-loaded clamp. Most hose clamps will have a screw mechanism that can be loosened with a screwdriver or wrench.

Loosening the Clamp:

For screw-type clamps, use a screwdriver or wrench to turn the screw counterclockwise to release the tension on the hose.

For spring-loaded clamps, you may need to use a special clamp removal tool to compress the spring and slide the clamp away from the hose.

Ensure the Clamp is Fully Loosened: Make sure the clamp is loosened enough to allow the hose to slide off the barb easily without resistance.

Tip: Always keep the clamp aside safely if you plan to reuse it, as it may be difficult to remove if it’s damaged or bent.

Step 3: Applying Lubrication for Easier Removal

Lubricating the connection between the hose and barbed fitting can make the removal process smoother, especially if the hose is stuck or has been in place for a long time.

Choose the Right Lubricant: Use a silicone-based lubricant or penetrating oil (like WD-40) to reduce friction and break any seal between the hose and barb.

Apply the Lubricant:

Spray the lubricant generously around the joint where the hose meets the barb.

Allow the lubricant to soak in for 5–10 minutes to loosen any dirt, corrosion, or buildup.

Alternative Method: If you don’t have a commercial lubricant, you can also use a soap solution (water mixed with dish soap) to lubricate the fitting.

Tip: Avoid using too much lubricant, as it can make the hose slippery and difficult to grip.

Step 4: Gently Remove the Hose from the Fitting

With the hose clamp loosened and the lubricant applied, you can now begin the process of removing the hose.

Grip the Hose Securely: Use your hands or hose pliers to firmly grip the hose as close to the fitting as possible.

Twisting Motion: Begin by gently twisting the hose back and forth while pulling it away from the fitting. This will help break any bond between the hose and the barb.

Be Patient and Gentle: If the hose resists, don’t force it. Instead, apply heat or additional lubrication and try again.

If Using Pliers: If the hose is particularly stubborn, use hose pliers to get a better grip. Be sure not to apply too much pressure, as this could damage the hose or fitting.

Tip: Always work slowly and carefully to avoid damaging the hose or fitting. If the hose is still stuck, consider using the heat method.

Step 5: Cleaning the Fitting Before Reinstallation

Once the hose is removed, it’s essential to clean both the hose and the barbed fitting before reinstalling or replacing the hose.

Clean the Fitting:

Use a cloth or a wire brush to remove any dirt, debris, rust, or old lubricant from the barbed fitting.

Inspect the fitting for any signs of damage or wear, such as cracks or worn barbs, which may require replacement.

Check the Hose: If you plan to reuse the hose, clean the inside of the hose to ensure no debris or old lubricants are left behind.

Inspect for Wear: Examine the hose for any damage that could have occurred during removal, especially if you’re reusing it. If there are any signs of damage, it may be time to replace the hose.

Tip: Regular cleaning of barbed fittings will help ensure better sealing and prolong the life of both the hose and the fitting.

Troubleshooting: What to Do When the Hose Won’t Budge

Dealing with Hardened Hoses

Over time, rubber hoses can become stiff, brittle, or hardened, making them difficult to remove from barbed fittings. This is especially common in older hoses that have been exposed to high temperatures, chemicals, or UV light.

Cause: Hardened hoses become less flexible and may not stretch or move as easily, making removal a challenge.

Solution:

Apply Heat: Use a heat gun, hairdryer, or boiling water to soften the rubber. Apply moderate heat evenly around the hose for a few minutes. This can help the rubber regain some flexibility, making it easier to slide off the barb.

Lubricate: After applying heat, use a silicone-based lubricant or penetrating oil around the fitting to reduce friction and ease the removal process.

Twisting and Pulling: Once the hose has softened, gently twist and pull the hose off. Be patient and avoid excessive force, which could cause the hose to crack or break.

Tip: If the hose is still resistant after heating and lubrication, it may be too far gone, and replacing it might be the best option.

Remove Rubber Hose from Barbed Fitting

Removing a Stuck Hose from a Brass or Stainless Steel Barb

Barbed fittings made of brass or stainless steel can sometimes create a tighter seal with the hose, especially if the hose has been in place for a long time or exposed to harsh conditions. Removing a hose from these materials requires some careful steps to avoid damaging both the hose and the barb.

Cause: Brass and stainless steel are highly durable but can form a strong bond with rubber hoses, especially if there is corrosion, dirt, or mineral buildup.

Solution:

Apply Heat and Lubrication: As with other materials, start by applying heat to soften the rubber hose. You can use a heat gun or warm water. Once the hose is heated, apply a penetrating oil or lubricant to the joint.

Twist and Pull Gently: Use a twisting motion to break the bond between the hose and the fitting. Take care not to force the hose off, as you may damage the barb.

Use Pliers for a Better Grip: If the hose is stubborn, gently use hose pliers to get a better grip on the hose. Carefully twist the pliers while pulling to ease the hose off without applying excessive force.

Tip: For brass or stainless steel barbs, avoid using excessive force as this can damage the fitting. If the barb has been scratched or bent, it may no longer be able to form a secure connection with the new hose.

When to Replace the Hose vs. Trying Again

If the hose still won’t come off despite applying heat, lubrication, and gentle twisting, it’s time to decide whether to continue trying to remove it or replace the hose entirely.

When to Replace the Hose:

Visible Damage: If the hose has cracked, split, or shown signs of severe wear during the removal process, it’s best to replace it to ensure safety and efficiency.

Severe Deformation: If the hose has stretched, bulged, or deformed significantly, it may not function properly even after removal.

Old, Brittle Rubber: For hoses that have become brittle or hardened over time, replacement is often the best option. Trying to reuse an old hose can lead to leaks, cracks, or breakage.

When to Try Again:

Mild Sticking: If the hose is only mildly stuck and there’s no visible damage, it may be worth continuing with heat, lubrication, or gentle twisting to remove it.

Proper Tools: If you don’t have the right tools (like hose pliers or a heat gun), investing in these tools may help you successfully remove the hose without damaging it.

Barbed Fitting is Undamaged: If the fitting is still in good condition and you believe the hose is the only part that’s causing the problem, you may still have the option to reuse it after removal.

Conclusion

In conclusion, mastering the art of hose removal involves using the right techniques to ensure both the hose and barbed fitting remain undamaged. Careful removal is essential not only to protect your equipment but also to extend the lifespan of both the hose and fitting, saving time and money on replacements. Remember to clean the fittings before reinstalling and always consider replacing a damaged hose rather than risking further complications.


FAQs

How do I know if my hose is too damaged to reuse?

If the hose is cracked, split, or has visible signs of wear (such as brittleness or stretching), it’s best to replace it to avoid leaks or other issues.

Can I remove a rubber hose without using any tools?

While it’s possible to remove a rubber hose by hand, using tools like hose pliers or a heat gun can make the process much easier, especially if the hose is stuck or hardened.

What should I do if the hose clamp is rusted or stuck?

If the clamp is rusted or difficult to remove, try using penetrating oil to loosen it. If it’s a spring-loaded clamp, use a clamp removal tool to compress and slide it off.

How can I prevent my hose from becoming stuck in the future?

Regularly check and maintain your hoses by cleaning barbed fittings, applying lubrication, and replacing old hoses before they become too stiff or brittle.

Is it safe to use heat on the rubber hose?

Yes, applying moderate heat using a heat gun or hot water can soften the rubber, making it easier to remove. Be cautious not to overheat the hose, as this could cause damage.

How often should I clean the barbed fittings?

It’s a good idea to clean the barbed fittings every time you remove a hose. Regular cleaning prevents buildup of dirt, corrosion, or debris that could affect the fit and seal.

How to Measure Hose Barb Fittings banner

How to Measure Hose Barb Fittings: The Essential Know-How

Accurate measurements in hose barb fittings are crucial for ensuring a secure, leak-free connection between hoses and fittings. An improper fit can lead to dangerous leaks, decreased system efficiency, or even system failure. By measuring the barb diameter, hose inside diameter (ID), and barb length correctly, you ensure that the fitting works as intended, offering reliability and safety.

Understanding Hose Barb Sizing: A Complete Breakdown

Hose barb sizing ensures a secure and leak-proof connection between hoses and fittings. Proper sizing is achieved by matching the barb diameter to the hose’s inner diameter (ID). Additionally, the barb’s length and angle influence the stability and effectiveness of the connection. Incorrect sizing can lead to leaks, reduced system performance, and even damage to the fittings or hoses over time.

How to Use a Hose Barb Fitting Size Chart

A hose barb fitting size chart simplifies the process of selecting the right fitting by providing dimensions and compatibility details.

Step 1: Measure the hose’s inner diameter (ID) using a caliper or gauge.

Step 2: Locate the matching barb diameter on the chart.

Step 3: Cross-reference the hose material and application to ensure compatibility.

Example Chart Detail: Charts often include ranges of sizes (e.g., 1/8″, 1/4″, 1/2″), along with notes on recommended pressure ratings or material-specific suitability. This ensures precise selection tailored to your project needs.

Common Hose Barb Fitting Sizes and Their Uses

Hose barbs are available in various sizes, each suited for specific applications:

1/8″ and 1/4″ Sizes: Ideal for low-flow systems such as fuel lines or small air compressors.

3/8″ and 1/2″ Sizes: Common in residential plumbing and medium-flow fluid transfer systems.

3/4″ and 1″ Sizes: Preferred for heavy-duty applications like industrial equipment and large water lines.

Selecting the right size impacts not only the system’s efficiency but also its durability under different pressure conditions.

How to Match Hose Barb Size to Hose ID for a Leak-Free Fit

Matching the barb size to the hose ID is essential for a secure connection:

Measure the hose’s inner diameter (ID) precisely with a caliper.

Ensure the barb diameter is slightly larger than the hose ID to achieve a tight fit. For example, for a 1/2″ hose ID, use a barb with a 9/16″ diameter.

Consider hose flexibility and material. Stiffer materials like PVC require closer diameter matches, while flexible hoses (e.g., rubber) allow slightly more variation.

Step-by-Step Guide: How to Measure Hose Barb Fittings

The First Step: Preparing the Tools You’ll Need

Before you begin measuring hose barb fittings, it’s essential to gather the right tools to ensure accurate measurements and a proper fit. Here’s what you’ll need:

Caliper or Micrometer: These tools are crucial for precise measurements of barb diameter and hose ID. A caliper provides more accuracy compared to a regular ruler.

Ruler or Tape Measure: These will be used for measuring the barb length or other larger dimensions of the fitting.

Thread Gauge: If you’re working with threaded hose barbs, you’ll need a thread gauge to measure the pitch and size of the threads.

Hose ID Gauge or Caliper: This specialized tool helps measure the inner diameter of the hose accurately to ensure it fits with the barb.

Flat Surface: Make sure you’re working on a clean, flat surface to avoid any errors in your measurements.

Make sure all tools are clean and in good condition to avoid inaccuracies that could affect your measurements. It’s always a good idea to double-check your tools before starting the process.

Measure Hose Barb Size

How to Measure Hose Barb Fittings

When measuring hose barb fittings, it’s crucial to understand the key components that determine the fitting’s compatibility with your hose. These include:

Barb Diameter: The main dimension that ensures the hose securely attaches to the fitting.

Hose ID (Inside Diameter): The diameter of the inside of the hose where it will connect to the barb.

Barb Length: The length of the barb itself, which affects how far the hose needs to slide onto the fitting.

Barb Angle: The angle of the barb, which can affect how well the hose is secured.

Each of these measurements plays a crucial role in achieving a leak-free, secure connection. Carefully measure and verify all components to ensure compatibility and optimal performance.

Measuring the Barb Diameter

The barb diameter is one of the most important measurements because it directly affects whether the hose will fit securely on the barb. If the barb diameter is too small, the hose will slip off under pressure; if it’s too large, the hose may not fit properly or could leak.

Use a Caliper: To measure the barb diameter, place the caliper around the outermost part of the barb ridge. Ensure the caliper is perpendicular to the barb to get an accurate reading.

Uniformity: Make sure the diameter is uniform along the length of the barb. An uneven barb can cause issues when connecting the hose, leading to leaks or weak connections.

Correct Fit: A snug fit ensures that the hose won’t slip off during operation, particularly in high-pressure systems. It’s essential for safety and performance.

Measuring the Hose ID (Inside Diameter)

The hose ID is equally important when measuring for hose barb fittings because it ensures that the hose fits securely onto the barb.

Use a Caliper or ID Gauge: To measure the hose ID accurately, place the tool inside the hose and measure the internal diameter. For greater accuracy, take measurements at several points along the hose to account for any irregularities.

Correct Fit: The hose ID should closely match the barb diameter, but it shouldn’t be too tight or loose. A tight fit can be difficult to attach and may damage the hose, while a loose fit can lead to leaks or instability in the connection.

Flexibility Considerations: Take into account the flexibility of the hose material, as some materials (like rubber) may expand slightly when pressure is applied, which can influence the final fit.

Checking the Hose Barb Length

The barb length is critical for ensuring the hose attaches properly and stays secure over time. Here’s how to measure it:

Measure from the Base: Using a ruler or tape measure, measure from the base of the barb (where it meets the fitting) to the tip of the barb.

Proper Length: The barb length should be long enough to allow the hose to slide on comfortably without being too long or too short. A longer barb helps provide a better hold on the hose, while a shorter one may not offer enough surface area for a secure connection.

The proper barb length ensures the hose stays in place and prevents leaks or hose detachment under pressure.

Understanding the Barb Angle

The barb angle plays an important role in how the hose slides onto the barb and how tightly it is held. Barb angles typically range from 30° to 45° depending on the fitting design. Here’s how to measure and understand the angle:

Use a Protractor or Angle Gauge: To measure the barb angle, align the gauge with the base of the barb and measure the angle formed between the barb and the fitting surface.

Impact on Performance: The angle affects how well the hose grips the barb. A steeper angle (e.g., 45°) may provide a firmer grip, especially in high-pressure systems. A shallower angle can make it easier to slide the hose onto the barb but might not provide as secure a fit.

Match to Hose Material: The angle may also influence compatibility with different hose materials. Some hoses may require a specific barb angle for better sealing and hose retention.

How to Measure Hose Barb Fittings for Thread Compatibility

Many hose barb fittings feature threaded ends, which require careful measurement for compatibility with your hose’s fittings. Here’s how to measure thread compatibility:

Use a Thread Gauge: To measure the pitch and size of the threads, use a thread gauge. This tool helps you measure the number of threads per inch (TPI) and the thread size (e.g., NPT, BSPT).

Measure the Thread Diameter: Use a caliper or micrometer to measure the external thread diameter of the fitting. Be mindful of whether the threads are tapered (as in NPT threads) or straight (as in BSPP threads).

Ensure Proper Match: When selecting a fitting, ensure that both the barb and the hose fitting are compatible in terms of thread size, type, and pitch. Incorrectly matched threads can lead to leaks or prevent a proper seal.

Hose Barb Fitting Types and Their Measurements

Different Types of Hose Barb Fittings

Hose barb fittings are available in various configurations, each designed to meet the specific needs of different applications. Here are the most common types and their general uses:

Straight Hose Barbs: The most basic type, used for direct connections between two hoses or a hose and a fitting. These are typically used in low to medium-pressure systems.

Elbow Hose Barbs: These have a 90-degree bend, allowing hoses to connect at an angle. Elbow hose barbs are ideal for systems where space is limited or when you need to change the direction of the hose connection.

Reducing Hose Barbs: These are designed to connect hoses of different sizes, typically used in systems where you need to transition from a larger hose to a smaller one.

Tee Hose Barbs: Tee fittings have three ports and are used to create branched connections, allowing you to split a fluid or gas flow into multiple directions.

Each of these hose barb types requires accurate measurements to ensure compatibility and optimal performance, with key dimensions like barb diameter, hose ID, barb length, and sometimes thread size.

Straight Hose Barbs vs. Elbow Hose Barbs

When comparing straight and elbow hose barbs, the key differences lie in their design and the measurements needed for a proper fit.

Straight Hose Barbs

Straight hose barbs are simple and direct, designed to connect two hoses in a linear fashion.

Barb Diameter: Measure the outer diameter of the barb at its widest point. This diameter must match the hose ID closely for a tight, secure fit.

Barb Length: Measure the length of the barb to determine how much of the hose will be pushed onto the barb. The length is critical for creating a strong connection that won’t slip off under pressure.

Additional Considerations: When using straight hose barbs, ensure that the hose material is flexible enough to slide over the barb easily without causing damage.

Elbow Hose Barbs

Elbow hose barbs are used when you need a change in direction, typically for tight spaces or when you need to redirect the flow of fluid or gas.

Barb Diameter and Length: These are measured similarly to straight hose barbs, but you must also take the bend radius into account, which is the curve of the fitting.

Barb Angle: In addition to the barb diameter, the barb angle plays an important role in elbow fittings. This is typically a 90-degree angle but could vary depending on the application.

Bend Radius: The bend radius affects how the hose fits and whether the fitting will work in the specific application. The radius must be large enough to prevent kinking of the hose, especially in high-pressure systems.

When measuring elbow hose barbs, it’s important to ensure the angle of the bend doesn’t interfere with the hose’s ability to connect securely. Be sure the barb’s bend radius and barb length are within the specifications for your application to maintain optimal flow and reduce strain on the hose.

barb brass fitting Topa

Male vs. Female Hose Barbs: What’s the Difference in Sizing?

Male and female hose barbs differ mainly in their threading, which affects how they fit into corresponding components. The sizing of male and female hose barbs varies, and you must be aware of these differences when measuring for the right fit.

Male Hose Barbs

Male hose barbs have external threads that screw into a female fitting or part. When measuring male hose barbs, consider the following:

External Thread Diameter: Use a caliper to measure the outside diameter of the threads. It’s important to match this with the size of the internal threads on the female fitting.

Barb Length: Measure from the base of the barb (where it connects to the fitting) to the end of the barb. The barb should be long enough to create a secure hold on the hose.

Thread Type: Male hose barbs can come in different thread types (e.g., NPT, BSPT). Be sure to measure the thread pitch and match it with the appropriate female fitting.

Female Hose Barbs

Female hose barbs have internal threads and are designed to connect to male fittings. Here’s how to measure them:

Internal Thread Diameter: Measure the inner diameter of the threads using a thread gauge or caliper to ensure they match the male fitting’s external threads.

Barb Diameter and Length: Measure the barb diameter and length as you would for a straight hose barb to ensure a secure fit with the hose.

Thread Size and Type: Just like male hose barbs, female fittings can have different thread types (e.g., NPT, BSPT), so you must carefully match the internal thread size with the corresponding external thread on the male fitting.

Troubleshooting Hose Barb Fitting Measurement Issues

What to Do If the Hose Barb Doesn’t Fit

If the hose barb doesn’t fit as expected, it’s essential to troubleshoot the issue systematically:

Double-Check Measurements: Start by verifying both the hose ID and the barb diameter using accurate measurement tools like calipers. If there’s any inconsistency in the size, this could be the cause of the fitting issue.

Assess Hose Condition: Ensure the hose hasn’t expanded or contracted due to temperature or environmental changes. Some hoses can change shape when exposed to heat or extreme cold.

Choose the Correct Barb Size: If the barb diameter is too large or small for your hose ID, look for a fitting that is more appropriately sized.

Adjust the Fit: If the barb is slightly too tight, lubricating the hose or warming it slightly can make installation easier. Use a heat gun or warm water to gently expand the hose material, but be cautious not to damage it.

Use Hose Clamps for a Secure Fit: If the barb is too loose, try using a hose clamp to secure the hose more tightly onto the barb. Alternatively, consider using a fitting with a tighter barb design, or use a different type of hose material that fits more snugly.

Addressing these issues promptly will prevent future leaks or hose separation under pressure.

How to Adjust Hose Barb Fittings for Better Compatibility

In case of fitting issues where the barb doesn’t properly grip the hose, follow these steps to enhance compatibility:

Check Hose Material: Different hose materials (PVC, rubber, or silicone) may require specific barb sizes and styles. For example, rubber hoses tend to be more flexible, and a slightly larger barb may be required for a secure fit. Make sure the barb fits the hose material’s properties.

Trim the Hose Ends: If the hose ends are damaged or too worn out, trimming them back to ensure a clean, straight cut can help create a better seal with the barb.

Use Hose Clamps or Sealing Products: Adding a hose clamp can help secure the hose even if the barb diameter is slightly off. Sealing products like silicone tape or rubber gaskets can fill in small gaps between the barb and the hose, enhancing the seal and preventing leaks.

Opt for Different Barb Designs: If issues persist, consider switching to a reducing barb (which tapers from a larger diameter to a smaller one) or a longer barb to provide a more secure fit. Some designs offer additional grip or an extended length, providing a stronger connection for problematic hoses.

By adjusting the fitting or materials, you can achieve a more compatible and reliable connection.

How to Solve Leaking Issues Caused by Incorrect Sizing

Leaks caused by incorrect sizing are common, but they can usually be resolved with a few steps:

Inspect the Hose ID and Barb Diameter: Confirm that the hose ID and barb diameter are closely matched. If there is a mismatch, the connection won’t form a tight seal, leading to leaks. Replace the fitting with one that matches the hose ID exactly.

Ensure a Full Hose Installation: Make sure that the hose is fully pushed onto the barb to the appropriate depth. The barb’s length should be long enough to ensure a secure connection.

Tighten Hose Clamps: Sometimes, the issue is a loose hose clamp. Tightening the clamp or adding an extra one can create a stronger, more leak-proof seal around the barb.

Replace Damaged Fittings or Hose Materials: If the barb or hose is damaged (e.g., cracked or worn), replacing them can prevent leaks. Likewise, some hoses may be too stiff, making it difficult for them to grip the barb properly. In this case, switching to a more flexible hose may solve the issue.

Routine Maintenance: Inspect hose barb fittings regularly for wear and tear. Over time, barbs can degrade due to constant pressure or exposure to chemicals, which can cause leaks. Tightening the fitting during regular maintenance can prevent future issues.

Conclusion

Mastering hose barb fitting measurements ensures that your system operates smoothly and efficiently over time. A perfect fit between the hose and barb creates a strong, leak-free connection that stands up to pressure, vibration, and wear. With accurate measurements, proper fitting selection, and regular maintenance, you can significantly extend the lifespan of your hose system, reduce downtime, and prevent costly issues in the future.


FAQ

How do I measure the hose barb diameter?

To measure the hose barb diameter, use a caliper to measure the outermost part of the barb ridge. This diameter should match the inside diameter (ID) of the hose for a secure fit.

What is the importance of the hose barb length?

The length of the hose barb determines how much of the hose needs to be inserted for a secure seal. A proper barb length ensures the hose fits snugly and reduces the risk of leaks.

Can I use a hose barb fitting if the size is slightly off?

Using a hose barb fitting that’s too large or small can result in leaks or an insecure connection. Always ensure the barb diameter closely matches the hose’s inner diameter (ID).

What’s the difference between male and female hose barbs?

Male hose barbs have external threads, while female hose barbs have internal threads. The fitting size and thread type must match the hose and system requirements for a secure connection.

How do I know if my hose barb fitting is compatible with my hose?

Check the hose ID and barb diameter. For a leak-free fit, the hose ID should be slightly smaller than the barb diameter. Verify that the hose material is compatible with the barb type for the best connection.

What should I do if my hose barb fitting leaks?

If you experience a leak, double-check the measurements of the hose and barb. Tighten the hose clamp, ensure the hose is pushed on properly, and consider replacing damaged components.

Ball Valve Open Position banner

Ball Valve Open Position: How to Instantly Spot the Difference

Ball valves operate with a simple yet effective mechanism. A spherical ball with a hollow center rotates within the valve body. When the hole aligns with the pipeline, the valve is in the open position, allowing free flow. A 90-degree turn of the handle shifts the ball, closing the flow path. Here’s what you need to know.

Understanding Ball Valve Basics

Anatomy of a Ball Valve: Key Components Explained

A ball valve consists of several critical components that work together to control fluid flow. The most notable parts include:

Each component plays a specific role, and together they create a robust mechanism capable of managing high-pressure systems with precision and reliability.

The Role of the Ball in Controlling Flow

The ball within the valve serves as the key element for flow control. When the hole in the ball aligns with the pipeline, it creates a clear path for liquids or gases to pass through. This is known as the open position. Conversely, when the ball is rotated 90 degrees, the solid portion of the ball blocks the flow, putting the valve in the closed position.

This design ensures minimal flow resistance when open and a complete seal when closed, making ball valves efficient for applications where tight shut-off and quick operation are crucial.

Ball Valve components

Ball Valve Orientation: Parallel vs. Perpendicular Positions

The position of the valve handle is a quick and reliable indicator of whether the valve is open or closed:

How to Identify the Open Position

Ball Valve Handle Position: The First Visual Clue

The position of the handle is the most straightforward way to determine whether a ball valve is open or closed. Manufacturers design ball valves so that the handle alignment corresponds directly to the valve’s position:

This visual cue makes it quick and easy for operators to identify the valve’s status without dismantling any components. However, for older or heavily used valves, handle misalignment might occur, requiring additional verification methods.

When Handle Position Isn’t a Reliable Indicator

While a 90-degree handle turn is standard in most two-way ball valves, not all ball valves operate this way. Certain types—especially three-way or multi-port valves—require more complex rotation and cannot always be judged by handle alignment alone.

Multi-Port Ball Valves: T-Port and L-Port

Three-way ball valves, such as T-type and L-type designs, allow for multiple flow paths and often require 180-degree or even 360-degree rotation to switch between modes. In these cases:

This means visual inspection alone may not reveal the actual internal flow path. Always consult the valve diagram or user manual when operating multi-port valves.

Locking Handles and Position Detents

In industrial environments where operational safety is critical, ball valves may include:

Ball Valve Flow Direction: Understanding the Path

In many cases, ball valves are equipped with markings or arrows on their bodies to indicate the flow direction. These markings provide further clarity, especially when the valve’s orientation isn’t obvious.

Understanding the flow path is particularly crucial in systems where incorrect positioning could lead to leaks, pressure build-up, or operational inefficiencies.

Why Installation Direction Matters for Ball Valves

In systems using unidirectional ball valves, proper installation is critical to ensuring safe and effective operation. Unlike bidirectional valves, which allow flow in both directions, unidirectional valves are engineered to control flow in a single direction only.

Most unidirectional ball valves feature an arrow or flow direction mark engraved on the valve body. This arrow must point in the same direction as the intended flow of fluid or gas. Installing the valve in reverse can result in several operational failures:

Using Status Indicators for Accurate Positioning

Many modern ball valves come with built-in status indicators for additional accuracy. These indicators may include:

Visual and Physical Indicators

How Handle Alignment Reveals the Open Position

The alignment of the handle is one of the simplest and most reliable ways to determine whether a ball valve is open:

This straightforward visual cue is a key feature of ball valves, making them user-friendly and efficient in various settings. However, handle misalignment due to wear or damage may sometimes make this less clear, requiring additional checks.

Arrows, Labels, and Markings: What to Look For

Many ball valves feature additional visual aids that help confirm their position:

By paying attention to these markings, operators can double-check the valve’s position quickly and accurately, even in challenging lighting or environmental conditions.

Checking Valve Alignment with the Pipeline

Another effective method for confirming the open position is to visually align the valve handle with the pipeline. This is especially useful in larger systems where other indicators may be obscured:

Using the handle’s alignment with the pipeline as a visual guide ensures quick and accurate identification, reducing the likelihood of errors during operation.

Confirming Valve Position Through Functional Testing

While visual inspection—such as handle alignment—is often sufficient to determine whether a ball valve is open or closed, certain applications require functional verification to ensure the valve is truly in the desired position. This is especially important when dealing with:

Functional Testing Methods

Here are commonly used field techniques to confirm valve status:

Blow-Through Test

Low-Pressure Leak Test

Electronic Position Indicators

Common Misconceptions

Debunking Myths About Ball Valve Operation

Ball valves are often seen as simple, foolproof devices, but several misconceptions can lead to mistakes in their operation. Let’s clear up a few common myths:

Myth 1: Ball Valves Only Work in One Flow Direction

Many people believe all ball valves are unidirectional, but most are actually bidirectional. Understanding the specific type of valve in use is key to ensuring proper operation.

Myth 2: Ball Valves Are Always Leakproof

While ball valves are designed for tight shut-off, wear and tear, improper maintenance, or using the wrong materials for the application can cause leaks over time.

Myth 3: The Handle Position Is Always Reliable

Handle alignment is a helpful indicator, but it isn’t foolproof. Damage, misalignment, or wear in the valve’s internal components can cause the handle to indicate the wrong position.

Recognizing these myths can help users avoid costly mistakes and maintain better control over their systems.

Why the Handle Alone May Not Always Tell the Full Story

While the handle is the primary visual indicator of a ball valve’s position, it isn’t always completely reliable. Situations where the handle might mislead include:

Troubleshooting Position Issues

Signs of a Faulty Ball Valve Alignment

Identifying alignment problems early can prevent costly repairs and system inefficiencies. Look out for these signs of faulty ball valve alignment:

Recognizing these warning signs helps operators address the problem before it escalates into a system failure.

Ball Valve lock Position

When the Handle Is Stuck or Misaligned

A stuck or misaligned handle is a common issue, often caused by the following factors:

How to Fix It

Recognizing Valve Position in Challenging Environments

In industrial and field operations, ball valves are often exposed to extreme or specialized conditions where traditional visual indicators—such as handle orientation or color coding—can become unreliable. In these situations, special consideration must be given to how valve status is confirmed.

Corrosive Environments

In environments such as chemical plants, marine platforms, or wastewater systems, corrosion can deteriorate:

Suggested solutions:

High-Temperature Applications

In steam systems, thermal oil loops, or metal-processing lines, heat can:

Suggested solutions:

Common Installation Errors That Affect Positioning

Incorrect installation can lead to long-term issues with ball valve operation and positioning. Here are frequent mistakes to avoid:

Preventative Measures

Maintenance Tips for Ball Valves

Routine Checks to Ensure Smooth Operation

Regular maintenance is key to keeping ball valves in top condition and extending their lifespan. Include these checks in your routine:

These simple checks can prevent small issues from becoming major problems, ensuring uninterrupted operation.

Cleaning and Lubricating the Valve for Longevity

Proper cleaning and lubrication are essential to prevent wear and tear. Follow these steps for optimal care:

Routine cleaning and lubrication not only enhance performance but also help identify potential issues early.

Preventing Corrosion and Wear in the Ball Valve

Corrosion and wear can significantly impact a ball valve’s performance and lifespan, especially in challenging environments. Here’s how to prevent them:

Conclusion

To ensure reliable operation, conduct routine inspections to detect alignment issues or leaks, clean and lubricate components regularly to prevent debris buildup and corrosion, and follow manufacturer guidelines during installation to avoid errors. By combining these practices with proper maintenance, you can ensure that ball valves remain efficient, dependable, and easy to manage for any application.


FAQ

What is the easiest way to identify a ball valve’s open position?

The easiest way is to check the handle alignment. If the handle is parallel to the pipeline, the valve is open.

Can a ball valve handle be misaligned?

Yes, over time, wear, corrosion, or improper installation can cause the handle to misalign, making additional checks necessary.

What markings indicate a ball valve’s open position?

Markings like arrows, “OPEN” labels, or color-coded indicators on the valve body or handle can show the open position.

How often should ball valves be inspected?

Routine inspections should be conducted at least annually or more frequently in systems with heavy usage or harsh environments.

What materials are best for corrosion-resistant ball valves?

Stainless steel and brass are excellent choices for corrosion resistance in ball valves.

How can I prevent a ball valve from leaking?

Ensure proper installation, perform regular maintenance, clean the valve, and replace worn seals or components when necessary.

Contact Topa

Save 30% on maintenance costs with our easy-install hydraulic fittings. Contact Now!