You’re holding a hydraulic fitting, the production line is down, and nobody knows what thread it is. Ordering the wrong replacement means more delays, wasted money, and mounting frustration.
Identifying a hydraulic thread is a simple, methodical process. By using a caliper to determine if the thread is parallel or tapered, measure its diameter, and find its pitch or TPI, you can accurately cross-reference it with a standard chart and find the exact match every time.
Why Is Identifying the Wrong Thread So Dangerous?
You think two threads look similar enough to fit, so you force them together. It seems to tighten, but you’ve just created a ticking time bomb that is guaranteed to leak or fail.
Mixing incompatible thread types, like NPT and BSPT, creates a high-risk connection. The mismatched thread profiles and angles prevent a proper seal and can strip the threads, leading to dangerous high-pressure leaks, equipment damage, and costly, unscheduled downtime.
What’s the First Step in Distinguishing the Thread Type?
You’re looking at a fitting, but you can’t tell if it’s supposed to seal on the threads or with a gasket. This single distinction determines the entire identification process.
The first crucial step is to determine if your thread is parallel or **tapered**. Use your caliper to measure the diameter at the beginning and end of the threads. If the diameters are the same, it’s parallel; if they get smaller, it’s tapered.
This initial check is the most important fork in the road. It immediately cuts your potential options in half and tells you how the fitting is designed to seal. Parallel threads (like Metric Parallel or BSPP) almost always seal using a gasket, O-ring, or bonded seal on a surface. Tapered threads (like NPT or BSPT) are designed to seal by the threads themselves wedging together, usually with the help of a sealant tape or paste. A procurement manager like Tony knows that getting this first step right prevents a whole category of ordering errors. This simple measurement provides the first and most critical piece of the puzzle.
The Caliper Technique for Parallel vs. Tapered
This is a simple but precise test. Take your digital caliper and follow these steps carefully:
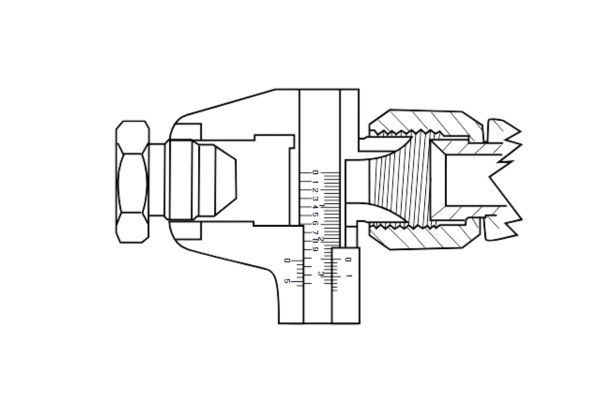
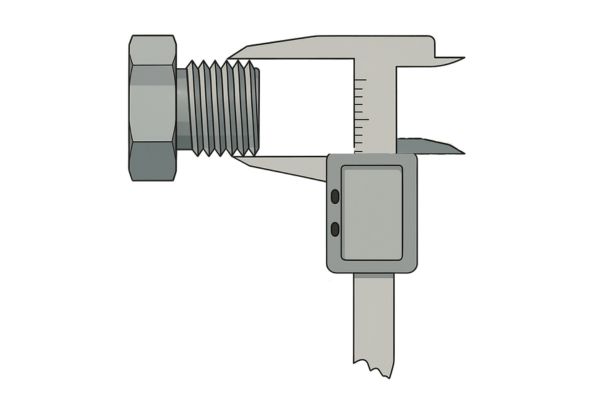
First Measurement: On a male (external) thread, carefully place the caliper jaws over the crests of the second or third thread from the end. Note the measurement. Avoid the very first thread as it’s often damaged or chamfered.
Second Measurement: Move the caliper down the fitting and measure the diameter again, perhaps over the eighth or ninth thread.
Compare:
- Parallel: If the two measurements are nearly identical (a difference of less than 0.1mm), you have a parallel thread.
- Tapered: If the second measurement is noticeably smaller than the first, you have a tapered thread.
You can also use your eyes as a quick check. A parallel thread will have a consistent profile, like a cylinder. A tapered thread will look like a very subtle cone.
| Feature | Parallel Thread | Tapered Thread |
| Visual Look | Straight, like a cylinder | Conical, gets smaller toward the end |
| Caliper Test | Diameters at start and end are the same | Diameter at start is larger than at the end |
| Sealing Method | O-ring, washer, bonded seal, or metal face seal | The threads themselves wedge together (with sealant) |
| Common Examples | BSPP (G), Metric Parallel, UN/UNF (JIC, ORB) | NPT, BSPT (R/Rc), Metric Tapered |
How Do You Accurately Measure the Thread Diameter?
You’ve identified your thread as parallel, but when you measure it, the number doesn’t match any standard you can find in a chart. A tiny error in measurement leads to a dead end.
For a male (external) thread, you must measure the major diameter (the widest part, from crest to crest). For a female (internal) thread, you measure the minor diameter (the narrowest part, from root to root). This measurement must be precise and perpendicular to the fitting.
This step seems basic, but it’s where small mistakes happen. I once had a customer who was measuring the diameter of his male fitting at a slight angle. This small tilt was adding 0.5mm to his measurement, causing him to look at the wrong section of the thread chart and order the wrong part twice. I advised him to gently rock the caliper as he closes it on the threads; the largest reading he sees before it starts to decrease is the true major diameter. For tapered threads, consistency is key—always record which thread you are measuring (e.g., “diameter at the 4th thread”). Precision here is what makes the final identification possible.
Measuring Male (External) Threads
The most important dimension on a male thread is its outside diameter, technically called the **major diameter**.
- Technique: Place the caliper jaws over the crests (the peaks) of the threads.
- Be Perpendicular: Ensure the caliper is perfectly straight across the fitting, not at an angle.
- Find the True Diameter: Gently close the caliper and give it a slight rock back and forth to ensure you are capturing the widest possible dimension.
- For Tapered Threads: Because the diameter changes, you need to measure at a consistent point. Good practice is to measure across the 4th or 5th thread crest from the end of the fitting. This avoids the often-damaged first thread and gives a representative measurement.
Measuring Female (Internal) Threads
For a female thread, you need to measure the **minor diameter**.
- Technique: Use the small, internal measuring jaws on the top of your caliper.
- Go Deep: Insert the jaws into the threaded hole, letting them expand until they make firm contact with the thread roots (the valleys).
- Find the True Diameter: Again, a slight wiggle as you expand the jaws will help you find the true, smallest diameter of the hole. This measurement is often more difficult to get perfectly and can be less reliable than a male thread measurement. Whenever possible, try to find a matching male fitting to measure instead.
Crucial Point: Remember that the measured diameter will rarely be the exact nominal size. For example, a 1/2″ NPT thread has a nominal major diameter of 0.840 inches (21.34 mm), not 0.5 inches. This is why a thread chart is essential. You are not looking for an exact match to the name, but an exact match to the dimensions in the chart.
How Do You Determine the Thread Pitch or TPI?
You have the diameter, but is it a coarse metric thread or a fine imperial one? This single detail separates two completely different and incompatible standards.
You must determine the distance between threads. For Metric threads, you measure the distance from one crest to the next in millimeters; this is the **pitch**. For Imperial threads (like BSP or NPT), you count the number of threads in one inch; this is the **TPI**.
Measuring Metric Pitch
Metric systems are beautifully simple. The pitch is a direct measurement.
- Method: Carefully place the sharp points of your caliper jaws on the crest of two adjacent threads.
- Measurement: The reading on your caliper (e.g., 1.5mm or 2.0mm) is the pitch.
- Increase Accuracy: To reduce error, you can measure across several threads (e.g., 5 threads) and then divide the total distance by the number of threads. For example, if the distance over 5 threads is 7.5mm, your pitch is 7.5 ÷ 5 = 1.5mm.
Measuring Imperial TPI (Threads Per Inch)
Imperial systems are based on a count, not a direct measurement.
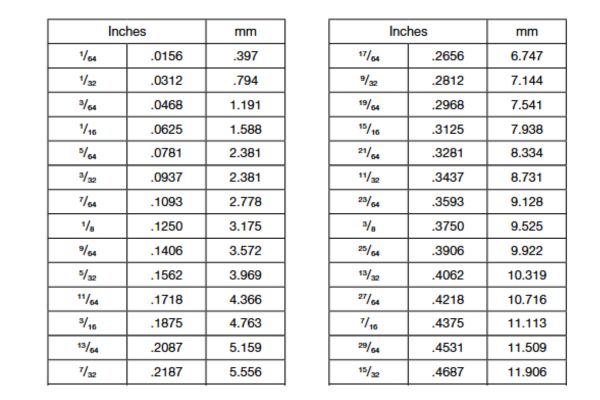
- The Best Caliper Method: Set your caliper’s jaws to exactly 25.4mm (which is 1 inch). Place one jaw on the crest of a thread and then count how many thread crests fall within that 1-inch span. This count is your TPI.
- The Calculation Method: If the threaded section is too short for a full inch, you can use a calculation. Measure the distance over a smaller number of threads (e.g., 5 or 10). Then use this formula: **TPI = 25.4 / (Total Length / Number of Threads)**. For example, if 5 threads cover a distance of 9.07mm, the average pitch is 1.814mm. The TPI would be 25.4 / 1.814 = 14 TPI.
This calculation is more prone to error, so the direct 1-inch counting method is always preferred when possible.
How Do You Put It All Together and Find the Standard?
You have three key pieces of data: thread type, diameter, and pitch/TPI. Now what? You are standing at the finish line but need to know which race you’ve won.
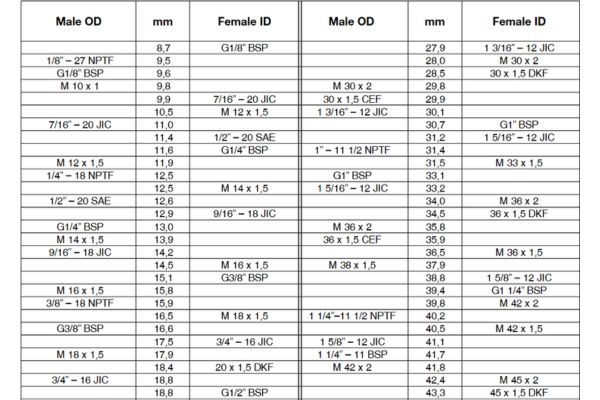
The final step is to take your measurements and compare them against a standard hydraulic thread chart. By cross-referencing your data, you can definitively identify the thread standard, such as NPT, BSPP, or Metric.
This is the “aha!” moment. It’s where all the careful measurements pay off. It feels like being a detective. You’ve gathered all the clues, and now you are comparing them to your list of suspects in the thread chart. Let’s walk through a few real-world examples from my experience helping customers.
Example 1: The Tapered Fitting
A customer in Chile sent me his measurements from a fitting on his mining equipment.
- Type: Tapered (diameter was smaller at the end).
- Diameter: ~33.2mm (measured at the 4th thread).
- Pitch/TPI: He counted 11.5 threads over a 1-inch span. So, **11.5 TPI**.
We opened our thread chart. We looked for a tapered thread with a diameter around 33.2mm and **11.5 TPI**. There was only one match: **1″ NPT**. Case closed.
Example 2: The Parallel Fitting
A farm owner in New Zealand needed to replace a hose on his European tractor.
- Type: Parallel (diameters were identical).
- Diameter: ~26.4mm (male major diameter).
- Pitch/TPI: He counted **14 TPI**.
We went to the chart. We looked for a parallel thread, ~**26.4mm** OD, and **14 TPI**. The perfect match was **BSPP (G) 3/4″**. The G stands for parallel.
Example 3: The Metric Fitting
An engineer from a factory in Romania had a fitting from a German press.
- Type: Parallel.
- Diameter: ~29.8mm (male major diameter).
- Pitch/TPI: He measured the distance between two crests as **1.5mm**.
Chart time. We searched for a parallel thread, ~**29.8mm** OD, with a **1.5mm pitch**. This pointed directly to a Metric M30 x 1.5 thread.
This systematic process removes all guesswork. You just need a good-quality caliper and a reliable thread chart. We provide these charts to all our customers to empower them to identify parts correctly on their own.
What Other Clues Can Confirm Your Identification?
Your measurements point to two very similar thread standards. How can you be 100% certain you’ve chosen the right one without any doubt?
Look beyond the threads. The sealing method and sealing angles are definitive clues. A thread that seals with a 37° flared cone is JIC, while one that uses a bonded washer on a flat face is BSPP. These physical features confirm your caliper measurements.
This is advanced detective work. Sometimes, two threads, like a Metric and an Imperial one, can have very similar diameters and pitches. The sealing method is the tie-breaker. It tells you how the fitting *functions*, which is unique to each standard. This is how a true professional confirms their choice. It’s not just about what the thread *is*, but what it *does*.
Identifying by Sealing Method
Once you have a likely candidate from your measurements, check the sealing surface for confirmation.
- Tapered Threads (NPT, BSPT): The seal is made by the threads themselves. You will almost always find old thread sealant tape or paste on a male fitting. The port it connects to will be simple and unadorned.
- BSPP (G) Threads: This parallel thread seals with a soft washer or a “bonded seal” (a metal washer with a rubber ring vulcanized to the inside). The male fitting will have a flat face behind the threads to compress this seal against a flat surface on the port.
- JIC / SAE 37° Flare: This is incredibly common in North America. It’s a parallel thread (UN/UNF), but the sealing is done by a distinctive 37° flared cone on the male fitting mating against a matching 37° cone on the female fitting.
- O-Ring Boss (ORB): This also uses a parallel UN/UNF thread. The seal is made by an O-ring that sits at the base of the male thread. It’s designed to fit into a special chamfered “boss” or groove at the top of the female port.
- 60° Cone Seat (BSPP): Some BSPP fittings don’t use a washer. Instead, they have a 60° cone inside the female fitting that mates with a matching cone on the male end. This is common but can be confused with JIC, so measuring the angle is key (if you have a protractor).
By combining your three caliper measurements with a visual confirmation of the sealing method, you can identify virtually any hydraulic fitting with an extremely high degree of confidence.
Conclusion
Mastering this caliper technique transforms uncertainty into expertise. It ensures every hydraulic connection you make is the correct one, guaranteeing system safety, reliability, and efficiency.