Your machine is down with a blown hose, miles from a workshop. Without a crimper, you’re stuck, losing valuable time and money with each passing minute of downtime.
You can fix a hose anywhere using only basic hand tools with reusable hydraulic fittings. The secret is correctly assembling the two-piece fitting—the socket and the nipple—onto a properly cut hose for a secure, factory-quality repair that gets you running again fast.
Why Choose Reusable Fittings for Field Repairs?
You need a new hose *now*, but the nearest hydraulic shop is hours away. Waiting for a mobile repair van is expensive, and carrying a heavy crimper everywhere is simply not practical for most operators.
Reusable fittings solve this problem entirely. They are specifically designed for assembly using only common hand tools, like a wrench and a vise. This turns a major delay into a minor, on-the-spot repair you can perform yourself.
Think of reusable fittings as your hydraulic first-aid kit. While permanently crimped fittings are excellent for mass production and standard assemblies, reusable fittings provide unmatched value for emergency repairs, prototyping, and low-volume custom applications. Their genius lies in a simple, robust mechanical design that allows for secure attachment without any specialized hydraulic equipment. Understanding this difference is key to appreciating why they are so valuable for field service.
Understanding the Two-Piece Design
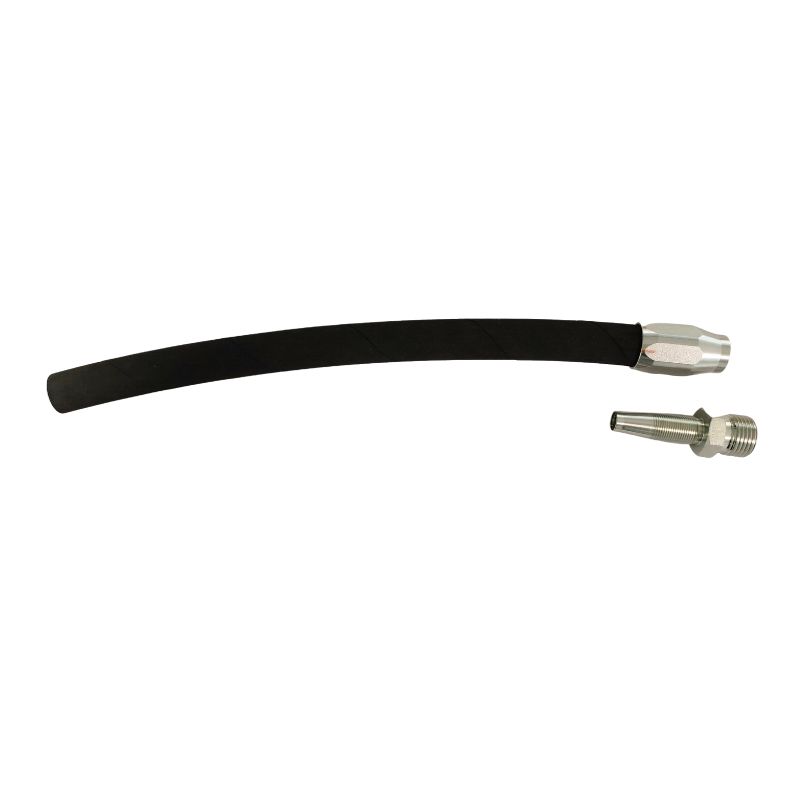
Unlike a one-piece crimp fitting, a reusable fitting consists of two separate, precision-machined components:
- The Socket: This is the outer piece with a coarse internal thread that screws onto the outside of the hydraulic hose. It firmly grips the hose’s cover and wire reinforcement.
- The Nipple: This is the inner piece, which includes the hose end connection (e.g., JIC, NPT) and a stem with a tapered thread that screws into the socket. As it tightens, it expands the inner tube of the hose, creating a secure, pressure-tight seal.
When Are Reusable Fittings the Best Choice?
Reusable fittings are the superior option in several common scenarios. Keeping a stock of common sizes can be a business-saving decision for many operators. They are ideal for:
- Emergency Field Repairs: The primary advantage. Get your equipment back up and running without waiting for outside help.
- Remote Locations: Essential for agriculture, forestry, mining, and marine applications where access to a hydraulic shop is limited or nonexistent.
- Prototyping: When designing new systems, you can quickly build and test hose assemblies of different lengths without wasting fittings.
- Low-Volume, Custom Hoses: If you only need one or two unique hose assemblies, investing in them is far more economical than buying a crimper.
What Tools Are Essential for a Field Repair?
You have the reusable fitting, but you’re missing a key tool. Now you are stuck trying to improvise, which risks a bad assembly, a persistent leak, or personal injury.
A successful field repair depends on having a small but specific set of tools ready. A proper hose cut and clean assembly are impossible without them. Prepare a simple kit with the right tools before you need it.

Essential Cutting and Preparation Tools
Getting the hose end prepared correctly is half the battle. A clean, square cut is non-negotiable for a leak-free seal.
- Hose Cutter or Fine-Tooth Hacksaw: A proper hose cutter provides the best result. If using a hacksaw, use a blade with 24-32 teeth per inch for a clean cut.
- Utility Knife: For skiving the hose cover, if required by the fitting type (most modern “no-skive” hoses do not need this).
- Tape Measure: For accurately measuring the required length of the new hose.
- Bench Vise: This is the most important tool. You must hold the hose securely to assemble the fitting correctly.
Assembly and Tightening Tools
Proper assembly requires leverage and lubrication.
- Two Good-Quality Wrenches: One for the socket and one for the nipple. Using two wrenches prevents you from simply twisting the entire hose.
- Light Oil or Hydraulic Fluid: Lubrication is *not optional*. It is required to prevent thread damage (galling) and to ensure components seat correctly without a false torque reading.
Safety First: Personal Protective Equipment (PPE)
Working with hydraulic hoses involves sharp wire and high pressures. Never attempt a repair without the proper safety gear.
- Safety Glasses: To protect your eyes from metal fragments or hydraulic fluid.
- Heavy-Duty Gloves: To protect your hands from the sharp ends of the cut wire reinforcement.
How Do You Safely Remove an Old Fitting?
You need to reuse the fitting, but you damage the threads while trying to remove it from the old, failed hose. Now the expensive reusable fitting is just as useless as the broken hose.
To safely remove and inspect a reusable fitting, you must use a systematic process. Secure the hose in a vise and use two wrenches to carefully unscrew the components without applying twisting force to the hose itself.

The whole point of these fittings is their reusability. A careless removal process can easily ruin them, defeating their purpose. Taking a moment to disassemble the fitting correctly not only salvages the component but also gives you a chance to inspect it for wear and tear. A damaged fitting should never be reused, as it will compromise the integrity of your new repair.
Step 1: Secure the Hose in a Vise
Firmly clamp the hose in a bench vise, allowing about 6 inches (15 cm) to stick out with the fitting attached. Clamp on the hose, not the fitting socket. This provides the stability needed for the next steps.
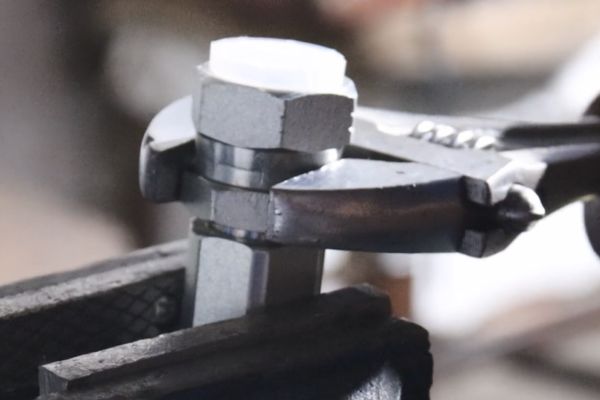
Step 2: Loosen and Unscrew the Nipple and Socket
First, use one wrench on the socket hex and another on the nipple hex to break the connection loose. Unscrew the nipple completely and remove it. Next, place a wrench on the socket hex and turn it clockwise to unscrew it from the hose. This is because the socket has a left-hand thread. It screws onto the hose counter-clockwise and comes off clockwise.
Step 3: Inspect Components for Reuse
Once removed, clean the socket and nipple thoroughly and inspect them for any signs of damage. This is a critical safety step.
| Component | What to Look For | Decision |
| Socket | Damaged or stripped internal threads, cracks in the body, rounded-off hex. | If any damage is found, **discard**. |
| Nipple | Damaged or galled threads, deformed sealing surface, cracks, bent stem. | If any damage is found, **discard**. |
Only reuse fittings that are in perfect condition. When in doubt, throw it out. The cost of a new fitting is nothing compared to the cost of a failed assembly.
What is the Correct Assembly Procedure?
You assembled your new hose, but it leaks from the fitting as soon as you power up the system. A subtle mistake during assembly has created a leak path, and now you have to do the job all over again.
To guarantee a leak-proof seal, you must follow the correct assembly sequence precisely. This involves a square cut, proper lubrication, and screwing the socket and nipple together to the correct depth.
Assembling a reusable fitting is a skill. It’s not difficult, but it requires attention to detail. Each step builds on the last to create a strong, reliable connection. Skipping a step or taking a shortcut, like forgetting to lubricate the threads, is the number one cause of field assembly failures.
Step 1: Prepare the Hose End
Measure your replacement hose and make a clean, square cut. An angled cut will prevent the hose from seating properly against the nipple and will cause a leak. Use a utility knife to trim away any frayed rubber or loose wire from the hose end.
Step 2: Screw the Socket onto the Hose
Clamp the hose in the vise. Lubricate the hose end and the internal threads of the socket. Now, push the socket onto the hose and turn it counter-clockwise to screw it on. The socket has a left-hand thread. Continue screwing until the hose just bottoms out inside the socket, then back it off a quarter turn.
Step 3: Lubricate and Insert the Nipple
Liberally lubricate the threads of the nipple and the inside of the hose. Push the nipple into the socket and hose end until you can engage the threads by hand.
Step 4: Tighten the Nipple into the Socket
Use two wrenches—one to hold the socket steady and one to turn the nipple hex. Tighten the nipple into the socket **clockwise**. Continue tightening until there is a small, visible gap between the nipple hex and the socket. Do not tighten until they touch. This gap is intentional and confirms a correct assembly. The size of this gap is typically 1/16 to 1/32 of an inch (0.8mm to 1.5mm).
What Common Mistakes Cause Leaks and Failures?
Your field repair failed almost immediately. You’re frustrated and covered in hydraulic oil. An easily avoidable mistake during assembly has cost you more time and created a bigger mess.
The most common mistakes are simple but critical: an angled hose cut, forgetting lubrication, incorrect socket depth, and over-tightening the nipple. Avoiding these four pitfalls is the key to a successful, long-lasting repair.

We have analyzed countless failed field assemblies over the years. The cause is almost never a defective fitting. It is overwhelmingly due to a simple error in the assembly process. Understanding these common mistakes is the most effective way to ensure your repairs are done right the first time, every time. Think of this as the professional technician’s checklist of what not to do.
Mistake #1: A Bad Hose Cut
A cut that is not perfectly square to the hose’s centerline is the number one cause of leaks. An angled cut means the hose end will not sit flush against the bottom of the nipple. This creates a direct leak path that no amount of tightening can fix.
- Solution: Use a proper hose saw or a sharp, fine-tooth hacksaw in a guide block. Take your time and make one clean, straight cut.
Mistake #2: Forgetting Lubrication
Assembling the fitting dry will cause the threads to gall and bind. This gives you a false sense of tightness. You may think the fitting is fully assembled, but it is not. The friction from the dry threads has stopped you from achieving the proper compression.
- Solution: Always use a light oil or hydraulic fluid on all threads (socket and nipple) and on the hose end itself before assembly.
Mistake #3: Incorrect Socket Position
If you don’t screw the socket onto the hose far enough, the nipple won’t be able to properly expand the hose tube for a good seal. If you screw it on too far, it can be difficult to start the nipple threads.
- Solution: Follow the “bottom out and back off 1/4 turn” rule. This positions the socket perfectly every time.
Mistake #4: Over-tightening the Nipple
Many people think tighter is better. With reusable fittings, this is false. Tightening the nipple until it touches the socket can damage the internal threads, strip the fitting, or cut the hose’s inner tube, creating a failure point.
- Solution: Always leave a slight, even gap (approx. 1/16″) between the nipple hex and the socket. This gap is your visual confirmation of a correct and secure assembly.
Conclusion
Mastering reusable fittings gives you the power to make reliable hydraulic repairs anywhere. You can turn costly downtime into a quick, simple fix with only the basic tools you already have, giving you control over your maintenance schedule.
Keep your machines running anywhere, anytime with Topa reusable hydraulic fittings. Designed for quick field repairs using only hand tools, they save you costly downtime and ensure reliable, leak-free performance. Contact us today to place your order and secure fittings that deliver strength, flexibility, and true peace of mind.
FAQ
What makes a fitting “reusable”?
Reusable fittings can be disassembled and reattached to a new hose using only hand tools, unlike crimp fittings which are permanent.
Do I need special tools to install reusable fittings?
No. A vise, two wrenches, a hose cutter (or hacksaw), and lubrication are enough for proper assembly.
Can reusable fittings handle the same pressure as crimp fittings?
Yes, when correctly assembled, they meet the same pressure ratings as equivalent crimped fittings.
What are the most common mistakes during assembly?
Bad hose cuts, forgetting lubrication, incorrect socket depth, and over-tightening the nipple.
When should I choose reusable fittings over crimp fittings?
They are best for emergency field repairs, remote locations, prototyping, and low-volume custom hoses.
Can I reuse a fitting from an old hose?
Yes, but only if it passes inspection. Discard any fitting with damaged threads, cracks, or worn sealing surfaces.