A one-piece hydraulic hose fitting helps prevent assembly errors only when the fitting series, hose construction, and crimp specification are correctly matched. The preassembled ferrule removes one selection step, but it cannot compensate for the wrong hose, incorrect insertion depth, unsuitable dies, or an out-of-tolerance crimp. For hose assembly technicians, controlling those variables is the practical route to preventing fitting blow-off, hose damage, leakage, and unplanned equipment downtime.
Why Can a One-Piece Fitting Still Fail Under Pressure?
Preassembly reduces parts, not engineering requirements
A one-piece fitting normally combines or permanently retains the fitting body or stem and ferrule as one assembly component. That arrangement reduces the chance of picking a separate ferrule from the wrong product family and makes handling at the crimp station simpler. It does not mean that every hose of the same nominal size will grip, seal, and deform correctly with that fitting.
The crimped connection works because the ferrule compresses the hose reinforcement and cover around a stem designed for a particular hose construction. If the combination and deformation are correct, the joint can resist pressure thrust and operating loads without damaging the hose. If they are wrong, the assembly may look acceptable while having inadequate retention, a restricted bore, displaced reinforcement, or an early leak path.
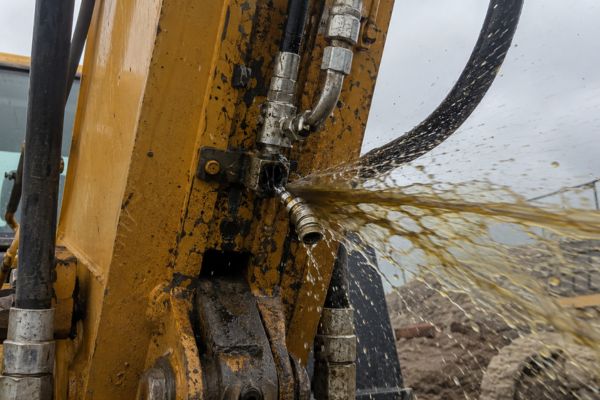
Burst and blow-off are different failure events
People often use “burst” for any sudden hose failure, but the location matters during diagnosis. A hose tube or reinforcement rupture away from the fitting differs from a fitting blow-off, a ferrule-area rupture, or leakage at the thread or sealing face. Identifying the actual failure mode prevents a technician from changing crimp diameter when the cause is abrasion, excessive temperature, an incompatible fluid, a damaged seal, or an unsuitable routing condition.
Start With the Approved Hose-and-Fitting Combination
Dash size alone does not establish compatibility
Matching dash size is necessary, but it is not proof of compatibility. Two hoses with the same nominal inside diameter can have different cover thicknesses, reinforcement layers, wire dimensions, tube materials, and outside diameters. Those differences change how the hose responds when a ferrule is compressed, so the fitting series and crimp target must be confirmed against the exact hose manufacturer and series.
Never create a combination by assuming that visually similar stems or ferrules are interchangeable across product lines. Use current, applicable crimp data from the hose or fitting system manufacturer, and resolve any conflict before assembly.
Confirm the application before touching the crimper
The rated capability of a hydraulic hose assembly is limited by its lowest-rated applicable component and by actual service conditions. Working pressure, pressure impulses, temperature, fluid compatibility, bend radius, movement, vibration, external abrasion, and end-connection loads all influence suitability. A correct crimp cannot make a hose, fitting material, plating, seal, or connection style suitable for an application outside its specified limits.
Before selecting components, record the machine function and failure consequences as well as the basic pressure and fluid data. Safety-critical steering, lifting, braking, or personnel-access applications may require equipment-specific parts, procedures, inspection, and traceability. When those requirements are unclear, consult the equipment, hose, fitting, and crimping-equipment documentation rather than approving a substitute from dimensions alone.
The Crimp Specification Is a Complete Process, Not One Number
Diameter, insertion, dies, and preparation work together
Crimp diameter is important, but it is only one controlled output. The applicable instructions may also specify cut length, skiving or no-skive preparation, cleaning, insertion depth, fitting orientation, die set, crimper setting, measurement location, and acceptable tolerance. Use the current instructions for the exact component combination because there is no universal diameter, insertion depth, pressure, or machine setting for all one-piece hydraulic hose fittings.
Marking the specified insertion depth on the hose provides a visible check that the hose has not backed away from the fitting shoulder before crimping. Where the process calls for skiving, remove only the prescribed material with the specified tooling; uncontrolled skiving can expose or damage reinforcement. Where the system is no-skive, removing the cover without authorization changes the designed interface and is not an improvement.
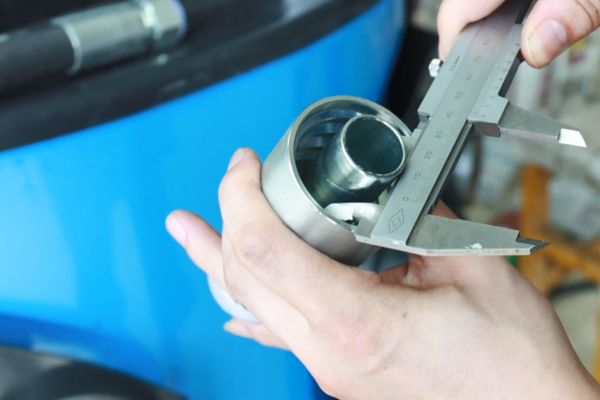
Machine settings do not replace measured results
A crimper setting is an input, while the finished crimp diameter is a measured result. Die wear, machine condition, spring-back, component tolerances, incorrect die selection, and setup errors can cause the final assembly to differ from the intended target. Measure the completed crimp at the locations and with the method required by the applicable crimp instructions, using calibrated equipment suitable for the tolerance.
Do not “correct” an uncertain result through repeated crimping unless the manufacturer’s procedure explicitly permits it. Additional compression may damage reinforcement, deform the stem, or reduce the bore while producing an attractive outside diameter. Quarantine an out-of-tolerance assembly, determine why it missed the specification, and follow the authorized disposition procedure.
A Repeatable Crimp Workflow Prevents Hidden Errors
Control the assembly before and during crimping
A dependable workflow makes the correct choice visible at each handoff. It also keeps a technician from relying on memory when several similar hose and fitting families share the same workstation. The following sequence should be adjusted to the current manufacturer instructions, but no step should be silently replaced by appearance or habit.
- Verify the work order, hose manufacturer and series, hose size, fitting part number, end style, orientation, and quantity.
- Confirm that the fitting series is approved for the hose construction and that the current crimp data apply to the available crimper and dies.
- Inspect the hose and fitting for damage, contamination, corrosion, incorrect markings, or dimensional anomalies; cut the hose square with suitable equipment.
- Prepare the hose exactly as specified, clean the bore, mark insertion depth, and insert the fitting fully without contaminating the sealing surfaces.
- Select and verify the dies and machine setup, position the assembly as instructed, keep hands clear, and complete the crimp.
- Measure and record the crimp at the prescribed locations; check insertion, alignment, orientation, bore condition where required, and overall workmanship.
Inspect without creating another hazard
Final inspection should confirm that the fitting has not shifted, the ferrule is correctly located, and the hose near the ferrule shows no cuts, exposed reinforcement, abnormal bulging, or heat damage. Also inspect the thread, seat, O-ring, flange face, or other sealing feature because connection-end damage causes leaks that a better crimp cannot solve. Caps or plugs should protect clean ends until installation where the cleanliness requirement calls for them.
Before installing, inspecting, or replacing any assembly on equipment, shut the machine down, release hydraulic pressure and stored energy, and follow the equipment and component manufacturers’ safety procedures. Never search for a pinhole leak with a hand; escaping hydraulic fluid can penetrate skin. A pressure or proof test, when required, must use an approved test procedure, protected test area, suitable equipment, and defined acceptance criteria.
Reading the Failure Location Before Making Another Hose
Common clues point to different corrective actions
When a hose fails near a one-piece fitting, preserve the assembly and record its installed position before cutting it apart. A pulled-out stem or hose may suggest inadequate retention, incomplete insertion, an incorrect combination, or excessive external loading, but the evidence must be compared with component identification and measured crimp data. A rupture next to the ferrule may instead involve over-compression, reinforcement damage, flexing at the rigid termination, or an application condition beyond the assembly design.
| Observed condition | Checks to prioritize | Why simply recrimping is unsafe |
|---|---|---|
| Hose or stem pulls from ferrule | Part numbers, insertion mark, finished diameter, hose OD, routing loads | The combination or insertion may be wrong even if diameter is smaller |
| Rupture at ferrule edge | Over-crimp, skive damage, bend immediately behind fitting, hose compatibility | More compression can intensify reinforcement damage |
| Leak at connection end | Thread form, seat angle, seal type, seal condition, installation alignment | Ferrule compression does not repair a mismatched or damaged seal |
| Leak between hose and fitting | Combination approval, insertion, crimp tolerance, stem/ferrule damage | External appearance does not establish internal grip or sealing |
| Burst away from fitting | Pressure, impulse, abrasion, heat, fluid, hose age and routing | The crimp may not be the initiating cause |
Do not erase evidence during teardown
Photograph the complete assembly, both ends, routing, failure area, equipment port, identification marks, and any visible insertion mark. Record the hose legend, fitting markings, measured crimp diameter, hose outside diameter where relevant, service conditions, and elapsed service information if known. Do not grind away the ferrule or discard damaged parts until the responsible technical authority has decided what examination is needed.
Small Process Mistakes That Produce Large Failures
Shortcuts weaken both retention and diagnosis
Several shortcuts repeatedly create uncertainty: selecting by ferrule appearance, mixing unverified brands, using an obsolete crimp chart, estimating insertion by feel, choosing dies from memory, or accepting a crimp without measurement. Using thread sealant to compensate for the wrong thread or damaged sealing face is another category error. Sealant may be specified for some pipe-thread connections, but it cannot convert incompatible thread forms or repair a metal seat, O-ring groove, or flange face.
Orientation mistakes deserve equal attention on elbow fittings. Rotating a hose assembly during installation to make an elbow line up can introduce twist, preload, and premature fatigue. Establish orientation before crimping, measure it according to the applicable convention, and verify it again after the second end is attached.

One-piece construction has useful limits
The retained ferrule simplifies picking and helps prevent a separate ferrule from being omitted or drawn from another bin. It can also make workstation organization and part-number control easier. Those are meaningful controls, but one-piece construction does not automatically guarantee compatibility, leak-free performance, pressure capacity, cleanliness, or correct operator technique.
It is also distinct from a reusable or field-attachable fitting; the terms should not be treated as synonyms. If a field repair lacks the approved components, current crimp data, correct dies, inspection equipment, or a safe pressure-release procedure, urgency does not make an improvised assembly acceptable. Use the equipment owner’s authorized recovery plan and obtain the specified parts and resources.
Build Traceability Into Every Finished Assembly
Record enough data to reproduce the result
Traceability turns a successful crimp into a repeatable process and a failed assembly into usable evidence. The record should connect the work order or assembly identifier to the exact hose, both fittings, applicable crimp specification, machine, dies, technician or station, date, and inspection result. Where required by the organization or application, retain material lots, calibration status, test results, and nonconformance disposition as well.
These records also improve the next urgent repair. Instead of identifying a damaged fitting from a photograph alone, the team can retrieve the verified hose series, fitting part numbers, orientation, cut length, and crimp data.
Prepare a complete crimp confirmation package
Before approving a new assembly, replacement, or substitute, collect only information that can be verified. If any item is uncertain, mark it as unknown rather than converting an assumption into a part number. A useful confirmation package includes:
- Hose manufacturer, exact series, hose ID or dash size, hose legend, and clear photos.
- Fitting part numbers, style and orientation, material or finish requirements, plus thread, seat, and seal details for each connection end.
- Current approved crimp specification, including preparation method, insertion depth, die selection, target diameter, tolerance, and measurement method.
- Crimping-machine identification, available dies, measurement-tool status, and any required test or inspection procedure.
- Working pressure, impulse conditions, temperature, fluid, routing, movement, environment, equipment function, and applicable safety requirements.
Conclusion
Effective one-piece fitting burst prevention comes from controlling the complete hose-to-fitting joint: an approved hose and fitting series, correct preparation and insertion, specified tooling, measured crimp results, safe inspection, and traceable records. Preassembly removes one ferrule-selection risk, but correct matching matters more than visual similarity, speed, or the lowest component price. Before the next crimp, prepare the exact hose and fitting identification, current manufacturer crimp data, machine and die information, and real application conditions.
Frequently Asked Questions
Can I use the same crimp diameter for two hoses with the same dash size?
No; the correct diameter depends on the exact hose construction, fitting series, and applicable manufacturer data. Identical nominal size does not mean identical cover, reinforcement, or outside diameter.
Does a smaller finished diameter always provide better fitting retention?
No; over-crimping can damage reinforcement, deform the stem, restrict flow, or initiate a rupture near the ferrule. Stay within the specified target and tolerance, and investigate any out-of-range result.
Can I identify a replacement one-piece fitting from a photo?
A photo can support initial screening but cannot establish the final selection. Confirm markings, hose series and size, thread diameter and pitch, thread form, seat angle, sealing method, orientation, material, and crimp data.
Should a failed assembly be duplicated from its old dimensions?
Not automatically, because the old assembly may have been incorrectly specified, crimped, routed, or installed. Compare its dimensions and markings with current approved data and the actual application before reproducing it.
When should manufacturer or equipment data override a shop’s normal practice?
Use the applicable current manufacturer and equipment requirements whenever they define component compatibility, preparation, crimping, installation, testing, pressure limits, or safety procedures. Shop practice can organize the work, but it should not replace product-specific technical limits.