Your machine just blew a hydraulic line, miles from the workshop. Now your entire operation is at a standstill, with downtime costing you money with every passing minute.
The best way to handle a field repair is by using field-attachable (reusable) fittings. These allow you to create a new, permanent hose assembly using only basic hand tools, getting your equipment back up and running quickly and safely.
What Safety Steps Are Absolutely Essential Before Starting?
You see hydraulic fluid spraying and your first instinct is to rush in and fix it. This impulse is dangerous and can lead to severe injection injuries, even from systems that appear powered down.
Before touching anything, the absolute first steps are to lock out the machine’s power, completely relieve all stored pressure in the hydraulic system, and put on your required Personal Protective Equipment (PPE). Safety is not optional.
Lockout/Tagout (LOTO) is Non-Negotiable
Lockout/Tagout is a formal safety procedure to ensure dangerous equipment is properly shut off and not started up again before the maintenance is complete.
- Turn off the machine.
- Isolate it from its energy source (e.g., turn off the main electrical disconnect).
- Place a lock and a warning tag on the isolation device.
- The person performing the repair is the only one with the key to that lock.
This prevents anyone from accidentally starting the machine while you are working on it.

Releasing Stored Hydraulic Pressure
Turning off the engine is not enough. Hydraulic systems can store energy in accumulators or even within the lines themselves. To release this pressure, you must work the machine’s hydraulic controls (levers, joysticks, etc.) back and forth several times with the engine **off**. You may hear a ‘hiss’ or see the attachments move slightly as the pressure dissipates. Continue until the controls feel loose and unresponsive.
Essential Personal Protective Equipment (PPE)
Hydraulic fluid is a skin and eye irritant. A high-pressure pinhole leak can inject this fluid through your skin, which is a life-threatening medical emergency.
- Safety Glasses: Always protect your eyes from splashes or sprays.
- Fluid-Resistant Gloves: Wear sturdy, nitrile or neoprene gloves to protect your hands from the fluid and from sharp edges on broken parts.
- Long Sleeves: Cover your arms to minimize skin contact with hydraulic fluid.
What Are Your Actual Repair Options in the Field?
You’ve made the area safe, but now you’re faced with a broken fitting. What can you actually do with limited tools to create a reliable seal and stop the leak?
Your most effective option is to replace the failed end with a field-attachable, or “reusable,” fitting. For a very temporary fix on certain hose types, a specialized hose repair clamp may be used to get the machine moved.
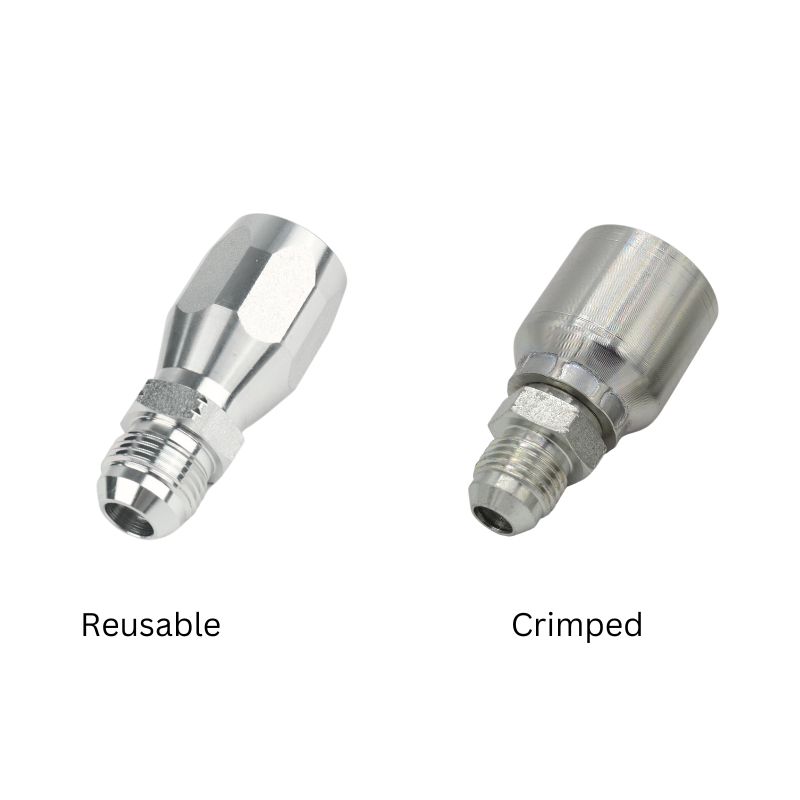
The Best Solution: Field-Attachable Fittings
These fittings are the gold standard for field repairs. They consist of two pieces: an outer socket and an inner nipple. The repair process is mechanical:
- Cut the damaged hose end off cleanly.
- Screw the socket onto the hose counter-clockwise.
- Lubricate and screw the nipple into the socket clockwise.
This action creates a secure, high-pressure seal. At Topa, we provide these fittings for many common hose types, and they are designed to match the performance of a factory-crimped assembly when installed correctly.
Temporary Fix: Emergency Clamps
In some situations, you might use a bolt-on emergency clamp. These are heavy-duty devices that surround the damaged section of the hose and are tightened with bolts to clamp down on the leak. It is critical to understand that these are temporary, low-pressure solutions meant only to get a machine moved to a safe location for a proper repair. They are not a permanent fix and should not be used in high-pressure or high-vibration applications for any extended period.
What You Must NEVER Do: Welding
Never, ever attempt to weld a hydraulic fitting or tube. The heat from welding can create a catastrophic failure by weakening the metal. More importantly, residual hydraulic fluid inside the line can vaporize into an explosive gas when heated. An attempt to weld a line can turn it into a pipe bomb. There is no situation where welding a pressurized hydraulic component is safe or acceptable.
| Repair Method | Reliability | Required Tools | Pressure Rating | Use Case |
| Field-Attachable Fitting | Permanent | Hand Wrenches, Cutter | Full System Pressure | Best Practice for all field repairs |
| Emergency Clamp | Temporary | Wrench/Socket | Low Pressure Only | “Get-Home” fix, not for operation |
| Welding | Prohibited | Welder | Zero | NEVER USE – Extreme explosion hazard |
What Should Be in Your Emergecy Repair Kit?
An equipment failure is stressful enough. The last thing you need is to realize you don’t have the right parts or tools on hand to perform the repair you know how to do.
A well-stocked emergency kit is your best defense against long downtimes. It should contain a curated selection of fittings, hose, and the basic tools needed to perform a field replacement for your specific equipment.
We actively help our long-term clients build these kits. A fleet manager for a logistics company in the UAE once ordered a huge variety of fittings from us. I worked with him to analyze his fleet’s most common hose sizes and thread types. Based on that, we pre-packaged small “truck kits” with the essentials. This proactive approach has saved his team countless hours. A prepared engineer is an effective engineer.
The Essential Tools
You don’t need a full workshop, just the basics to get the job done. Keep these in a dedicated, easy-to-grab toolbox.
- Two Good Wrenches: One to hold the hose or adapter, and one to turn the fitting. Adjustable wrenches can work, but a set of fixed-size wrenches is better to avoid stripping the hex.
- Hose Cutter: A proper hydraulic hose cutter provides a clean, square cut. A hacksaw can work in a pinch, but it’s messy and can contaminate the line with metal debris.
- Vise-Grips or a Clamp: To hold the fitting or hose securely while you work.
- Flashlight: Failures often happen in poorly lit areas.
The Critical Components
These are the parts you will be replacing. Your kit should be tailored to your machinery.
- Field-Attachable Fittings: Stock the 2-3 most common sizes and thread types on your equipment (e.g., -06 JIC, -08 ORFS).
- Bulk Hose: Carry a few feet of the most common hose types that match your fittings.
- Adapters: A small selection of common adapters (e.g., a JIC to NPT elbow) can be incredibly useful.
- O-Rings and Seals: A small kit with common O-rings for ORFS fittings and bonded seals for BSPP ports.
The Supporting Items
These small items make the job cleaner, safer, and more successful.
- Clean Rags: For cleaning fittings and wiping up spills.
- Lubricant: A small bottle of clean hydraulic fluid to lubricate threads and O-rings.
- Zip Ties and Duct Tape: For temporarily securing a leaking line or protecting a new hose from abrasion.
- Containment Pan & Absorbent Pads: To manage spills and protect the environment.
Identify the Problem
Before attempting any repair, the first step is to identify the exact issue with the hydraulic fitting. Misdiagnosis often leads to wasted time, unnecessary part replacements, or even larger failures. Careful inspection ensures you target the true cause of the problem.

Signs of a Failing Hydraulic Fitting
Hydraulic fittings usually give clear warning signs before a total failure. Watch for the following indicators during operation or inspection:
- Visible leaks at the connection – Dripping or weeping fluid around the joint often means worn seals or loose fittings.
- Fluid spraying under pressure – A dangerous condition showing a complete seal failure or cracked fitting.
- Damaged O-rings or seals – Flattened, cut, or missing O-rings compromise sealing capability.
- Loose or corroded threads – Rust or stripped threads weaken the connection, leading to leaks.
- Reduced system performance – Loss of pressure, slower actuation, or overheating may point to hidden leaks in fittings.
Quick Field Inspection Checklist
A simple checklist can help technicians quickly assess the problem without dismantling the entire system.
| Inspection Point | What to Check | Possible Issue |
| Threads | Look for stripped, worn, or dirty threads | Cross-threading, poor seal, or weakened connection |
| O-rings/Seals | Check if cracked, missing, or swollen | Seal failure, leak risk |
| Hose End | Inspect for bending, cracks, or fraying | Hose damage, risk of burst |
| Fitting Body | Look for corrosion, dents, or cracks | Compromised fitting, needs replacement |
| Tightness | Test for over- or under-tightening | Leaks due to improper torque |
Replace or Reseat the Fitting
When a hydraulic fitting fails, the choice between a quick fix and a full replacement depends on the severity of the damage and the availability of parts in the field. Acting quickly can minimize downtime, but choosing the wrong repair approach may risk safety or system performance.
Temporary vs Permanent Fix
- Temporary Field Fix In emergencies, fittings may be tightened or reseated to control small leaks. Replacing an O-ring on-site can also restore short-term sealing. However, these fixes are temporary and should be followed by a permanent solution as soon as possible.
- Permanent Fix The most reliable method is replacing the damaged fitting or hose with approved parts. Permanent fixes ensure proper sealing surfaces, correct torque, and long-term system reliability, reducing the chance of repeated leaks.
How to Replace a Damaged Fitting
Follow these steps to safely replace a hydraulic fitting in the field:
- Remove the old fitting carefully – Avoid damaging the hose or port threads during removal.
- Clean threads and sealing surface – Dirt or metal particles can prevent proper sealing.
- Install new O-ring or bonded seal – Always use new seals that match the system specification.
- Hand-tighten the fitting to align threads – Ensures correct alignment and avoids cross-threading.
- Torque to specification if possible – Use a torque wrench for accuracy; overtightening or undertightening leads to leaks.
Field Tip
If no torque wrench is available in the field, tighten the fitting snugly by hand and apply a quarter to half turn with a wrench. Once back in the workshop, recheck torque with calibrated tools.
| Issue Found | Quick Fix | Permanent Solution |
| Damaged O-ring | Replace with spare | Replace with correct size/compound |
| Cross-thread | Reseat carefully | Replace fitting or port |
| Minor leak | Retighten fitting | Replace fitting and seal |
| Cracked fitting | None | Replace entire fitting |
Test the Repair
Once the fitting has been replaced or reseated, the repair process is not complete until the connection is tested. Skipping this step can result in undetected leaks, leading to repeat failures or safety hazards. A proper test confirms the integrity of the repair before the equipment is returned to service.
System Pressure Test
- Re-pressurize the hydraulic system slowly to avoid sudden surges that may stress the new fitting.
- Inspect the connection point carefully while pressure builds up. Look for drips or spray under light.
- Use a clean cloth to wipe the joint—this helps detect small fluid seepage that may not be visible.
- Check torque if needed if any minor seepage is detected, retighten carefully without over-torquing.
Verify Reliability
- Operate the equipment under normal load conditions for a short trial period.
- Monitor pressure, flow, and temperature readings to ensure stable performance.
- Inspect the fitting after operation—if no leaks are visible, the repair is considered complete.
- Record the repair in the maintenance log to track part replacement and service history.
Preventing Future Hydraulic Fitting Failures
Fixing a leak is only part of the job. To reduce downtime and extend system life, it’s critical to adopt preventive measures. Regular inspections and good installation habits can stop small issues from becoming costly failures.
Regular Maintenance Checklist
Include these checks in your weekly or monthly schedule:
- Inspect hoses and fittings weekly for leaks, corrosion, or visible wear.
- Replace worn O-rings immediately instead of reusing old seals.
- Clean fittings before assembly to remove dirt, rust, or metal shavings.
- Torque to manufacturer specifications using a calibrated wrench.
- Use compatible fluids and sealants to avoid chemical damage.
Long-Term Practices
Beyond routine checks, build habits that strengthen long-term system reliability:
- Train operators to spot early leaks so problems are caught before escalation.
- Keep spare fittings and seals in field kits to reduce downtime during repairs.
- Standardize fittings (BSP, NPT, Metric) across equipment to avoid mismatches.
- Document repairs and inspections to track recurring issues and improve planning.
Why Prevention Matters
Consistent maintenance not only prevents leaks but also lowers overall operating costs. By combining inspections, proper training, and standardization, hydraulic systems remain safer, more reliable, and easier to service in the field.
Conclusion
A field repair is about preparation. With a well-stocked kit, a commitment to safety, and knowledge of reusable fittings, you can turn a crisis into a routine, manageable task. At Topa, we supply high-quality Field attachable hydraulic fittings, hoses, and couplings with fast delivery and competitive prices. Send us your inquiry today—our engineering team will provide the best solution for your system needs.
FAQ
What is the quickest way to stop a leaking hydraulic fitting in the field?
The fastest method is to reseat the fitting or replace the O-ring if available. This is only a temporary fix until a proper replacement can be installed.
Can I reuse old O-rings during a field repair?
No. Old O-rings may be cracked, flattened, or chemically damaged. Always use new seals that match the manufacturer’s specifications.
How tight should I make a hydraulic fitting?
Fittings should be tightened to the manufacturer’s torque specifications. If no torque wrench is available, hand-tighten first, then add a quarter to half turn with a wrench.
How do I test a hydraulic fitting after repair?
Slowly re-pressurize the system, inspect the connection for leaks, wipe with a clean cloth, and run the equipment under normal operating conditions.
What tools should I carry for hydraulic field repairs?
A field kit should include O-rings, spare fittings, a thread gauge, torque wrench, sealant, and clean cloths for wiping and inspection.
How can I prevent hydraulic fittings from failing again?
Regularly inspect hoses and fittings, replace worn seals immediately, torque to spec, keep components clean, and train operators to detect early leaks.