A leaking reusable hydraulic fitting is almost always due to improper assembly, mismatched parts, or component damage. To troubleshoot, you must systematically check for a proper assembly gap, confirm hose and fitting compatibility, and inspect all parts for wear or damage before reassembly.
Dealing with a persistent leak is one of the most frustrating things in hydraulics. I’ve been there many times. The good news is that it’s rarely the fault of a high-quality fitting itself. It’s almost always a problem in the process. Reusable fittings are a fantastic piece of engineering, but they demand precision.
Was the Fitting Assembled Incorrectly?
You tightened the fitting down, but it’s still seeping oil. This makes you question the fitting’s quality, but the issue is likely the technique, not the component.
The most common cause of leaks is incorrect assembly. Either the nipple was over-tightened, eliminating the required gap, or the socket was not screwed onto the hose far enough.
A reusable fitting is a precision instrument. Unlike a simple nut and bolt, it is not “tighter is better.” The seal is created by a precise wedging action that depends on each part being in the correct position. If you get this geometry wrong, it will leak. Learning the right feel and the visual cues of a correct assembly is the most important skill for using these fittings successfully. Let’s examine the common mistakes.
Look for the Critical Assembly Gap
The most important sign of a correct assembly is a small gap between the socket hex and the nipple hex. This gap should be about 1/16 inch (1.5mm).
- Why the gap is good: This space tells you the nipple has screwed into the socket to the correct depth. The internal parts have properly wedged the hose to create the seal.
- Why no gap is bad: If the two hexes are touching, you have likely over-tightened the fitting. This can damage the threads, flatten the hose too much, and paradoxically create a leak path. It puts extreme stress on the parts without improving the seal.
Check the Socket Installation Depth
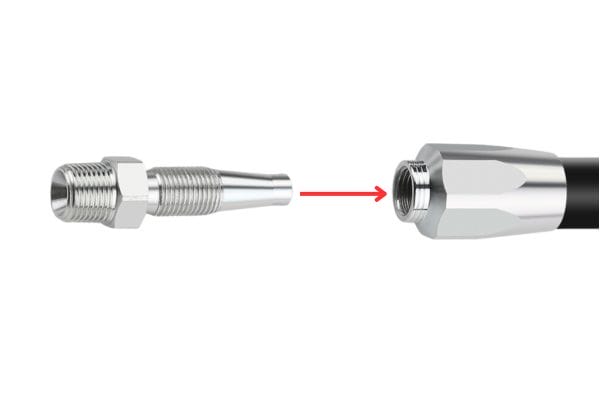
The socket must have a bulldog grip on the hose. This is the foundation of the entire connection.
- The Process: To install it, you screw the socket counter-clockwise onto the hose until the hose end bottoms out inside. The sharp internal threads must cut into the hose cover and bite firmly into the wire reinforcement.
- The Mistake: If the socket is not screwed on far enough, it doesn’t have enough grip. When you tighten the nipple, the entire hose can be pushed back out of the socket, resulting in a weak connection and a certain leak.
Did You Use Lubrication?
Assembling the fitting dry is a recipe for failure.
- The Reason: Lubricating the nipple threads and the inside of the hose with hydraulic oil is essential. This lubrication allows the parts to turn smoothly against each other.
- The Problem with Dry Assembly: Without lube, the friction is immense. This can make you think the fitting is fully tightened when it is not. It can also cause the threads to gall or strip, permanently damaging the fitting.
Are the Hose and Fitting Compatible?
You have a leak even with perfect assembly. The problem might be that you’ve used parts that were never meant to be together, creating a dangerous mismatch.
Using a fitting designed for one hose standard on a different type of hose is a guaranteed failure. A fitting for a single-wire hose will not seal on a thicker two-wire hose.

I cannot stress this enough: reusable fittings are not universal. They are engineered with very specific dimensions to match a particular hose construction. Grabbing a fitting and hose just because they have the same dash size is a huge mistake. The inside and outside diameters of hoses vary, and the fitting is designed to accommodate only one specific set of dimensions. Always verify your parts before you start.
Why Hose Construction Matters
Different hoses have different wall thicknesses and reinforcement layers. A fitting is designed to grip and seal one specific type.
- SAE 100R1AT Hose: Has one layer of high-tensile steel wire braid.
- SAE 100R2AT Hose: Has two layers of steel wire braid, making it thicker and stronger.
A fitting made for the thinner 100R1AT hose will not have enough room to accommodate the thicker wall of a 100R2AT hose. You simply won’t be able to assemble it correctly.
How to Decode Your Hose Layline
The information you need is printed right on the side of the hose. This text is called the layline. Look for the SAE or EN standard. It will clearly say something like “SAE 100R2AT” or “EN 853 2SN.” This code tells you exactly what kind of hose you have. You must then look at your fitting supplier’s catalog (like ours at Topa) to find the reusable fitting series designed for that exact standard.
Common Mismatches and Their Results
Using mismatched parts will lead to predictable failures. Here is what happens when you get it wrong:
| Fitting Type | Hose Type | Expected Result of Mismatch |
| For 1-Wire Hose | 2-Wire Hose | Socket is too small. Nipple cannot enter far enough to seal. Assembly is impossible or results in an immediate leak. |
| For 2-Wire Hose | 1-Wire Hose | Socket grip is too loose. Nipple tightens too far and may bottom out, but the hose is not properly compressed. High risk of blow-off. |
| Screw-Type | SAE 100R5 Hose | Totally incompatible. 100R5 hose has a fabric cover and requires a different, clamp-style reusable fitting. |
Have You Inspected the Components for Damage?
You’re re-using an old fitting to save money, but it leaks. The fitting may have reached the end of its life, with hidden damage preventing a good seal.
Even though they’re called “reusable,” these fittings can wear out or get damaged. Always inspect the threads and sealing surfaces of both the nipple and socket before any assembly.

A fitting that has been over-tightened in the past, dropped on concrete, or exposed to corrosion might look okay at a glance but be unusable. A small scratch on a sealing surface or a slightly stripped thread is all it takes to cause a persistent leak that no amount of tightening will fix.
Inspecting the Socket for Wear
The socket does the heavy lifting of gripping the hose. Its internal threads must be in good condition.
- Check the Threads: Look inside the socket. The threads should be sharp and well-defined. If they look flattened, worn, or stripped, the socket cannot get a secure bite on the hose. Discard it.
- Look for Cracks: Examine the outside of the socket, especially around the hex. Any visible crack means the part is compromised and could fail under pressure.
Inspecting the Nipple for Damage
The nipple forms two seals: one with the hose and one with the mating port.
- Main Threads: Check the threads that screw into the socket. If they are galled (roughened) or stripped from a previous over-tightening, the fitting is trash.
- Sealing Surface: This is the most critical part. For a JIC fitting, the 37-degree flared surface must be perfectly smooth. Any nicks, scratches, or dents will create a leak path. For a pipe thread (NPT) fitting, the tapered threads must be clean and undamaged.
What About the Hose Cut?
Your components include the hose itself. The quality of the hose end is part of the assembly. A bad cut is a form of damage that prevents a good seal.
- Must Be Square: The hose must be cut at a perfect 90-degree angle. Use a proper hose cut-off saw.
- Why it Matters: An angled cut means the hose cannot bottom out evenly inside the socket. This leaves a built-in leak path from the very beginning.
Could the Leak Source Be the Port Connection?
You see a drip and immediately blame your new hose assembly. But the fluid could be coming from the connection point, not from your reusable fitting’s seal on the hose.
Before disassembling your hose, thoroughly clean the area and pinpoint the leak’s exact origin. The issue may be a bad adapter, a damaged port, or a failed O-ring.

It’s a common mistake to assume the newest part is the faulty one. Many times, I’ve seen technicians waste time rebuilding a perfectly good hose assembly when the real problem was a 10-cent O-ring on the adapter it was screwed into. Always confirm the source of the leak before you reach for your wrenches.
The “Clean and Watch” Method
This is the professional way to find a leak’s true origin.
- De-pressurize the System: Safety first. Never work on a pressurized system.
- Clean a Large Area: Using a degreaser and rags, clean the fitting, the hose around it, and the component it connects to until they are perfectly dry and free of oil.
- Re-pressurize and Observe: Start the system. Watch the clean area closely. Do not use your hands to feel for leaks. Look for the very first sign of wetness. This will tell you exactly where the fluid is escaping.
Common Leaks at the Port
If the leak is not coming from between the hose and the socket, the problem lies at the nipple’s connection point.
- O-Ring Seals (ORB/ORFS): The O-ring could be missing, old and hardened, twisted during installation, or have a small nick in it.
- Tapered Threads (NPT/BSPT): The thread sealant tape or paste might be old, insufficient, or incorrectly applied.
- Flared Seals (JIC/SAE): There could be a scratch or piece of dirt on the sealing cone of either the nipple or the adapter.
Inspect the Mating Surface
The fitting can only seal against a good surface. If the port itself is damaged, no fitting will fix the leak. Check the thread port or adapter for cracks, corrosion, or damage to the sealing surfaces. Over-tightening in the past can crack a valve body or manifold, creating a problem that requires a much bigger repair.
Are External Stresses Causing the Failure?
Your assembly was perfect, but it started leaking after a few weeks of harsh use. The problem may not be the fitting, but the intense forces acting upon it.
Constant, heavy vibration or a poorly routed hose puts immense side-load and stress on a fitting. This can cause even a perfectly installed connection to work itself loose and leak over time.

A hydraulic fitting is designed to hold pressure, not to act as a structural support for the hose. If the hose is whipping around, being pulled on, or subject to extreme vibration, that energy gets transferred directly to the fitting connection. This is a system design problem, and just re-tightening or replacing the fitting will not solve it. You have to address the root cause of the external stress.
The Destructive Power of Vibration
Vibration is a relentless enemy of threaded connections. The constant shaking can slowly overcome the friction holding the threads in place, allowing the nipple to back off slightly. This is enough to break the seal and start a leak. While re-torquing might fix it temporarily, the real solution is to isolate the hose from the vibration using cushioned clamps to secure it to a stable frame.
Consequences of Poor Hose Routing
The path your hose takes is critical. A bad route puts constant physical strain on the fittings at either end.
- Hose Too Short: A hose pulled taut has no room to flex. Every machine movement pulls directly on the fitting.
- Hose Too Long: An excessively long hose can get snagged on other parts or create a “whip” effect that hammers the connection.
The hose should always have gentle bends and enough slack to accommodate movement without stressing the fittings.
Add Support with Clamps
Properly supporting the hose is a non-negotiable part of a reliable hydraulic system. Use cushioned clamps to anchor the hose to the machine frame at regular intervals. Clamping the hose within a few inches of the fitting is especially effective. This provides strain relief and prevents machine vibration from reaching the connection point.
When Is It Time to Replace the Fitting?
You have tried everything on this list, and the fitting still weeps oil. Trying to salvage a faulty part is now costing you more in downtime than a new fitting would.
A reusable fitting is not infinitely reusable. If it continues to leak after you have confirmed correct assembly, component compatibility, and a lack of external stress, it’s time to discard it.
Clear Signs of a Non-Salvageable Fitting
If you see any of these signs, do not attempt to reuse the part. Its structural integrity is compromised.
- Any visible cracks on the socket or nipple.
- Threads that are visibly stripped, crossed, or galled (rough and torn up).
- A JIC nipple with a flare that is visibly deformed, dented, or deeply scratched.
- Heavy corrosion that has created pitting on any sealing surface or thread.
The Real Cost of a Persistent Leak
A small drip might not seem like a big deal, but the costs add up quickly.
- Fluid Cost: Hydraulic oil is expensive. A small leak can lose gallons over weeks or months.
- Environmental Impact: Oil leaks contaminate the ground and can lead to fines.
- Safety Hazards: Leaked oil creates slip-and-fall risks. A high-pressure pinhole leak can cause a fluid injection injury, which is a medical emergency.
- Downtime: A machine that is constantly being patched up is not a productive machine.
Conclusion
Fixing a reusable fitting leak is a methodical process. By checking your assembly, compatibility, and external factors, you can almost always find and correct the root cause of the problem.
FAQ
Can reusable hydraulic fittings handle high pressure?
Yes, but only when matched with the correct hose type and assembled properly.
How many times can I reuse a reusable fitting?
Typically several times, but lifespan depends on handling, environment, and whether components remain undamaged.
Are reusable fittings suitable for all hose types?
No, they are designed for specific hose constructions. Always check the manufacturer’s catalog.
Do reusable fittings require special tools for assembly?
Only basic hand tools like wrenches are needed, but correct technique is essential.
Can reusable fittings be used in mobile equipment?
Yes, they are commonly used in field repairs for construction, mining, and agricultural machines.
What’s the main advantage of reusable fittings over crimped ones?
They can be installed or replaced on-site without expensive crimping machines, reducing downtime.