Struggling with hydraulic leaks and costly downtime? Field repairs can be a headache when you don’t have the right parts, causing frustrating delays and lost profits on the job.
The key to successfully using reusable hydraulic fittings is ensuring proper identification, assembly, and inspection. These fittings, which don’t require special crimping machines, can be assembled and disassembled with basic hand tools, making them ideal for quick, reliable field repairs if done correctly.
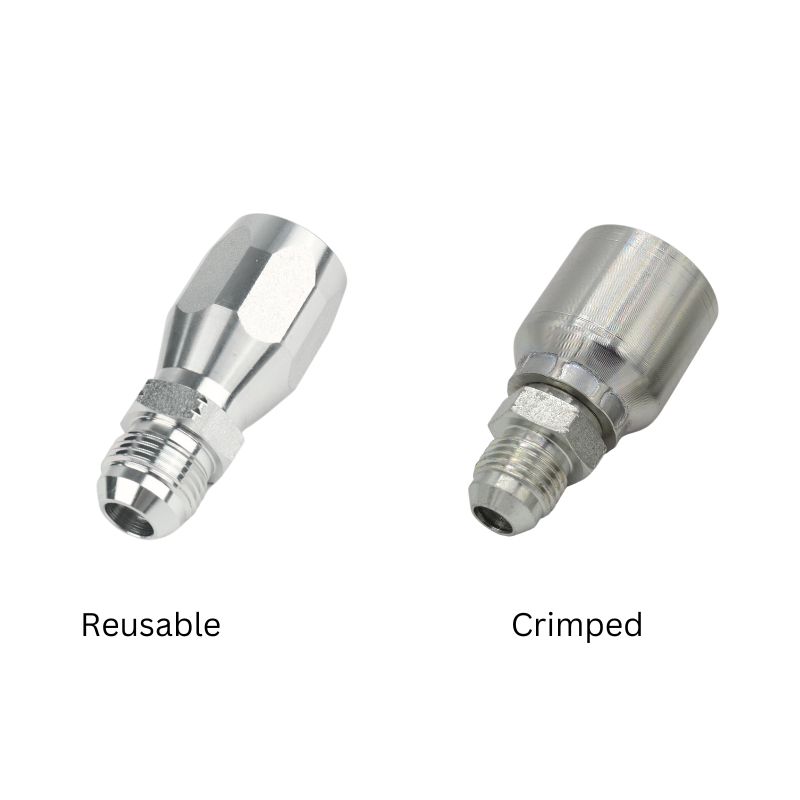
What Exactly Makes a Fitting Reusable?
Confused about what “reusable” really means for hydraulic fittings? Misunderstanding this term can lead to improper use, unexpected system failures, and wasted components, costing you time and money.
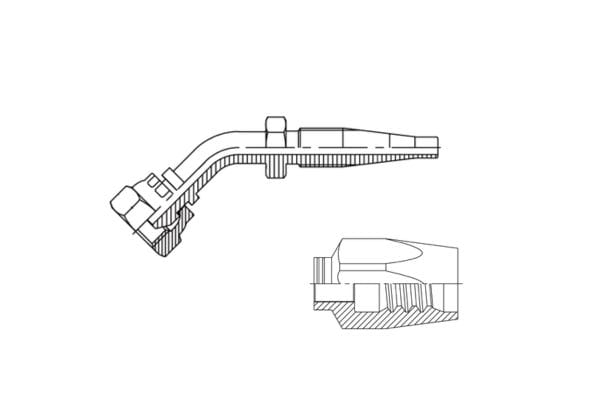
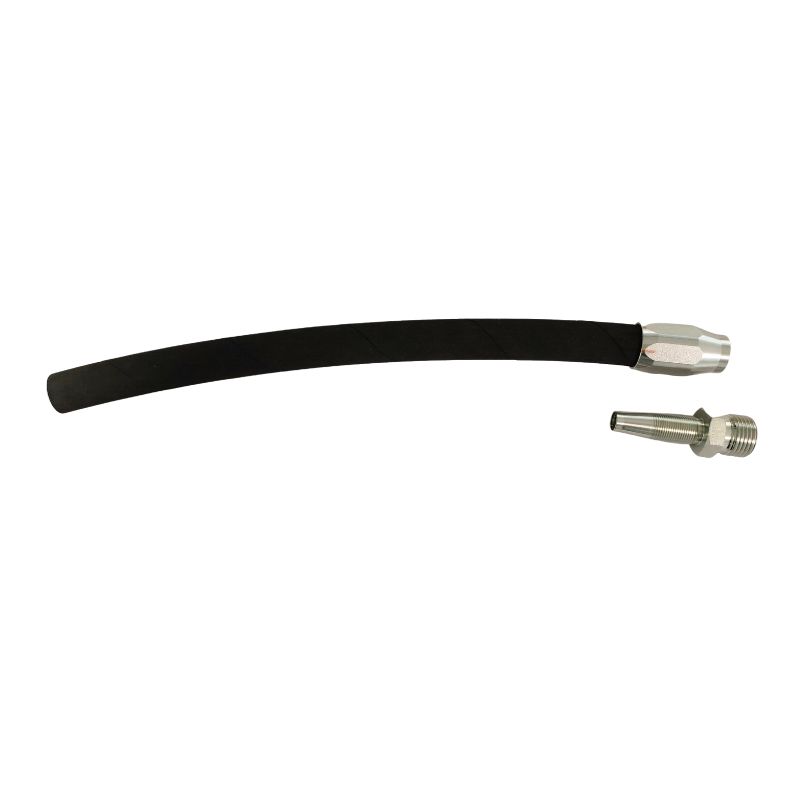
A hydraulic fitting is considered “reusable” because its two-piece design—a socket and a nipple—allows it to be attached to a hose without a crimper. This means you can disassemble it from an old hose and re-install it on a new one using only hand tools.
The brilliance of the reusable fitting lies in its mechanical design. Unlike permanent crimp fittings that are compressed onto a hose, reusable fittings work on a thread and seal principle. This design is what makes them “field attachable,” a term we often use in the industry.
The Core Components: Socket and Nipple
The fitting consists of two main parts. The socket is the outer shell with an internal thread. The nipple is the inner part that goes inside the hose tube. When you assemble it, the hose is essentially clamped securely between these two components. This simple, robust design is what gives it strength.
Why No Special Tools Are Needed
The assembly relies on mechanical threading. You screw the socket onto the outside of the hose, and then you screw the nipple into the socket. The threads do all the work of creating a tight, high-pressure seal. This is why you only need standard wrenches for the job, making it perfect for on-the-spot repairs.
| Feature | Reusable Fittings | Crimped Fittings |
| Tools Required | Basic hand wrenches | Hydraulic crimping machine |
| Installation Site | Field or workshop | Workshop only |
| Reusability | Fitting can be reused | Fitting is single-use |
| Initial Cost | Higher per fitting | Lower per fitting |
| Repair Speed | Very fast in the field | Requires transport to workshop |
How Do You Properly Match a Reusable Fitting to a Hose?
Choosing the wrong hose and fitting combination? This common mistake guarantees a weak connection, leading to dangerous leaks, hose blow-offs, and damage to your expensive hydraulic equipment.
To correctly match a reusable fitting, you must ensure three things: the hose type is compatible (e.g., 100R2AT), the fitting series matches the hose, and the inside diameters of both the hose and fitting are identical. Check manufacturer specifications for confirmation.
I cannot stress this enough: compatibility is not something you can guess. In my experience dealing with customers from the Philippines to the USA, mismatching is the root cause of over half of all fitting failures. A fitting designed for a one-wire braid hose (like 100R1) will not seal properly on a two-wire braid hose (100R2), because the outer diameters and construction are different. The socket is designed to grip a specific hose thickness and cover type. Using the wrong one means you’re creating a failure point from the very beginning.
Understanding Hose Designations
Hydraulic hoses have codes like “SAE 100R1AT” or “SAE 100R2AT.” These aren’t just random numbers. They specify the hose’s construction, pressure rating, and number of wire reinforcement layers. Reusable fittings are engineered to work with these specific constructions.
- 100R1AT: Typically has one layer of high-tensile steel wire braid.
- 100R2AT: Has two layers of steel wire braid, making it suitable for higher pressures.
The Importance of Dash Sizes
Both hoses and fittings use a “dash size” system (e.g., -04, -06, -08) to indicate the inside diameter (I.D.) in sixteenths of an inch. A -08 hose has an I.D. of 8/16″ or 1/2″. You must match the dash sizes perfectly. A -06 fitting will not work on a -08 hose.
Here’s a quick reference table we provide to our clients.
| Dash Size | Hose I.D. (Inches) | Hose I.D. (mm) | Common Applications |
| -04 | 1/4″ | 6.4 mm | Low-flow pressure lines |
| -06 | 3/8″ | 9.5 mm | Medium-flow return/pressure lines |
| -08 | 1/2″ | 12.7 mm | Standard industrial applications |
| -12 | 3/4″ | 19.0 mm | High-flow suction/return lines |
| -16 | 1″ | 25.4 mm | Heavy equipment, high-volume lines |
Always double-check the markings on both the hose and the fitting packaging. If you’re ever in doubt, consult the manufacturer’s catalog or contact your supplier. It’s a simple step that prevents big problems.
What is the Correct Assembly Process Step-by-Step?
Are your field repairs failing sooner than expected? Improper assembly techniques, even small ones, can compromise the integrity of the connection, leading to gradual leaks or sudden, catastrophic blowouts.
The correct assembly process involves five key steps: cleanly cutting the hose, lubricating the components, screwing the socket on counter-clockwise, inserting the nipple, and tightening it until the socket and nipple hexes are properly spaced. Leave a small gap; do not overtighten.
As a supplier, our goal is to ensure our customers, whether they’re farmers in Australia or construction business owners in Mexico, can use our products successfully. A perfectly manufactured fitting can still fail if it’s not put together right. We have seen that the most common error is overtightening. People think tighter is better, but with reusable fittings, that’s not true. Overtightening can crack the socket, strip the threads, or cut into the hose reinforcement, creating a weak spot. Following a precise method is key.
Step 1: Prepare the Hose
Use a fine-tooth hacksaw or a proper hose cutter to get a clean, square cut. A crooked cut means the hose won’t seat properly against the nipple, creating a potential leak path. After cutting, make sure to clean the inside of the hose to remove any debris.
Step 2: Lubricate
Apply a light coat of hydraulic oil or thread lubricant to the inside of the hose, the hose threads, and the nipple threads. This is crucial. It reduces friction during assembly, preventing the hose from tearing or twisting and ensuring the threads engage smoothly.
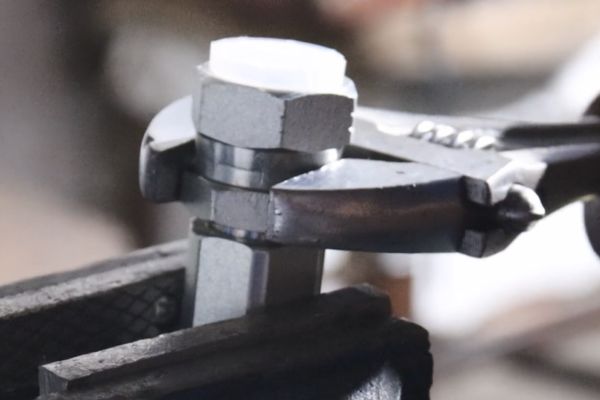
Step 3: Install the Socket
This is the part many people get wrong. Place the socket in a vise and screw the hose into it counter-clockwise until the hose bottoms out inside the socket. Then, back the hose off a quarter turn. This sets the hose correctly for the next step.
Step 4: Install the Nipple
Now, screw the nipple (the male threaded part) clockwise into the socket and hose. You will feel resistance as the threads engage and the nipple expands the hose inside the socket.
Step 5: Final Tightening
Use two wrenches to tighten the nipple until the hex on the nipple is close to the hex on the socket. Do not let them touch. There should be a visible gap of about 0.8mm to 1.5mm (1/32″ to 1/16″). This gap is essential; it shows the assembly is under the correct tension without being overtightened.
How Many Times Can You Actually Reuse a Fitting?
Worried about when to reuse and when to replace a fitting? Using a worn-out fitting is a big risk, as it might fail under pressure, causing dangerous oil sprays and stopping your operations.
While there’s no fixed number, a reusable fitting‘s lifespan depends on inspection. It can be reused multiple times as long as it passes a thorough check for damaged threads, cracks, corrosion, and deformation. If any damage is found, it must be discarded immediately.
I often get this question from new customers, especially price-conscious buyers from regions like Africa and Southeast Asia. They want to maximize the value of every component, which is completely understandable. The name “reusable” implies multiple lives, but it doesn’t mean infinite lives. The key is shifting from a mindset of “how many times” to “what condition is it in.” A fitting used once in a highly corrosive environment might be less reusable than one used five times in a clean, dry setting. Safety should always be the priority over cost-saving in this instance.
The Critical Inspection Checklist
Before you even think about putting a used fitting on a new hose, you must perform a detailed inspection. We advise all our partners to train their technicians on this simple but vital process.
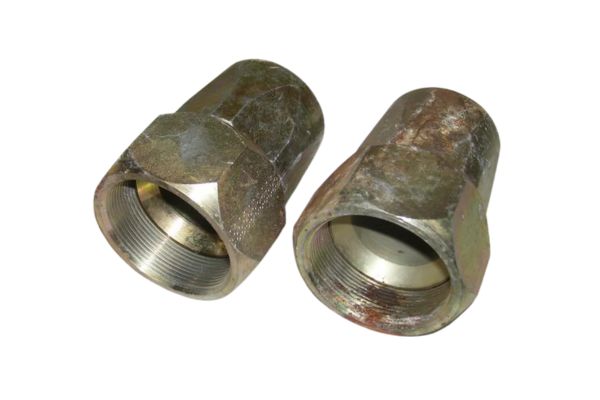
- Check the Threads: Look closely at the threads on both the nipple and inside the socket. Are they sharp and well-defined? Any signs of stripping, cross-threading, or flattening mean the fitting will not seal correctly.
- Look for Cracks: Inspect the hex and body of both pieces for any hairline cracks, especially around the corners. High pressure can turn a tiny crack into a complete failure.
- Examine for Deformation: Is the hex rounded off from improper wrench use? Is the body bent or oval-shaped? Any change from its original shape compromises its strength.
- Inspect Sealing Surfaces: Check the tapered or flared end of the nipple. Any nicks, scratches, or corrosion on this surface will prevent a metal-to-metal seal and cause leaks.
| Condition to Check | Good (Safe to Reuse) | Bad (Discard Immediately) |
| Threads | Clean, sharp, and undamaged | Stripped, crossed, flattened, or corroded |
| Body/Hex | No visible cracks, original shape | Any visible cracks, rounded hex, bent |
| Sealing Surface | Smooth, free of nicks or scratches | Dented, scratched, pitted, or corroded |
| Overall Condition | Clean, retains original plating | Heavy rust, severe discoloration |
If a fitting fails even one of these checks, it’s not worth the risk. The cost of a new fitting is tiny compared to the cost of equipment failure, downtime, and potential safety incidents.
What Are the Common Signs of an Improperly Installed Fitting?
How can you tell if a reusable fitting is about to fail? Ignoring the early warning signs of a bad installation can lead to a sudden hose burst, endangering personnel and causing significant oil spills.
The most common signs of an improper installation are visible leaks around the socket, hose cover blisters or bubbles near the fitting, and the hose itself pulling out of the fitting. Any of these signs mean the assembly must be depressurized and repaired immediately.

A small drip is not just a nuisance; it’s a warning. It’s the hydraulic system telling you that something is wrong. A proactive check can prevent a reactive crisis. Many operators get used to seeing a little bit of oil, but this “sweating” is often the first stage of a failure that could have been prevented with a better assembly.
Reading the Warning Signs
Your hydraulic system provides clear clues when a fitting isn’t right. Here’s what to look for during routine equipment inspections.
- Weeping or Drips: This is the most obvious sign. Oil should not be escaping from the connection. If you see wetness or an active drip at the point where the hose enters the socket, the seal is compromised. This could be due to overtightening, undertightening, or a damaged sealing surface.
- Blisters on the Hose Cover: If you see a bubble or blister forming on the outer cover of the hose within a few inches of the fitting, it’s a serious red flag. This indicates that high-pressure oil has breached the inner tube and is trapped under the cover. The assembly is failing from the inside out and is at high risk of bursting.
- Hose Slippage: Look for any sign that the hose is backing out of the socket. You can sometimes see a fresh, unweathered line on the hose right at the edge of the fitting, indicating movement. This means the mechanical grip is insufficient and a complete blowout is imminent.
Troubleshooting Common Problems
When we provide after-sales support, we often use a simple table to help our clients in places like Mauritius or Ghana troubleshoot these issues quickly.
| Sign | Possible Cause | Solution |
| Leaks at the socket | – Undertightened – Overtightened (cracked socket) – Wrong hose/fitting match | Check tightness. If correct, disassemble, inspect for damage, and reassemble with new components if needed. Verify compatibility. |
| Blisters near fitting | – Hose cut improperly – Internal damage during assembly – Wrong fitting for hose | Depressurize immediately. Cut out the failed section and install a new hose assembly. Review assembly procedure. |
| Hose pulling out | – Hose not fully seated in socket – Wrong hose/fitting match – Extreme pressure spikes | Depressurize immediately. This is a critical failure. Re-do the entire assembly with new components, ensuring the hose bottoms out in the socket. |
Regularly inspecting your assemblies for these signs is a non-negotiable part of safe hydraulic system maintenance.
When Should You Choose Reusable Fittings Over Crimped Fittings?
Unsure when to use a reusable fitting versus a standard crimped one? Making the wrong choice can lead to inefficient repairs, higher long-term costs, or an inability to fix equipment in the field.
Choose reusable fittings for field repairs, remote locations, or applications requiring frequent modifications where access to a crimper is impractical. Opt for crimped fittings for high-volume, factory production runs where speed, consistency, and lower unit cost are the priority.
There is no single “best” type of fitting; it’s about choosing the right tool for the job. While we manufacture and supply both types, I always advise clients to think about their operational reality. If your equipment operates hundreds of miles from the nearest city, having a stock of reusable fittings and bulk hose is not just a convenience, it’s a necessity for keeping your business running.
The Case for Reusable Fittings
The main advantage is flexibility and independence. You are not tied to a workshop or a heavy, expensive crimping machine.
- Emergency Field Repairs: This is the number one reason to use them. A blown hose on a harvester or excavator can be fixed on-site in under 30 minutes.
- Prototyping and Custom Builds: When you are designing a new hydraulic circuit, you may need to change hose lengths and routings multiple times. Reusable fittings make this process easy and cost-effective.
- Low-Volume, High-Mix Operations: If you are a maintenance shop that services many different types of equipment, stocking reusable fittings allows you to make a wide variety of assemblies without needing a huge inventory of pre-made hoses.
The Case for Crimped Fittings
Crimped fittings excel in controlled environments where efficiency and repeatability are paramount.
- OEM Manufacturing: If you are building hundreds of identical machines, crimping is faster and more consistent. The per-unit cost of the fitting is also lower.
- Extremely High-Pressure/Critical Applications: While reusable fittings are very reliable up to their specified pressure ratings, some engineers prefer the perceived security of a factory-quality crimp for the most demanding applications.
- Vibration-Heavy Environments: A properly crimped connection offers excellent resistance to vibration, which is a key consideration in some industrial machinery.
Here’s a summary to guide your choice:
| Scenario | Best Choice | Why? |
| Equipment breaks down in a remote field | Reusable | Allows for immediate, on-the-spot repair with basic tools. |
| Manufacturing 100 new tractors | Crimped | Faster production, lower cost per assembly, high consistency. |
| A maintenance shop services diverse machinery | Reusable | Offers flexibility to create custom hoses as needed for various repairs. |
| Prototyping a new hydraulic system | Reusable | Easy to adjust lengths and configurations during the design phase. |
| Replacing hoses on an entire factory line | Crimped | Efficient for replacing a large number of standard-length hoses. |
Ultimately, many of our most successful clients use a hybrid approach. They use crimped assemblies for standard, high-wear parts and keep reusable fittings on hand for the unexpected failures that always happen.
Conclusion
Mastering reusable hydraulic fittings comes down to proper matching, careful assembly, and diligent inspection. They are an invaluable tool for fast, effective field repairs when used correctly.
If you’re looking for a partner who can provide standard and custom fittings with guaranteed quality, we’re here to help. Contact the Topa team today for a quote, and let’s keep your equipment running at its best.
FAQ
What makes a hydraulic fitting reusable?
A reusable fitting has a two-piece design—a socket and a nipple—that can be attached and removed from hoses without a crimping machine, using only basic hand tools.
How do I know if a reusable fitting matches my hose?
Check the hose type (e.g., SAE 100R1AT or 100R2AT), fitting series, and dash size. All three must match perfectly for a safe, leak-free connection.
What’s the correct way to assemble a reusable hydraulic fitting?
Cut the hose cleanly, lubricate the parts, screw the socket counter-clockwise onto the hose, insert the nipple, and tighten until a small gap (0.8–1.5 mm) remains.
How can I tell if a fitting is safe to reuse?
Inspect for cracks, corrosion, stripped threads, and deformed hexes. If any damage is visible, replace it immediately instead of reusing it.
What are the warning signs of a bad installation?
Watch for leaks near the socket, hose blisters, or hose slippage. These are early indicators of a loose or mismatched assembly and require immediate repair.
When should I choose reusable fittings instead of crimped fittings?
Use reusable fittings for field repairs, remote locations, or custom jobs. Choose crimped fittings for mass production or extremely high-pressure, vibration-heavy applications.