Are your hydraulic systems facing frequent downtime due to hose failures and complicated repairs? Inefficient repair methods often lead to extended service interruptions and increased operational costs. This comprehensive training guide provides the essential knowledge and practical steps for technicians to master reusable hydraulic fittings. It will reduce downtime and achieve long-term cost benefits for your equipment.
Understanding Reusable Hydraulic Fittings
Do you fully grasp what reusable hydraulic fittings are and how they differ from other types? A clear understanding is fundamental for effective maintenance.
What Are Reusable Fittings?
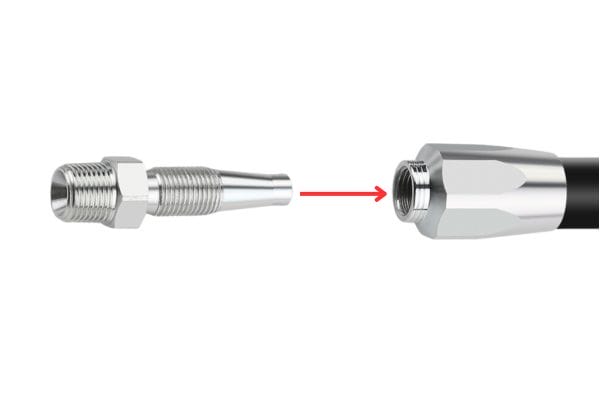
Reusable fittings typically comprise a socket (often called a “shell” or “ferrule”) and a nipple. The socket threads onto the outer cover of the hose. The nipple then threads into the hose’s inner tube or engages with the hose’s inner dimension. This creates a secure, leak-proof connection without requiring specialized crimping equipment. They are designed for repeated assembly and disassembly.
How Do They Differ from Crimped Fittings?
Crimped fittings involve a sleeve or ferrule permanently compressed onto the hose, creating a fixed assembly.
| Feature | Reusable Hydraulic Fitting | Crimped Hydraulic Fitting |
| Assembly Method | Mechanical thread | Permanent compression (crimping) |
| Reusability | Yes, components can be salvaged | No, discarded with hose |
| Tools Needed | Basic hand tools | Specialized crimping machine |
| Repair Location | On-site, field | Shop, or specialized service |
Safety First: Essential Protocols for Technicians
Are you aware of the critical safety measures necessary when working with hydraulic systems? Ignoring safety protocols can lead to severe injuries and equipment damage.
Safety is paramount when working with live hydraulic systems. Technicians must always wear appropriate Personal Protective Equipment (PPE), including eye protection and gloves. They must also follow strict lockout/tagout procedures to de-energize systems before working. This prevents accidental pressure release and minimizes the risk of fluid injection injuries.

Personal Protective Equipment (PPE)
- Work Gloves – Sturdy gloves to protect hands from cuts and high-pressure fluid.
- Safety Glasses / Face Shield – Protects eyes and face from fluid splashes and flying debris.
- Steel-Toed Boots – Shields feet from heavy or falling objects.
- Hearing Protection – Earplugs or earmuffs for noisy work environments.
Lockout/Tagout Procedures
Before working on any hydraulic system, always perform a lockout/tagout procedure. This involves de-energizing the system and physically locking out power sources. It also includes visually checking that stored pressure is relieved before starting work.
Essential Tools and Equipment
Hose Cutting Tools – Use hose cutters (abrasive saw or guillotine) for clean, square cuts. Avoid hacksaws or shears.
Assembly Wrenches – Use open-end or adjustable wrenches in good condition for secure grip.
Torque Wrenches – Ensure correct tightening per manufacturer specs to prevent leaks or damage.
Cleaning Supplies – Keep cleaning solutions, lint-free cloths, and brushes ready to remove contaminants before assembly.
Selecting the Right Components
Are you confident in selecting the correct hose and fitting for your hydraulic system? Incorrect component selection is a leading cause of premature failure and system inefficiency.
Correct component selection is critical for hydraulic system integrity. Technicians must accurately identify hose type, size (ID/OD), and pressure rating, ensuring compatibility with the specific fluid and temperature range. For fittings, precise thread identification (e.g., NPT, BSP, JIC) is paramount, along with matching the fitting type to the hose for a secure and functional assembly.
Selecting the right hose and fitting combination is perhaps the most critical step in creating a reliable hydraulic assembly. A mismatch in size, pressure rating, or thread type will lead to immediate failure or a drastically shortened lifespan. Always follow the manufacturer’s guidelines and hydraulic industry standards like SAE and ISO.
Hose Identification
Identify the hose by its type, internal diameter (ID), and pressure rating. The hose layline printed on the side of the hose provides crucial information. It specifies the manufacturer, hose type (e.g., SAE 100R2, EN 853), nominal ID, maximum working pressure, and often the date of manufacture. Different hose types require different fitting styles.
Fitting Thread Identification
Proper thread identification is paramount. Common thread types include NPT (National Pipe Taper), BSP (British Standard Pipe, both parallel and tapered), JIC (Joint Industry Council 37-degree flare), ORB (O-Ring Boss), and various Metric threads. Use thread identification gauges to accurately determine thread size, pitch, and type to ensure a perfect seal.
| Thread Type | Abbreviation | Common Regions/Usage Areas | Sealing Method |
| National Pipe Taper | NPT | North America | Metal-to-metal (tapered) |
| British Standard Pipe Parallel | BSPP | Europe, Asia, Australia | O-ring / bonded washer |
| British Standard Pipe Tapered | BSPT | Europe, Asia, Australia | Metal-to-metal (tapered) |
| Joint Industry Council | JIC | North America | Metal-to-metal (37° flare) |
| O-Ring Boss | ORB | North America | O-ring |
| Metric Parallel/Tapered | Metric | Europe, Asia | Varies; often O-ring |
Step-by-Step Assembly Procedure
Do you follow a precise, consistent procedure for assembling reusable hydraulic fittings? Inconsistent assembly is a common cause of leaks and premature hose failure.
Proper assembly of reusable hydraulic fittings requires a meticulous step-by-step process. Technicians must accurately measure and cut the hose, prepare its ends by skiving (if necessary), and then carefully thread the socket onto the hose. Finally, the nipple is installed, followed by precise torque to ensure a robust, leak-free connection.
Step 1: Measure and Cut the Hose
Measure the required hose length accurately, accounting for any bends or system requirements. Use a specialized hose cutter to make a clean, square cut. A clean cut prevents reinforcement wires from fraying and ensures proper fitting engagement. Remove any internal debris after cutting.
Step 2: Prepare the Hose Ends (Skiving if Necessary)
Depending on the reusable fitting type, the hose may require “skiving.” Skiving involves carefully removing a portion of the hose’s outer cover, inner tube, or both to expose the reinforcement layer. Always refer to the fitting manufacturer’s instructions for exact skiving dimensions and whether skiving is required for your specific fitting and hose combination.
Step 3: Thread the Socket onto the Hose
Securely place the hose in a vice, ensuring it does not twist. Apply appropriate lubrication to the hose end and the inside of the socket. Then, thread the socket counter-clockwise onto the hose. Continue threading until the hose visibly bottoms out inside the socket or the specified number of turns is achieved, as per manufacturer’s instructions.
Step 4: Install the Nipple
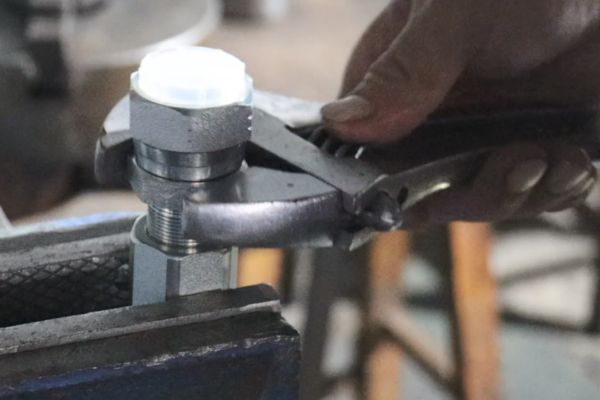
Lubricate the nipple threads and the hose’s inner tube. Carefully insert the nipple into the hose end and thread it clockwise into the socket. Use one wrench to hold the socket steady and another to turn the nipple. Ensure the nipple threads smoothly without cross-threading.
Step 5: Tighten to Proper Torque
Tighten the nipple into the socket until the wrenching flats of the nipple and socket come into firm contact, or until the specified torque value is reached using a torque wrench. Avoid over-tightening. This can damage the fitting or hose. Confirm the number of exposed threads on the nipple matches the manufacturer’s instruction.
Step 6: Final Inspection
After assembly, visually inspect the completed hose assembly. Check for proper hose fit within the fitting components, ensure no twists in the hose line, and verify that the cutting and skiving (if applicable) were done correctly. A proper visual inspection can often identify potential issues before system pressurization.
Disassembly and Reusability Procedures
Do you know how to safely disassemble a hydraulic hose assembly with reusable fittings for inspection or reuse? Proper technique is key to salvaging components.
Disassembly of reusable hydraulic fittings involves safely removing the old hose while preserving the fitting components for reuse. Technicians should ensure the system is depressurized, then carefully unthread the nipple and socket. Thorough cleaning and inspection of all parts are critical before reassembly, ensuring the continued integrity and performance of the fitting.
One of the main advantages of reusable hydraulic fittings is their ability to be disassembled and used again. However, this process must be done correctly to avoid damaging the fitting components and to ensure they are fit for reuse. Proper disassembly techniques preserve the value of these components.
Safe Removal of Old Hose
First, ensure the hydraulic system is fully depressurized and verified to be safe. Secure the hose assembly in a vice. Use wrenches to loosen and unthread the nipple from the socket. Once separated, the hose can be pulled or unthreaded from the socket and nipple. Be careful not to damage the fitting threads during this process.
Cleaning and Inspection of Components
After disassembly, thoroughly clean the socket and nipple components. Use a suitable cleaning solution and brush to remove all hydraulic fluid, dirt, and debris. Inspect both components for any signs of damage, such as stripped threads, cracks, deformation, or excessive wear. Pay close attention to sealing surfaces.
When to Reuse vs. Replace
Reuse fitting components only if they pass a thorough visual inspection and show no signs of damage or wear that could compromise their performance. If there are any doubts about the integrity of a component, replace it. It is always safer to replace a questionable part than to risk a system failure. The cost of a new component is far less than the cost of downtime or potential injury.
Troubleshooting Common Issues
Are you prepared to diagnose and fix common problems with reusable hydraulic fittings? Effective troubleshooting reduces downtime and extends component life.
Troubleshooting common issues with reusable hydraulic fittings involves systematically identifying the root cause of leaks, twists, or premature failures. Technicians should inspect for improper assembly, damaged threads, or incompatible components. Knowledge of these typical problems and their remedies helps ensure reliable, leak-free operation and efficient maintenance.

Leaks (Causes and Remedies)
Leaks are the most common issue. Causes often include improper torque (under- or over-tightening), damaged threads, incorrect thread identification, foreign material on sealing surfaces, or a twisted hose. The remedy usually involves disassembling, cleaning, inspecting for damage, reassembling with proper torque, and ensuring exact component compatibility.
| Problem Source | Possible Cause | Remedy |
| Leaks | Incorrect torque | Re-torque to manufacturer specifications |
| Damaged threads | Replace damaged fitting or nipple | |
| Improper hose skive | Re-cut hose and re-assemble | |
| Foreign material in joint | Disassemble, clean, re-assemble | |
| Hose Failure | Kinks or bends too tight | Re-route hose, ensure bend radius |
| Abrasive wear | Install hose guards, re-route | |
| Incorrect pressure rating | Replace with correct pressure-rated hose |
Kinks or Twists
Kinks usually result from exceeding the hose’s minimum bend radius or from improper routing. Twists occur during assembly if the hose is allowed to rotate relative to the fitting. These can restrict fluid flow and lead to premature hose failure. Always respect the minimum bend radius and ensure the hose is installed without any twists.
Improper Assembly Signs
Signs of improper assembly include exposed hose reinforcement where it should be covered by the fitting, too many or too few hose threads engaged in the socket/nipple, or a visibly skewed connection. These indicate a compromised joint and will likely lead to failure. Disassemble immediately and re-assemble following the correct procedure.
Hose Failure Analysis
When a hose fails, analyze it to determine the cause. Look for indications of chafing, kinking, burst areas, or fitting blow-off. Understanding why a hose failed helps prevent repeat issues. This analysis also confirms if the reusable fitting itself contributed to the failure or if it was solely a hose issue.
Conclusion
Mastering the use of reusable hydraulic fittings is a critical skill for modern technicians. This comprehensive guide, covering safety, component selection, precise assembly, and meticulous record-keeping, equips you with the expertise to ensure reliable and efficient hydraulic system operation.
At Topa, we provide the high-quality hydraulic fittings and related components that professionals like you can trust.
Are you ready to elevate your hydraulic maintenance skills and optimize your system’s performance with reliable reusable fittings? Contact the Topa team today. Let us support your training needs and supply you with the components you need for success.
FAQ
What are reusable hydraulic fittings used for?
Reusable hydraulic fittings are designed for assembling and repairing hydraulic hoses without specialized crimping machines. They allow field repairs and repeated use.
How do reusable fittings differ from crimped fittings?
Reusable fittings can be disassembled and reused, while crimped fittings are permanently attached and must be discarded with the hose.
What tools are needed to assemble reusable fittings?
Basic hand tools like open-end wrenches, torque wrenches, and hose cutters are sufficient. No heavy crimping equipment is required.
Can all hoses work with reusable fittings?
No. Only certain hose types are compatible with reusable fittings. Always check manufacturer guidelines for hose construction and pressure ratings.
What are common problems with reusable hydraulic fittings?
Leaks, kinks, and twists are common. They usually result from incorrect assembly, improper torque, or mismatched threads.
How many times can a reusable fitting be reused?
There is no fixed number. Fittings can be reused as long as inspection shows no damage, cracks, or thread wear. Replace if the integrity is doubtful.