A failing hydraulic hose can stop your entire operation in its tracks. The downtime, repair costs, and safety risks are a constant headache. Secure support is the simple solution.
The best way to support hydraulic hoses is by using the right combination of clamps, supports, and routing techniques. This prevents abrasion, sagging, and vibration, which are the main causes of premature hose failure. It’s about creating a stable, stress-free path for the hose.

This sounds simple, but the details make all the difference. Understanding why it’s so important is the first step to getting it right and avoiding catastrophic failures. Let’s explore the real-world consequences of poor hose support and how to prevent them. Getting this part right is fundamental to building a reliable hydraulic system.
What Happens If You Don’t Support Hydraulic Hoses Correctly?
An unsupported hose is an accident waiting to happen. The resulting system failure can halt your entire operation, costing you time and money you can’t afford to lose.
When hoses are not supported correctly, they can suffer from abrasion, twisting, kinking, and extreme vibration. This leads to leaks, bursts, and complete system failure, causing dangerous fluid spray, equipment damage, and unplanned downtime that hurts your bottom line.

When we talk to customers, especially business owners or maintenance supervisors, we see the results of poor support firsthand. It’s never pretty. A hose that fails isn’t just a part that needs replacing; it’s a chain reaction of problems. The cost isn’t just the new hose; it’s the lost production, the cleanup, and the potential for injury. I remember a client from the Philippines who had a hose fail on a critical piece of construction equipment. It wasn’t a defective hose; it was rubbing against a steel beam. A single, inexpensive clamp would have saved them a full day of lost work and the high cost of an emergency repair.
The True Cost of a Failed Support
It’s easy to overlook a small detail like a clamp, but the consequences are significant. Here’s how these issues develop:
| Problem | Direct Consequence | Ultimate Failure |
|---|---|---|
| Abrasion | The hose’s outer cover wears away, exposing reinforcement wires. | Wires rust and weaken, leading to a hose burst under pressure. |
| Sagging | Gravity pulls the hose down, putting stress on the fittings. | Leaks develop at the crimp, and the hose can kink or collapse. |
| Vibration | Constant shaking fatigues the hose material and fittings. | Cracks form in the hose or fittings, leading to sudden failure. |
| Twisting | The internal reinforcement structure is weakened. | The hose loses its ability to handle pressure, shortening its life by up to 70%. |
How Should Hydraulic Hoses Be Routed to Minimize Stress?
You’ve seen hoses twisted and bent at awkward angles. This puts enormous stress on the entire system. There’s a much better way to plan the hose path for longer life.
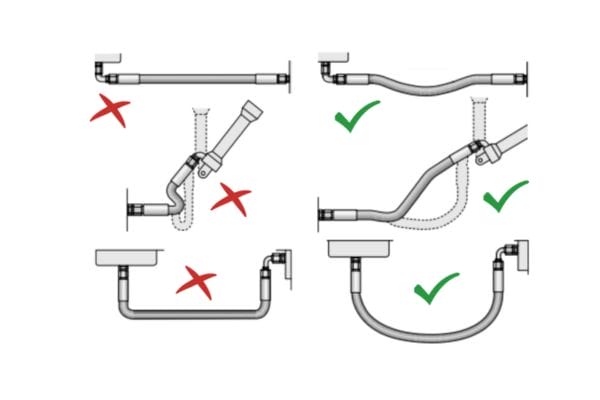
Route hoses to follow the machine’s contours, avoiding sharp bends, twists, and potential abrasion points. Use clamps to secure them, maintain the minimum bend radius, and ensure they have enough slack for movement without being too loose. The goal is a smooth, natural path.

Routing is part art, part science. You are creating a path that lets the hose do its job without fighting against itself or its environment. As a supplier, we can provide the best quality hose in the world, but if it’s installed incorrectly, it will fail. That’s why we always try to share these insights with our clients, from engineers in the USA to maintenance teams in Ghana. A little knowledge here goes a long way.
The Golden Rules of Hose Routing
Think of these as the fundamental laws for hose installation. Breaking them will almost always lead to problems.
- Avoid Twisting: A hydraulic hose is designed to flex, not twist. Twisting misaligns the wire reinforcement, severely weakening the hose. I always tell my team to check the layline—the continuous text printed along the hose. If that line starts to spiral, the hose is twisted. Straighten it before you tighten the fittings.
- Respect the Bend Radius: Every hose has a minimum bend radius specified by us, the manufacturer. Bending it tighter than this limit will cause it to kink, restricting flow and creating a weak spot. This is a common mistake we see with customers who are trying to fit a hose into a tight space.
- Account for Length Changes: Hoses can shorten or lengthen slightly when pressurized. You need to build in just enough slack to allow for this change, but not so much that the hose can sag and rub against something. The ideal is a gentle, natural curve.
Which Support Types Work Best for Different Applications?
A simple zip-tie won’t work for a high-pressure line. Using the wrong clamp is almost as bad as using no clamp at all. So how do you choose the right one?
The best support depends on the application. For single lines, cushioned loop clamps are great. For multiple lines, modular stacking clamps are ideal. In high-vibration areas, use clamps with vibration-dampening inserts. Always match the clamp material to the environment to prevent corrosion.

Choosing the right type of support is a critical decision. It’s part of the one-stop sourcing support we offer at Topa. You don’t just need the hose; you need the full system to make it work reliably. For a customer building equipment for a marine environment in the UAE[^1], we didn’t just sell them hoses. We advised them to use our 316 stainless steel cushioned clamps. A standard zinc-plated steel clamp would have rusted away in that salty air, but the stainless steel option provided the long-term, corrosion-resistant solution they needed. The environment always dictates the material.
[^1]: Learn about the unique challenges faced in the UAE’s marine environment and how to overcome them for better equipment performance.
Matching the Clamp to the Job
Not all clamps are created equal. Using the right one for the situation ensures the hose is protected and secure.
| Clamp Type | Best For | Key Feature |
|---|---|---|
| Cushioned Loop Clamp | Single hose lines, vibration dampening | Has a rubber or neoprene cushion that protects the hose from abrasion and absorbs vibration. |
| Modular Stacking Clamp | Multiple parallel hose runs | Allows you to neatly organize and secure several hoses. They can often be stacked vertically. |
| Gang Clamps | Securing multiple hoses of different sizes side-by-side. | A single mounting point holds several clamps together, saving space and installation time. |
| P-Clamps | Light-duty, low-vibration applications | A simple, low-cost solution for securing a hose or tube directly against a surface. |
How Do You Install Hose Supports the Right Way?
You have the right clamps and the perfect route planned. But incorrect installation can undo all your hard work. Getting the clamp spacing right is key to a secure system.
Install supports at intervals recommended by the hose or equipment manufacturer. As a general rule, place clamps at appropriate intervals to prevent sagging, and always place a clamp within 6 inches (15 cm) of a fitting to support its weight and prevent stress.
This is where attention to detail really pays off. A common mistake I see is when installers space clamps too far apart. The hose sags under its own weight, especially when filled with hydraulic fluid. This sagging puts a huge strain on the fittings at each end, which is the most common place for leaks to start. We once had a new customer from Mexico who was experiencing repeated failures at the fitting. After sending us pictures, we saw immediately that there was no support clamp near the fitting. We advised them to add one, and the problem disappeared.
Spacing and Placement are Everything
The clamp’s job is to support the hose’s weight and hold it in place. Proper spacing is not just a suggestion; it is essential for long service life.
While you should always check the equipment manufacturer’s specifications first, here is a good general guide for clamp spacing:
| Hose Outer Diameter | Recommended Clamp Spacing |
|---|---|
| Up to 1/2″ (12.7 mm) | Every 3 feet (1 meter) |
| 1/2″ to 1″ (12.7 – 25.4 mm) | Every 4 feet (1.2 meters) |
| Over 1″ (25.4 mm) | Every 5 feet (1.5 meters) |
Remember two more crucial things:
- Support, Don’t Crush: The clamp should be snug enough to hold the hose, but not so tight that it constricts it. Over-tightening can restrict flow and damage the hose’s cover.
- Protect the Fittings: The most important clamp is the one closest to the fitting. This clamp supports the weight and leverage of the hose, protecting the crimped connection from stress and vibration.
When Should You Inspect or Replace Hose Supports?
Hose supports are not a ‘set it and forget it’ part. Harsh industrial conditions can cause them to loosen, corrode, or break. A quick inspection can prevent a massive failure.
Inspect hose supports during all routine equipment maintenance. Look for loose, damaged, or corroded clamps, and check for signs of hose abrasion or sagging. Replace any compromised supports immediately to prevent a small issue from becoming a major system failure.

This is all about proactive maintenance. It feels much better to find a rusted clamp during an inspection than to discover it after it has failed and caused a hose to burst. I advised a commercial farming client in Australia to add a hose support check to their pre-season equipment prep. While getting their harvester ready, they found several corroded clamps that were about to fail. For the cost of a few new clamps, they prevented a potential hydraulic failure in the middle of their busiest season. That’s a huge return on investment for just a few minutes of inspection.
Your Quick Inspection Checklist
Make this part of your regular preventive maintenance (PM) schedule. It’s a fast and easy way to ensure system integrity.
- [ ] Check for Tightness: Are all mounting bolts and clamp screws secure? Vibration is a constant enemy and can loosen hardware over time.
- [ ] Inspect for Corrosion: Look for rust on steel clamps or signs of degradation on other materials. This is especially important in wet, salty, or chemical-rich environments.
- [ ] Examine Cushions: Are the rubber or plastic inserts on cushioned clamps still in place? Are they cracked, brittle, or worn out? A missing cushion allows for metal-on-metal contact.
- [ ] Look for Hose Abrasion: Is the hose cover showing signs of rubbing against the clamp, the machine frame, or another hose? This is a red flag that something is loose or misaligned.
- [ ] Check for Sagging: Do you see any new sags between supports? This could mean a clamp has failed or the original spacing was too wide for the operating conditions.
Conclusion
Securing hydraulic hoses isn’t just one action, but a complete system. Proper routing, correct supports, and regular checks ensure safety, reliability, and peace of mind for your operations.


