How to Install and Tighten JIC Hydraulic Fittings

How to Install and Tighten JIC Hydraulic Fittings

How to Install and Tighten JIC Hydraulic Fittings

Introduction

JIC hydraulic fittings are an essential part of the hydraulic system and are the backbone of many operations in various industries. These fittings ensure the flow of hydraulic fluid, which is vital to the operation of a machine. This article is intended to guide readers through the meticulous process of properly installing and tightening JIC hydraulic fittings, an essential skill for maintaining the efficiency and safety of your hydraulic system.

Understanding JIC Hydraulic Fittings

The Basics of JIC Hydraulic Fittings

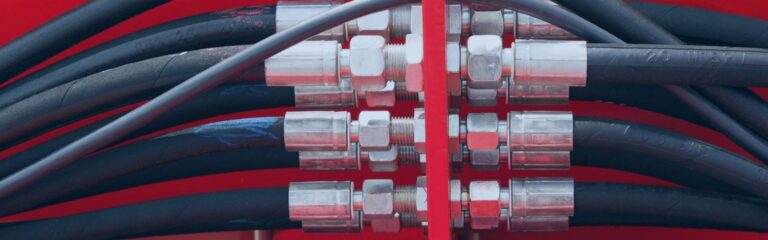
Hydraulic JIC fittings, standing for Joint Industry Council, are paramount in the hydraulic systems landscape, celebrated for their exceptional reliability and robustness. These fittings are engineered to endure high pressures and adverse conditions, a testament to their origins in the aerospace industry. The hallmark of JIC fittings is their 37-degree flare seating surface, a critical feature that facilitates the creation of secure, leak-proof connections.

Types of Hydraulic JIC Fittings

The diversity of JIC fittings serves as a cornerstone for their widespread application across various hydraulic systems, ensuring that there is a fitting type for virtually every possible scenario.

Straight Fittings

Straight JIC fittings are the most basic and commonly used type. They provide a direct connection between hydraulic hoses and components such as pumps, cylinders, and valves. They offer a straightforward solution for transferring fluid in a linear path without altering direction.

45-Degree Fittings

45-degree JIC fittings are designed to change the direction of the hydraulic line by 45 degrees. These fittings are invaluable in systems where space constraints prevent the use of straight lines or where a more gradual change in direction is beneficial to fluid dynamics. They help in minimizing the pressure drops and turbulence that can occur with sharper bends, ensuring a smoother flow of hydraulic fluid.

90-Degree Fittings

90-degree JIC fittings are essential for creating right-angle connections in hydraulic systems. They are particularly useful in tight spaces where bending a hose at a 90-degree angle would be impractical or could cause damage to the hose.

Bulkhead Fittings

Bulkhead JIC fittings are used to pass hydraulic lines safely and without leakage through bulkheads such as tanks or walls. They ensure system integrity while effectively separating components or parts of a hydraulic system.

Swivel Fittings

Swivel JIC fittings provide a pivoting connection point that can be rotated or moved without disassembling the fitting or twisting the hydraulic hose. These fittings reduce the risk of hose wear and leakage in applications where components need to move or rotate freely.

Tee and Cross Fittings

Tee and cross JIC fittings are used to branch hydraulic lines to distribute fluid from one source to multiple locations.

Applications of Hydraulic JIC Fittings

The utility of JIC fittings stretches across a broad spectrum of industries, marking them as indispensable components in fields as varied as agriculture, construction, and manufacturing. This widespread applicability is a testament to their versatility and the reliability they bring to hydraulic systems. Among the myriad advantages of JIC fittings are their ease of assembly and disassembly, which greatly simplifies maintenance and repair tasks. Additionally, their inherent resistance to vibration makes them an ideal choice for applications subject to constant movement or mechanical shock, ensuring that connections remain secure even in the most challenging conditions. The extensive range of sizes and configurations available further underscores the adaptability of JIC fittings, enabling their use in virtually any hydraulic system configuration one might encounter.

Pre-Installation Checklist

Before diving into the installation of hydraulic JIC fittings, it’s crucial to undertake thorough preparation. This preparation not only sets the stage for a smooth installation process but also ensures the safety and reliability of the hydraulic system. Let’s explore the essential steps, tools, and safety measures required to get started.

Tools Required

The installation of JIC fittings demands precision and the right set of tools. Each tool plays a significant role in ensuring that the fittings are installed correctly and securely. Here are some of the essential tools and their purposes:

Wrenches: Adjustable wrenches are indispensable for tightening and loosening fittings. Using two wrenches simultaneously — one to hold the fitting and the other to turn the nut — helps prevent the twisting of lines.

Tube Cutters: A clean, square cut on the hydraulic tube is vital for a leak-free connection. Tube cutters provide a precise cut, reducing the risk of leaks at the fitting interface.

Flaring Tools: For creating the 37-degree flare on tubing, a flaring tool is necessary. This flare matches the angled surface of the JIC fitting, ensuring a tight, leak-proof seal.

Deburring Tools: After cutting the tube, it’s essential to remove any sharp edges or burrs. Deburring tools ensure a smooth surface that won’t damage the sealing surface or O-ring.

Inspection Tools: Gauges and calipers are useful for verifying the dimensions of fittings and tubes, ensuring they meet the required specifications for a secure fit.

Safety Measures

Working with hydraulic systems requires a keen awareness of safety to prevent accidents and injuries. Here are some critical safety measures to observe:

Protective Gear: Always wear appropriate protective gear, including gloves, safety glasses, and steel-toed boots, to protect against hydraulic fluid spills and flying debris.

Depressurizing the System: Before starting any work, ensure the hydraulic system is fully depressurized. This step is crucial to prevent accidental discharge of hydraulic fluid under pressure.

Awareness of Surroundings: Be conscious of your environment, especially the potential for slipping on hydraulic fluids or tripping over equipment.

Fire Safety: Because hydraulic fluid is flammable, keep a fire extinguisher nearby and ensure the work area is well-ventilated to prevent the buildup of fumes.

Topa Install and Tighten JIC Hydraulic Fittings

Preparing the Fittings and Hydraulic Lines

Proper preparation of the fittings and hydraulic lines is foundational to a successful installation. This process includes several key steps:

Inspection: Carefully inspect all fittings and hydraulic lines for any signs of damage, such as cracks, nicks, or corrosion. Damaged components should be replaced to avoid leaks or system failures.

Compatibility Check: Ensure that the fittings and hydraulic lines are compatible in size, material, and pressure rating. Mismatched components can lead to leaks or damage under pressure.

Cleaning: Remove any contaminants from the fittings and tubing. Cleanliness is critical to prevent dirt or debris from entering the system, which can cause wear or blockages.

Deburring: After cutting the tubing to the desired length, use a deburring tool to smooth the cut edge. This step is crucial to prevent damage to the sealing surfaces and ensure a leak-free connection.

Flaring: For tubing that requires flaring, use a flaring tool to create a 37-degree flare that matches the fitting. This precise angle is critical for a secure fit and leak-proof seal.

Step-by-Step Installation Guide

Inspection

Objective: Ensure the compatibility and integrity of both hydraulic lines and fittings before installation.

Process: Carefully examine the hydraulic lines and fittings for any signs of damage, such as cracks, nicks, or any form of debris that might compromise the installation. Verify that the fittings match the hydraulic line in terms of size, type, and material.

Preparation

Objective: Prepare the hydraulic line for fitting installation.

Process: If necessary, use a tube cutter to cut the hydraulic line to the required length, ensuring a clean, square cut. After cutting, use a deburring tool to remove any sharp edges or burrs from the cut end of the line, creating a smooth surface for fitting installation.

Flaring (If Applicable)

Objective: Create a 37-degree flare on the hydraulic line to match the JIC fitting angle.

Process: Utilize a flaring tool to form a precise 37-degree flare at the end of the hydraulic line. This flare is essential for establishing a leak-proof seal with the JIC fitting.

Fitting Installation

Objective: Securely connect the fitting to the hydraulic line.

Process: Start by threading the fitting nut onto the hydraulic line, followed by threading the fitting itself. It’s important to hand-tighten the fitting initially to ensure proper engagement and alignment, avoiding cross-threading.

Tightening

Objective: Secure the fitting to the correct torque specification to ensure a leak-proof connection.

Process: Use two wrenches for this step — one to hold the fitting in place and the other to tighten the nut. This prevents the fitting from turning and potentially damaging the hydraulic line. Tighten the nut to the manufacturer’s recommended torque specification, being careful not to over-tighten, as this could strip the threads or damage the fitting and the line.

Common Mistakes to Avoid

When installing JIC fittings, certain pitfalls can compromise the integrity and performance of the hydraulic system. Awareness and proactive measures can prevent these issues:

Cross-threading: This occurs when the fitting is not properly aligned with the thread of the port or hose. To avoid cross-threading, start threading by hand to ensure proper alignment. If resistance is felt, backtrack and realign rather than forcing the fitting.

Over-tightening: Excessive force can strip threads or deform the fitting and the sealing surface, leading to leaks or fitting failure. Adhering to the manufacturer’s torque specifications is crucial. Use a torque wrench whenever possible to apply the correct amount of torque.

Under-tightening: Insufficient torque can lead to leaks due to inadequate seal compression. Ensure that fittings are tightened to the recommended torque value, checking for leaks under pressure after installation.

Using Damaged Components: Inspecting all fittings and hydraulic lines for damage before installation is essential. Damaged threads, cracks, or deformities can prevent a proper seal, leading to leaks or system failure. Replace any damaged components before proceeding with the installation.

Troubleshooting Installation Issues

Leaks

Immediate Action: Verify that the fitting is tightened to the manufacturer’s recommended torque. Over- or under-tightening can lead to leaks.

Further Steps: If leaks persist after ensuring proper torque, disassemble the connection for a thorough inspection. Look for signs of damage to the threads, fitting, or tubing. Ensure no foreign material is present on the sealing surfaces. Re-install after ensuring all components are clean and undamaged.

Poor Fit

Verification: Double-check the compatibility of the fitting with the hydraulic line. This includes checking the size, type (male or female), thread pattern, and material. Incorrectly matched components can lead to poor fit and potential system failure.

Resolution: Replace any components that do not match exactly. Always refer to the manufacturer’s specifications for both the fittings and the hydraulic lines.

Pressure Drop

Investigation: A significant pressure drop post-installation could indicate several issues, such as under-tightening, which might not create a proper seal, or using an incorrect fitting type that does not match system requirements.

Diagnostic Steps: Check the entire system for any signs of leaks or improper fittings. Ensure all fittings are correctly tightened. If the issue persists, consult the system’s hydraulic schematic to verify that the correct type of fittings is used and that they are installed in the correct orientation.

Additional Troubleshooting Tips

Cross-Contamination: Ensure that different materials (e.g., stainless steel and carbon steel) are not used together in the same system to prevent galvanic corrosion.

Thread Damage: Inspect threads on both the fittings and the hydraulic lines for any signs of damage. Even minor thread damage can prevent a proper seal.

Use of Sealants: While JIC fittings are designed to seal without additional sealants, ensure no unauthorized sealants have been used, as they can cause issues with the hydraulic fluid and system performance.

Tightening Hydraulic JIC Fittings

Understanding the Tightening Process

The correct tightening of JIC hydraulic fittings is crucial to prevent leaks and ensure the longevity of both the fitting and the hydraulic system. Over-tightening can be as detrimental as under-tightening. The former can lead to deformation of the fitting, damage to the threads, or even cracking, while the latter may result in leaks or disconnection under pressure. Therefore, understanding and applying the correct torque is essential for a secure and reliable connection.

Tools for Tightening JIC Fittings

Torque wrenches are highly recommended for the tightening process as they allow for precise application of torque. These tools are critical in preventing over-tightening, ensuring that each fitting is tightened to the manufacturer’s specified torque value.

The Flats Method

The flats method is a commonly used technique for achieving the correct torque without a torque wrench, particularly in field conditions where precise tools may not be available. This method involves tightening the nut by a specific number of flat surfaces on the hex nut after finger-tightening. While useful, it’s less precise than using a torque wrench and can potentially lead to over-tightening if not done with care.

Final Inspection and Testing

After installation and tightening, conducting a thorough inspection and testing phase is critical. This includes checking for any signs of over-tightening such as thread damage, leaks, or any deformation of the fitting and tubing. Pressure testing the system can help verify that connections are secure and there are no leaks, ensuring everything is assembled correctly and functioning as intended.

Over-tightening JIC Hydraulic Fittings

Over-tightening JIC fittings can compromise the integrity of the hydraulic system. It can lead to damaged threads, compromised seal integrity, and even cracking of the fitting or flared end of the tubing. These issues can result in leaks and reduced system performance, and they may necessitate costly repairs or replacements. Therefore, it’s essential to follow the specified torque values and use the appropriate tools and techniques to avoid over-tightening.

Conclusion

The correct installation and tightening of JIC hydraulic fittings is vital to the efficiency of your hydraulic system. By following this guide, you can ensure that your systems are maintained to a high standard. If you still have any questions, feel free to contact Topa with your confusion!

FAQ

To install JIC hydraulic fittings, ensure the fitting is properly aligned and threaded onto the hose or pipe before tightening.

No, JIC fittings rely on the metal-to-metal contact for sealing, so no additional sealant is required.


Use a proper wrench to tighten the fitting until it is snug, but avoid over-tightening, which can damage the threads or cause leaks.

You will need a wrench or socket tool that fits the specific size of the JIC fitting for secure installation.

Yes, JIC fittings are commonly used on both rigid pipes and flexible hydraulic hoses, provided they are the correct size.

A JIC fitting is tight enough when it is securely fastened and there is no visible gap or leakage at the connection point.

Topa Blog

Find out more about Topa Blog and learn more about specialized hydraulic fittings.

7 Tips to Prevent High Pressure Hose Assembly Failure

6 Tips to Prevent High-Pressure Hose Assembly Failure

6 Tips to Prevent High-Pressure Hose Assembly Failure

Table of Contents

Introduction

Failures in high-pressure hose assemblies can have serious consequences—ranging from safety hazards and potential injuries to costly downtime, equipment damage, and lost productivity. Most hose failures result from factors such as repeated abrasion, extreme temperatures, UV exposure, improper routing, kinks, fluid incompatibility, or poorly installed fittings. This guide is designed to help professionals identify these risks early and implement practical, proven solutions.

Common Hose Failure Types and How to Identify Them

Understanding the common types of hose failures can help you spot problems early and prevent equipment damage or safety risks. Below are some of the most frequent issues and how to recognize them:

Fitting Blown Off Hose

What’s the issue?

The hose has separated from its metal fitting, which can lead to fluid spraying or system failure.

How to spot it:

Sudden drop in system pressure

Visible fluid spraying from the connection point

Fitting looks loose or has completely detached

Common causes: Improper installation, excessive pressure, or incompatible fittings.

Hard and Brittle Hose

What’s the issue?

The hose has lost its flexibility and may crack easily.

How to spot it:

Feels stiff to the touch

Makes a cracking sound when bent

Small surface cracks are visible

Common causes: Long-term exposure to high temperatures or aging materials.

Leaks Between Fitting Shell and Hose

What’s the issue?

Fluid is seeping out where the hose meets the metal shell of the fitting.

How to spot it:

Oil stains or wet spots near the base of the fitting

Wipe it dry and see if the fluid returns after a few minutes

Reduced system performance

Common causes: Loose assembly, worn-out seals, or low-quality fittings.

Proper Hose Selection

Importance of Choosing the Right Hose Material

The selection of the right hose is a critical decision in the design and maintenance of high-pressure hydraulic systems. This choice goes beyond merely picking a hose off the shelf; it involves a detailed consideration of the application’s specific needs. Factors such as pressure ratings, temperature range, fluid compatibility, and environmental conditions play a pivotal role in determining the most suitable hose material and design. The right hose ensures optimal performance, longevity, and safety, significantly reducing the risk of failure under high-pressure operations.

Pressure Ratings

Selecting a hose with the appropriate pressure rating is paramount. A hose’s pressure rating must match or exceed the maximum operating pressure of the hydraulic system, including any potential pressure spikes. Underestimating the system’s pressure can lead to hose bursts, whereas overestimation can unnecessarily increase costs and reduce flexibility.

Temperature Range

The operating temperature range of the system is another critical factor. Both the fluid temperature and the ambient temperature can affect hose performance. Materials that are not suited to the temperature range can degrade, leading to leaks, cracks, and ultimately, system failure.

Fluid Compatibility

different types of hydraulic hoses Topa

Incompatible materials can degrade when exposed to certain fluids, causing the hose to swell, delaminate, or even disintegrate, which can lead to contamination of the system and environment, as well as system failure.

Environmental Conditions

Environmental factors such as exposure to UV light, ozone, chemicals, saltwater, and extreme temperatures can affect hose materials. For example, rubber hoses can degrade when exposed to UV light or ozone, while metal hoses can corrode in salty or acidic environments.

Correct Hose Installation

Proper installation of high-pressure hose assemblies is vital to their performance and longevity. Incorrect installation can lead to premature hose failure, resulting in leaks, bursts, and potentially severe safety hazards.

Avoiding Twisting and Kinking

Twisting a hose can significantly weaken its structure, leading to reduced life expectancy and increased risk of failure under pressure. During installation, ensure that the hose is aligned correctly, with the fittings oriented to prevent any torsion. Kinking, on the other hand, occurs when a hose is bent too sharply, causing a constriction that can impede fluid flow and increase internal pressure. To avoid kinking, always adhere to the minimum bend radius specified by the manufacturer.

Importance of the Recommended Bend Radius

The bend radius of a hose is the minimum radius one can bend the hose without damaging it or significantly reducing its life. It is a critical factor to consider during installation. Exceeding the recommended bend radius can cause the hose’s layers to separate or the reinforcement to weaken, leading to a failure. Ensure that the hose’s routing allows for gentle curves rather than sharp bends, respecting the manufacturer’s recommended bend radius at all times.

Installing the Correct Length to Accommodate System Movement and Expansion

Accounting for system movement and expansion is essential when determining the correct length of a hose. Thermal expansion and contraction, as well as mechanical movement, can all affect hose length. A hose that is too short may become stretched or compressed, leading to stress at the fittings and potential failure. Conversely, a hose that is too long can lead to looping or sagging, which can cause abrasion or kinking. To accommodate movement and expansion, provide a slight excess in length and consider the routing paths that allow the hose to flex without stretching or compressing.

Regular Inspection and Maintenance

A proactive approach to the inspection and maintenance of high-pressure hose assemblies is essential for ensuring their reliability and longevity. Regularly scheduled inspections can identify potential issues before they lead to failure, while maintenance practices, including timely replacement, can prevent downtime and ensure the safety of operations. Here’s how to establish an effective routine inspection plan and understand the importance of maintenance and replacement protocols.

Establishing a Routine Inspection Plan

Frequency: Determine the inspection frequency based on the hose application, environment, and historical performance. High-risk applications may require more frequent inspections, such as daily or weekly, while lower-risk environments might necessitate monthly or quarterly checks.

Inspection Checklist: Develop a comprehensive checklist that includes examining hoses for signs of wear, abrasion, leaks, and other forms of damage. Specific points to check include:

  • Hose cover for cuts, abrasions, or bulging.
  • Hose fittings for corrosion, cracks, or leaks.
  • Hose routing to ensure no kinks, twists, or undue stress points.
  • Changes in hose flexibility or signs of hardening.

Documentation: Keep records of all inspections, noting the condition of each hose, any corrective actions taken, and the date. This documentation can help track hose performance over time and identify patterns that may indicate a need for procedural changes.

Importance of Regular Maintenance

Maintenance isn’t just about reacting to issues; it’s about preventing them. Regular maintenance should include:

Cleaning: Remove any contaminants that could degrade the hose materials.

Proper Storage: Store spare hoses in a clean, dry environment away from direct sunlight and extreme temperatures to prevent premature aging.

System Flush: After replacing a hose, flush the system to remove any debris or contaminants that could harm the new hose.

Hose Replacement Guidelines

Manufacturers’ Guidelines: Always follow the hose manufacturer’s recommendations for replacement intervals. These guidelines are based on extensive testing and are designed to ensure maximum hose life while minimizing the risk of failure.

Industry Standards: Adhere to industry standards, such as those from the International Fluid Power Society (IFPS), which provide guidelines on hose inspection, maintenance, and replacement.

Condition-Based Replacement: Beyond adhering to set intervals, replace hoses based on their condition and performance during inspections. Any hose showing signs of significant wear, damage, or degradation should be replaced immediately, regardless of age.

Avoiding Environmental Damages

Environmental factors can significantly impact the lifespan and performance of high-pressure hose assemblies. Exposure to extreme temperatures, ultraviolet (UV) light, harsh chemicals, and abrasive surfaces can cause hoses to degrade prematurely. Here are practical tips to protect hose assemblies from these environmental challenges, including the use of protective coverings, strategic routing, and guards.

Protecting Against Extreme Temperatures

Insulation and Heat Shields: Use insulation or heat shields to protect hoses from extreme heat, especially when hoses are routed near engines or other high-temperature equipment. Conversely, in extremely cold environments, consider using heaters or maintaining ambient temperatures to prevent hose material from becoming too rigid and cracking.

Strategic Routing: Route hoses away from hot spots and sources of extreme cold when possible. Ensure there’s adequate airflow around the hoses to prevent heat build-up in confined spaces.

Guarding Against UV Exposure

UV-Resistant Wraps: Apply UV-resistant wraps or sleeves to hoses exposed to direct sunlight. These protective coverings can significantly reduce the degradation caused by UV radiation.

Routing Considerations: Whenever possible, route hoses in a manner that minimizes their exposure to direct sunlight. Utilize the natural protection offered by equipment structures or use additional protective coverings.

Chemical Resistance

Chemical-Resistant Hoses: Select hose materials that are specifically designed to resist the types of chemicals they will be exposed to. This information is typically provided by the manufacturer.

Protective Coatings: Apply protective coatings or use hose sleeves that offer resistance to harsh chemicals. This is particularly important in environments where spillage or spraying of chemicals might occur.

High Pressure Hose Assembly Failure

Protection from Abrasive Surfaces

Abrasion-Resistant Covers: Many hoses are available with abrasion-resistant outer covers. These are ideal for environments where hoses might rub against equipment or other surfaces.

Hose Guards and Sleeves: Use hose guards or sleeves at points where the hose comes into contact with abrasive surfaces. These guards can be made of various materials, including metal, plastic, or specially designed fabrics.

Proper Routing and Clamping: Ensure hoses are properly clamped and routed to avoid unnecessary contact with abrasive surfaces. Secure hoses so they do not sag or rub against surfaces during operation.

Recommendations for Protective Coverings

Selection and Application: Choose protective coverings based on the specific environmental challenges faced. Ensure that the coverings are properly installed, covering the entire length of the hose that is exposed to the harmful environment.

Regular Inspection: Include protective coverings in your regular hose inspection routine. Check for signs of wear, damage, or degradation, and replace coverings as necessary to maintain protection.

Proper Fitting and Connection Techniques

Ensuring the reliability and safety of high-pressure hose assemblies heavily relies on the use of compatible fittings and adherence to precise assembly instructions for securing connections. This step is critical in preventing leaks, bursts, and failures that could lead to operational downtime or safety hazards.

Importance of Using Compatible Fittings

Material Compatibility: The materials of both the hose and the fittings must be compatible with each other as well as with the fluid being conveyed. Incompatibility can lead to corrosion, degradation, and ultimately, failure.

Size and Type Match: Fittings must match the size and type of the hose. Using the wrong size or type can result in poor connections, leaks, and an increased risk of detachment under pressure.

Pressure Rating Alignment: The fittings’ pressure rating must meet or exceed the hose’s maximum operating pressure, including any surges or spikes. Mismatched pressure ratings can compromise the assembly’s integrity.

Following Precise Assembly Instructions

Manufacturer’s Guidelines: Always follow the hose and fitting manufacturer’s assembly instructions closely. These guidelines are designed to ensure optimal fitment and performance.

Tooling Requirements: Use the correct tools and equipment specified for the assembly process. Improper tools can damage the hose, fittings, or both, leading to leaks or failures.

Assembly Cleanliness: Keep the hose and fittings clean during assembly. Contamination can obstruct fluid flow and cause system malfunctions.

Common Mistakes in Fitting Selection and Installation

Ignoring Compatibility: Selecting fittings based solely on size, without considering material compatibility or pressure ratings, is a frequent mistake that can lead to premature assembly failure.

Over-Tightening: Applying excessive force when tightening can strip threads or deform fitting components, compromising the seal.

Under-Tightening: Conversely, insufficient tightening can result in leaks or the fitting becoming loose under operational pressures.

Lack of Inspection: Failing to inspect the fittings and hose ends for damage or irregularities before assembly can result in poor connections and leaks.

Skipping Steps: Overlooking any steps in the assembly process, such as properly cleaning the components or using the right lubrication when required, can decrease the integrity of the connection.

Proper Selection of Hose Material

The cornerstone of ensuring the longevity and reliability of a high-pressure hose assembly lies in selecting the appropriate hose material. This decision is crucial because the material must withstand the specific demands of the application, including compatibility with the fluid being conveyed, operating pressures, temperature ranges, and environmental conditions. Selecting the wrong hose material can lead to premature hose failure, resulting in potential safety hazards, operational downtime, and increased costs due to replacements and repairs.

Various Materials

Hose Material

Key Features

Typical Applications

Fluid Compatibility

Synthetic Rubber

Oil,heat &weather resistant
Durable &versatile

Mobile machinery industrial hydraulics

Petroleum-based fluids,water,air

Thermoplastic

Lightweight,flexible
Resistant to chemicals &abrasion

High-pressure pneumatics, chemical exposure environments

Synthetic oils,water- based fluids

PTFE(Teflon)

Excellent chemical & temperature resistance
Non-stick surface

Harsh chemicals,food processing, high-temp systems

Acids,solvents,gases

Metal (Stainless Steel)

High strength &heat resistance
Corrosion-resistant

Steam,high-temperature, outdoor or hazardous environments

Steam,hot gases, corrosive chemicals

Conclusion

Proactive maintenance and proper operation are key to ensuring the reliability and extended life of high-pressure hose components. By implementing protective measures and routine inspections, companies can significantly reduce the risk of unplanned breakdowns, costly downtime, and safety hazards. Proactively managing hose assemblies is not only a smart move, it’s an important investment in the performance and safety of your hydraulic system.

If you need a high-pressure hose with the highest level of safety, contact Topa and we can provide it!

FAQ


Always use the correct fittings and ensure they are properly tightened to prevent leaks and connection failure.

Choosing the correct hose material ensures the assembly can handle the pressure and avoid premature wear or rupture.

Regular inspections help identify signs of wear, damage, or corrosion before they lead to hose failure.

Yes, proper routing avoids excessive bending or kinking, which can weaken the hose and lead to failure under pressure.

It’s generally not recommended to reuse high-pressure hose assemblies, as the hose and fittings may have degraded after previous use.


Pressure testing ensures that the hose assembly is rated for the required pressure and that no leaks or weaknesses are present.


Topa Blog

Find out more about Topa Blog and learn more about specialized hydraulic fittings.

9 Causes of Hydraulic Fitting Leaks

9 Causes of Hydraulic Fitting Leaks

9 Causes of Hydraulic Fitting Leaks

Table of Contents

Introduction

Despite their efficiency and power, hydraulic systems are inevitably prone to problems, the most common and troublesome of which is leakage. More than just a nuisance, hydraulic fitting leaks pose a significant threat to system efficiency, safety and the bottom line of operating costs. Leaks can lead to degraded performance, potential safety hazards due to slippery surfaces, and increased environmental concerns. This article takes a deep dive into the top 10 leading causes of leaks in hydraulic fittings, providing insight into why leaks occur and, most importantly, how to prevent them.

Understanding Hydraulic Fitting Leaks

Hydraulic fitting leaks represent a significant challenge in the operation and maintenance of hydraulic systems. These leaks are unintended releases of fluid from the system, which can occur at connection points between components or within the components themselves. Leaks are not only a sign of potential system failure but also indicators of underlying issues that could lead to more severe problems if not addressed.

The Importance of Addressing Leaks Promptly

The early identification and resolution of leaks are paramount. Even a minor leak can quickly develop into a major problem, potentially stopping operations and leading to expensive repairs. The reasons for this are manifold:

Safety Hazards: Leaks can create slip hazards and, depending on the fluid, may pose fire risks.

Environmental Impact: Spilled hydraulic fluid can harm the environment, leading to fines and cleanup costs.

Operational Efficiency: Leaks can reduce the effectiveness of a hydraulic system, leading to decreased performance and increased wear on components.

Cost: The loss of hydraulic fluid and the potential for damage to machinery can lead to significant costs over time.

broken fitting

Causes of Hydraulic Fitting Leaks

Improper Installation

Improper installation of hydraulic fittings is a prevalent cause of leaks. This can result from several factors, including inadequate tightening, misalignment of fittings, or the use of incorrect tools during installation. These mistakes can significantly compromise the integrity of the seal, leading to leaks that can affect the system’s efficiency and safety.

Key Points:

Adequate Tightening: Ensuring that fittings are tightened to the manufacturer’s specifications is crucial. Over-tightening can damage threads or fittings, while under-tightening may not form an adequate seal.

Correct Alignment: Fittings must be properly aligned to prevent cross-threading and ensure a proper seal.

Appropriate Tools: Using the correct tools for installation is essential to avoid damaging the fittings. Specialized hydraulic tools should be used according to the specifications of the fitting type and size.

Material Incompatibility

Material incompatibility in hydraulic systems can lead to a variety of issues, most notably leaks. This incompatibility can occur between the hydraulic fluid and the materials used for fittings and seals within the system. Different hydraulic fluids have unique chemical properties that can adversely affect the materials they come into contact with if not properly matched.

The Chemistry of Hydraulic Fluids

Hydraulic fluids can vary widely in their chemical composition. Common types include mineral oils, synthetic fluids, and water-based fluids, each with specific characteristics and applications. The choice of hydraulic fluid depends on various factors, including the operating temperature range, environmental concerns, and the specific machinery’s requirements.

Impact on Materials

The interaction between hydraulic fluid and the materials used in the system’s components can lead to:

Corrosion: Some fluids can cause corrosion of metal components, particularly if the metals are not suited to the type of fluid used.

Swelling of Seals: Certain hydraulic fluids can cause rubber or polymer seals to swell, leading to compromised seal integrity and eventual leaks.

Degradation: Over time, incompatible fluids can degrade the materials in seals and fittings, making them brittle or causing them to break down, which can result in leaks.

Selecting Compatible Materials

To ensure the long-term integrity of hydraulic systems and prevent leaks, it’s crucial to select materials that are compatible with the chosen hydraulic fluid. This involves:

Understanding Fluid Properties: Familiarize yourself with the chemical properties of the hydraulic fluid being used and how it interacts with different materials.

Choosing the Right Seals and Fittings: Select seals and fittings made from materials known to be compatible with your hydraulic fluid. Manufacturers often provide compatibility charts or guides to assist in this process.

Regular Inspection and Maintenance: Even with compatible materials, regular inspection and maintenance are essential to identify early signs of wear or degradation that could lead to leaks.

Over-Tightening or Under-Tightening of Fittings

install ferrule fitting Topa

The correct installation of hydraulic fittings is critical to the integrity and proper functioning of hydraulic systems. Two common mistakes that can lead to leaks are over-tightening and under-tightening of fittings. Both can compromise the system’s performance and lead to significant issues over time.

Over-Tightening of Fittings

Over-tightening hydraulic fittings can cause several problems:

Stripped Threads: Applying too much torque can strip the threads of the fitting or the component it’s being attached to, making it difficult or impossible to achieve a proper seal.

Cracked Fittings: Excessive force can also crack or damage fittings, especially those made from more brittle materials.

Deformed Sealing Surfaces: Over-tightening can deform the sealing surfaces, leading to leaks.

To prevent over-tightening, it’s essential to use a torque wrench and adhere to the torque specifications provided by the manufacturer. This ensures that the fitting is tightened sufficiently without exceeding the recommended torque, preserving the integrity of the connection.

Under-Tightening of Fittings

Under-tightening, on the other hand, fails to create a seal tight enough to prevent leaks. This issue might not be immediately apparent and can lead to gradual leaks, which may worsen over time. Inadequate tightening can result from:

Incorrect Torque Application: Not applying enough torque can leave a gap for hydraulic fluid to escape.

Improper Tool Use: Using the wrong tools for installation can lead to insufficient force being applied to the fitting.

Vibrational Loosening

Vibration within hydraulic systems is a prevalent cause of fitting loosening, which can lead to leaks over time. The dynamic nature of hydraulic machinery, combined with the high pressures at which these systems operate, makes them particularly susceptible to the effects of vibration. This can cause even tightly secured fittings to loosen, compromising the integrity of the hydraulic circuit.

Causes of Vibrational Loosening

Machinery Operation: The regular operation of machinery, especially those involving high-speed movements or heavy loads, generates significant vibration.

Pulsating Pressures: Hydraulic systems often experience pulsating pressures due to the pump action or sudden changes in direction of fluid flow, contributing to vibration.

External Sources: External sources, such as adjacent machinery or environmental factors, can introduce additional vibrational forces to the system.

Mitigating Vibrational Loosening

To prevent vibrational loosening and the resultant leaks, several measures can be implemented:

Securing Lines: Hydraulic lines should be securely clamped at regular intervals to minimize movement and absorb vibrations. This helps to prevent the transmission of vibrational energy to fittings.

Using Anti-Vibration Fittings: Specialized fittings designed to withstand vibrational forces can be used in areas of high vibration. These fittings often include features such as locking mechanisms or flexible sections that absorb vibrational energy.

Locknuts and Thread Locking Compounds: Applying locknuts or thread locking compounds to threaded connections can significantly reduce the likelihood of loosening. These materials provide an additional layer of security, maintaining the integrity of the connection even under vibrational stress.

Regular Maintenance: Incorporating vibrational analysis into regular maintenance routines allows for the early detection of loosening fittings. This enables timely tightening or replacement before leaks can develop.

Thermal Expansion and Contraction

Temperature fluctuations are a fundamental concern in hydraulic systems, influencing the behavior of materials, including fittings and seals. As temperatures change, the materials used in hydraulic systems will expand or contract. This phenomenon, known as thermal expansion and contraction, can compromise the integrity of hydraulic fittings, leading to potential leaks.

The Science Behind Thermal Expansion and Contraction

Thermal Expansion: When the temperature increases, the molecules within a material gain energy and move more vigorously, causing the material to expand. In a hydraulic system, this can affect both the metal fittings and the fluid within, altering pressures and potentially causing leaks at connection points.

Thermal Contraction: Conversely, as temperatures decrease, materials contract. This contraction can loosen fittings and seals, creating gaps through which hydraulic fluid can escape.

Impact on Hydraulic Systems

The effects of thermal expansion and contraction in hydraulic systems can be significant:

Weakening of Seals: Seals are particularly susceptible to temperature changes. Over time, repeated expansion and contraction can cause seals to wear, crack, or become misshapen, losing their ability to prevent fluid leakage.

Fitting Displacement: Temperature variations can lead to the gradual loosening of fittings. For example, a fitting that was tightened under a certain temperature condition may loosen as the system experiences temperature fluctuations, if not properly accounted for during installation.

Mitigation Strategies

Designing hydraulic systems to accommodate temperature changes is essential for minimizing the risk of leaks due to thermal expansion and contraction:

Flexible Fittings and Expansion Joints: Utilizing flexible fittings or expansion joints can accommodate the movements caused by temperature fluctuations, maintaining a tight seal despite the expansion or contraction of materials.

Material Selection: Choosing materials with similar coefficients of thermal expansion for both fittings and the surrounding structure can minimize the relative movement between parts.

Temperature Control: Where possible, controlling the temperature of the environment in which the hydraulic system operates can reduce the severity of temperature fluctuations.

Regular Inspections: Routine maintenance should include checking for signs of thermal wear on seals and fittings, and ensuring that any compromised components are replaced before leaks develop.

Wear and Tear

Broken hydraulic fitting Topa

Wear and tear on hydraulic fittings are inevitable consequences of regular use. Over time, the constant flow of hydraulic fluid at high pressure, coupled with the mechanical movements of system components, leads to the gradual deterioration of fittings and seals. This natural process can significantly contribute to the development of leaks within the system.

Causes of Wear and Tear

Mechanical Stress: Continuous mechanical movements create stress on fittings, gradually wearing down their surfaces.

High-Pressure Operation: The high pressures at which hydraulic systems operate can strain fittings and seals, accelerating their wear.

Environmental Factors: Exposure to harsh environmental conditions, such as extreme temperatures, moisture, and contaminants, can hasten the degradation of materials.

Impact on Hydraulic Systems

Leakage: As fittings and seals wear out, their effectiveness in sealing connections diminishes, leading to leaks.

Reduced Efficiency: Leaks and deteriorating components can reduce the system’s overall efficiency, requiring more power to achieve the same output.

Increased Maintenance Costs: Frequent replacements and repairs of worn components can lead to increased maintenance costs over time.

Mitigation Strategies

To minimize the impact of wear and tear on hydraulic systems, several strategies can be employed:

Routine Maintenance: Establishing a regular maintenance schedule is crucial for early detection and replacement of worn components. Regular inspections can identify wear and tear before it leads to leaks.

Quality Components: Using high-quality fittings and seals can extend the lifespan of hydraulic components. Higher quality materials are typically more resistant to wear and environmental factors.

System Design: Designing hydraulic systems with redundancy and ease of maintenance in mind can reduce the impact of wear and tear. For example, installing easily replaceable sections can minimize downtime and maintenance costs.

Environmental Protection: Implementing measures to protect hydraulic systems from harsh environmental conditions can slow the rate of wear and tear. This may include using protective coverings or installing systems in locations less exposed to extreme conditions.

Seal Degradation

Seal degradation is a common issue in hydraulic systems that can lead to leaks and decreased system efficiency. Seals within hydraulic fittings are critical for preventing fluid escape by maintaining a tight barrier between moving parts. Over time, these seals can degrade, losing their elasticity and effectiveness, which compromises the integrity of the hydraulic system.

Causes of Seal Degradation

Aging: Rubber and other elastomeric materials used in seals naturally deteriorate over time, losing flexibility and resilience.

Chemical Exposure: Hydraulic fluids, especially those with aggressive chemical compositions, can cause seals to swell, soften, or even disintegrate.

Thermal Stress: Repeated exposure to high temperatures can accelerate the aging process, while extreme temperature fluctuations can cause seals to crack or become brittle.

Mechanical Wear: Constant motion and pressure can physically wear down seals, reducing their sealing capability.

Impact on Hydraulic Systems

Degraded seals are less effective at containing hydraulic fluid, leading to leaks that can reduce the system’s pressure and efficiency. Even minor leaks can introduce contaminants into the system, further exacerbating wear on components and potentially leading to system failure.

Contamination

Contamination in hydraulic systems is a significant cause of leaks and component failure. Particulate matter, including dirt, metal shavings, and other debris, can enter the system through various means, such as during maintenance, from component wear, or through contaminated hydraulic fluid. Once inside, these contaminants can cause abrasion and deterioration of fittings and seals, leading to leaks.

Sources of Contamination

External Sources: Contaminants can enter the system from the surrounding environment during maintenance operations or through damaged seals and components.

Internal Sources: Wear and tear on system components can generate particles that circulate within the system, causing further damage.

Impact on Hydraulic Systems

Abrasion of Components: Particles can abrade the surfaces of components, including the internal walls of hoses and the sealing surfaces of fittings, leading to leaks.

Seal Deterioration: Contaminants can accelerate the degradation of seals, reducing their effectiveness and leading to leaks.

System Blockages: Accumulation of contaminants can lead to blockages in the hydraulic system, impairing function and causing increased pressure that can lead to leaks.

Mitigation Strategies

To prevent contamination-related issues in hydraulic systems, several strategies can be employed:

Filtration: Installing high-quality filtration systems can remove particulate matter from the hydraulic fluid, protecting components from abrasion and wear.

Regular Fluid Changes: Regularly changing the hydraulic fluid can reduce the concentration of contaminants and reduce wear on components.

Seal Maintenance: Regular inspection and maintenance of seals can prevent external contaminants from entering the system.

Clean Work Practices: During maintenance, ensuring a clean work environment and using clean tools and components can prevent the introduction of new contaminants.

Incorrect Fitting Type or Size

Using the wrong type or size of hydraulic fitting is a common cause of leaks in hydraulic systems. The hydraulic circuit’s integrity depends on the precise matching of fittings to the system’s specifications, including size, pressure rating, and material compatibility. When fittings do not match these specifications, the result can be inadequate seals, leading to leaks and compromised system performance.

Importance of Correct Fitting Selection

Size Compatibility: The size of the fitting must match the size of the hose or tube it connects. An incorrect size can lead to gaps or excessive pressure on the connection points, causing leaks.

Type Suitability: The type of fitting must be suitable for the specific application, including the fluid type, pressure, and dynamic requirements. Different fitting types offer varying degrees of seal integrity and resistance to vibration, temperature, and pressure fluctuations.

Material Compatibility: The fitting material must be compatible with the hydraulic fluid used in the system. Incompatibility can lead to corrosion or degradation of the fitting, resulting in leaks.

Conclusion

Understanding the causes of leaks in hydraulic fittings is critical to maintaining the efficiency, safety, and cost-effectiveness of hydraulic systems. By proactively addressing these issues, operators can avoid the downtime and expense associated with leaks. We encourage you to ask Topa for any experience or tips you may have in managing leaks in hydraulic fittings and we would be happy to assist you.

FAQ

The most common cause is improper installation, such as over-tightening or misalignment of fittings.

Yes, using incompatible fittings or incorrect size can lead to leaks due to poor sealing.


Vibration can cause fittings to loosen over time, leading to leaks at connection points.

Yes, dirt or debris in the system can damage seals, leading to leaks at the fitting connection.

Yes, seals that are worn or damaged will lose their ability to create a tight seal, resulting in leaks.

Extreme temperature changes can cause materials to expand or contract, which can break seals and cause leaks at the fitting connection.

Topa Blog

Find out more about Topa Blog and learn more about specialized hydraulic fittings.

Unlock the Secrets of Hydraulic Hose Laylines

Unlock the Secrets of Hydraulic Hose Laylines

Unlock the Secrets of Hydraulic Hose Layline

Understanding Hydraulic Hose Laylines

Definition and Purpose

A hydraulic hose layline acts as a critical identifier within the complex ecosystem of hydraulic systems, akin to an identity card for each hose. This identifier is not merely for show; it is a carefully designed feature that encodes essential data about the hose’s manufacture and capabilities. Laylines are more than a convenience—they are a necessity for ensuring that components within a hydraulic system are compatible, operate safely under designated pressures and temperatures, and meet the rigorous standards required for reliable performance. By offering a quick and accessible reference, laylines significantly streamline the process of system maintenance, component selection, and safety compliance.

Components of a Layline

The information encapsulated within a layline is comprehensive, covering all aspects necessary to ascertain the hose’s suitability for specific applications and environments. Let’s delve into each component of a layline to understand its significance fully:

Manufacturer’s Name

The inclusion of the manufacturer’s name on the layline provides a direct link to the hose’s origins. This is more than a brand identifier; it’s a mark of accountability and quality assurance. In cases of warranty claims or the need for specific product support, knowing the manufacturer is paramount. This detail assures users of the hose’s provenance and the manufacturing standards adhered to during its production.

Hose Size

The size of a hose is critical for ensuring the correct flow rate and fitting compatibility within a hydraulic system. Hose size on a layline is typically indicated in terms of the inner diameter, often in inches or millimeters. This measurement is crucial for matching the hose with the system’s required flow dynamics and ensuring that connections are leak-proof and secure.

Hydraulic Hose Laylines
Temperature Range

Hydraulic systems can operate in a variety of environments, from the cold to extreme heat. The temperature range specified on a layline informs users of the operational limits of the hose, ensuring that it can perform optimally without risk of damage from overheating or becoming brittle in cold conditions. This information is vital for selecting hoses that will maintain integrity and reliability under specific working temperatures.

Pressure Rating

The pressure rating denotes the maximum pressure that a hose can safely handle. This figure is usually presented in units such as psi (pounds per square inch) or bar. Selecting a hose with an appropriate pressure rating is fundamental to preventing premature hose failure, which can lead to leaks, bursts, and potentially hazardous situations. It ensures that the hose can withstand the system’s operational pressures, including any surges or spikes.

Standards

Laylines often reference specific industry standards, such as those set by the Society of Automotive Engineers (SAE) or the International Organization for Standardization (ISO). These standards signify that the hose has been designed, manufactured, and tested to meet recognized benchmarks of quality, safety, and performance. Compliance with these standards ensures that the hose can be reliably integrated into hydraulic systems that adhere to the same or compatible guidelines.

Date of Manufacture

Understanding the age of a hydraulic hose is crucial for effective maintenance and lifecycle management. The date of manufacture helps users track the hose’s service life, informing maintenance schedules and replacement planning. It is also essential for warranty purposes, providing a clear timeline of the hose’s usage period.

Deciphering Layline Codes

Manufacturer's Identification

The ability to recognize the manufacturer from the layline is not just about identifying who made the hose but understanding the quality and reliability associated with that manufacturer’s products. Each manufacturer may use unique identifiers, such as logos or specific alphanumeric codes, which serve as a hallmark of quality and a point of contact for warranty or technical support issues. Identifying the manufacturer allows users to access detailed product specifications, historical performance data, and support resources, ensuring the hose aligns with the operational standards and expectations of the hydraulic system.

Size and Pressure Ratings

The size of a hose, typically denoted by its inner diameter, and its pressure rating are among the most crucial pieces of information on a layline. These figures, often represented numerically with units of measurement (e.g., inches, millimeters for size, psi, or bar for pressure), are indispensable for selecting a hose that fits the system’s requirements. The size influences the flow rate and velocity of the hydraulic fluid, while the pressure rating indicates the maximum pressure the hose can withstand without failure. Correct interpretation of these values ensures the hose will perform safely and efficiently under the system’s operating conditions, preventing potential malfunctions or hazards.

Temperature and Compatibility

Understanding the temperature range and fluid compatibility of a hydraulic hose is essential for ensuring its longevity and effectiveness in specific environments. Temperature ranges are usually indicated in degrees Celsius or Fahrenheit and signify the operational limits within which the hose can function without degradation. Symbols or abbreviations may also be present to denote the hose’s compatibility with different types of hydraulic fluids, such as petroleum-based oils, water-glycol solutions, or synthetic fluids. These markers are critical for selecting a hose that will not deteriorate or fail when exposed to particular hydraulic fluids or operating temperatures, thereby safeguarding system integrity.

Standards and Certifications

Laylines often feature abbreviations representing the standards and certifications the hose meets, such as SAE (Society of Automotive Engineers) or ISO (International Organization for Standardization) specifications. For example, a hose marked with “SAE J517” complies with the SAE’s specifications for hydraulic hoses. These certifications inform users of the hose’s adherence to international quality and safety benchmarks, ensuring its suitability for specific applications and its interoperability within global markets. Knowledge of these standards allows users to make informed choices, selecting hoses that meet the regulatory and performance criteria necessary for their hydraulic systems.

The Significance of Date Codes and Batch Numbers

Manufacturing Date

The manufacturing date on a hydraulic hose is more than just a timestamp; it’s a crucial piece of data for managing the hose’s lifecycle and ensuring system reliability. Often encoded to conserve space, this date reveals when the hose was made, enabling users to calculate its age and anticipate when it might need replacement. This information is instrumental in establishing preventive maintenance schedules, which are vital for minimizing downtime and avoiding catastrophic system failures. Additionally, the manufacturing date is often required for warranty claims, serving as proof of the hose’s age and determining eligibility for replacement or repair under warranty terms. Understanding how to read and interpret these encoded dates ensures that hydraulic system operators can maintain their systems efficiently and effectively.

Batch Numbers

Batch numbers serve as a critical link back to the specifics of the hose’s production, including the materials used, the manufacturing conditions, and the quality control measures in place at the time of manufacture. This information is invaluable for quality control purposes, allowing manufacturers and users to trace the origins of a hose should any issues arise. In the event of a defect or recall, batch numbers enable quick identification of affected hoses, facilitating targeted actions to rectify the issue. This traceability is not only essential for maintaining high standards of quality and safety but also for complying with regulatory requirements in many industries. By leveraging batch numbers, companies can manage recalls efficiently, minimizing the impact on their operations and reputation.

The encoding of manufacturing dates and the inclusion of batch numbers on hydraulic hose laylines highlight the industry’s commitment to quality, safety, and accountability. These markers provide a wealth of information that, when decoded, can significantly enhance the management and maintenance of hydraulic systems. By paying close attention to these details, users can ensure their hydraulic hoses are always in top condition, contributing to the overall health and efficiency of their hydraulic systems.

Practical Tips for Using Layline Information

Selection

When selecting a hydraulic hose, the layline information is your first checkpoint for compatibility with your system. This includes ensuring that the hose’s size is adequate for the required flow rate and that it fits correctly with other components. The pressure rating must meet or exceed the maximum pressure of the hydraulic system to prevent leaks or bursts under pressure. Temperature range is also critical, as the hose must be capable of operating efficiently within the environmental conditions it will be exposed to. Additionally, fluid compatibility symbols or abbreviations guide you in choosing a hose that won’t degrade when in contact with the hydraulic fluid used in your system. This careful matching process ensures optimal system performance and longevity.

Maintenance

The proactive use of layline information for maintenance schedules is a strategic approach to hydraulic system care. The manufacturing date, prominently displayed on the layline, is a key factor in determining the hose’s age and, by extension, its expected lifespan. This allows maintenance teams to implement timely replacements, circumventing potential hose failures that could lead to system downtime or even hazardous situations.

Moreover, the layline provides a snapshot of the hose’s operational history and environmental exposure, enabling tailored inspection schedules. For instance, hoses used in extreme temperatures or corrosive environments may require more frequent inspections. By integrating layline data into maintenance planning, it’s possible to forecast wear and tear with greater accuracy, scheduling inspections and replacements to preempt failures. This not only prolongs the life of the hydraulic hoses but also enhances the reliability and efficiency of the entire hydraulic system.

Troubleshooting

In the event of hydraulic system malfunctions, the layline serves as an invaluable diagnostic tool. A thorough review of the hose’s specifications—its size, pressure rating, temperature range, and fluid compatibility—can swiftly reveal mismatches between the hose and its intended application. Such mismatches might be the root cause of common issues like leaks, bursts, or reduced system efficiency.

Early identification of these incompatibilities or signs of hose failure can significantly streamline the troubleshooting process. It allows maintenance personnel to focus their efforts on rectifying the specific problem, whether that means replacing an incorrectly sized hose, addressing compatibility issues, or adjusting the system to accommodate the hose’s specifications. Quick and accurate diagnosis based on layline information minimizes downtime and resource expenditure, facilitating efficient repairs that restore system operation.

Common Mistakes and Misconceptions

Misreading Laylines

One of the most prevalent errors in dealing with hydraulic hoses is the misinterpretation of layline information. This can occur with any aspect of the layline, from hose size and pressure ratings to standards compliance. For instance, mistaking the hose size can lead to improper fitting connections, causing leaks or restricted flow within the system. Misunderstanding pressure ratings may result in selecting a hose that cannot withstand the system’s operational pressures, leading to dangerous failures under stress.

Each manufacturer may have a unique coding system for their laylines, making it imperative for users to familiarize themselves with these nuances. Investing time in learning how to accurately read and interpret these codes is crucial. It ensures that the selected hoses are fully compatible with the system’s requirements, thereby avoiding costly errors and potential safety hazards.

Overlooking Important Details

Another common pitfall is overlooking critical details conveyed in the layline, such as the temperature range or the manufacturing date. Ignoring the temperature range can result in using a hose in environments for which it was not designed, either too hot or too cold, compromising its integrity and functionality. Similarly, disregarding the manufacturing date can lead to the use of older, potentially degraded hoses, risking failures and leaks.

The consequences of overlooking these details can be significant, ranging from reduced system efficiency and premature hose failure to severe safety risks. It’s essential to approach layline information comprehensively, considering every component of the layline in the context of the hose’s intended application. This holistic understanding safeguards against the inadvertent selection of unsuitable components, ensuring the hydraulic system operates safely and efficiently.

Conclusion

Fully grasping the wealth of information provided by hydraulic hose laylines is pivotal for the safety, maintenance, and efficiency of hydraulic systems. By applying the knowledge shared in this exploration, hydraulic system users can unlock the full potential of their systems, ensuring optimal performance and reliability. Let the secrets of laylines guide you toward a more informed and effective use of hydraulic technology.

FAQ

A hydraulic hose layline is a printed line or marking on the hose that provides information about the hose’s specifications, such as size, material, and pressure rating.


The layline helps users identify key details about the hose, ensuring it is used correctly and safely in hydraulic systems.

Yes, the layline often includes the manufacturer’s name or logo, making it easier to trace the hose’s origin.

Yes, the layline typically includes pressure ratings, ensuring the hose is suitable for specific applications.


In addition to pressure ratings, laylines may also indicate the hose’s material type, temperature range, and compliance standards.


To read a layline, simply follow the printed markings along the hose to understand its specifications and ensure compatibility with your system.

Topa Blog

Find out more about Topa Blog and learn more about specialized hydraulic fittings.

Contact Topa

Save 30% on maintenance costs with our easy-install hydraulic fittings. Contact Now!