Understanding JIC Fitting Measurements Basic Tips and Errors

JIC Fitting Measurements: Basic Tips and Errors

JIC Fitting Measurements: Basic Tips and Errors

Table of Contents

Introduction

JIC hydraulic fittings are crucial components in hydraulic systems, ensuring leak-proof connections and efficient fluid flow. This post aims to provide essential tips for accurately measuring JIC fittings and highlight common errors that can compromise system performance. Understanding these measurements is vital for maintaining safety, reliability, and efficiency in various industrial applications.

What are JIC Fittings?

JIC (Joint Industry Council) fittings are integral components in various hydraulic systems, known for their reliability and durability. These fittings are standardized by the SAE (Society of Automotive Engineers), which ensures a consistent and high-quality product across different manufacturers and applications.

Key Characteristics of JIC Fittings

37-Degree Flare Seating Surface:

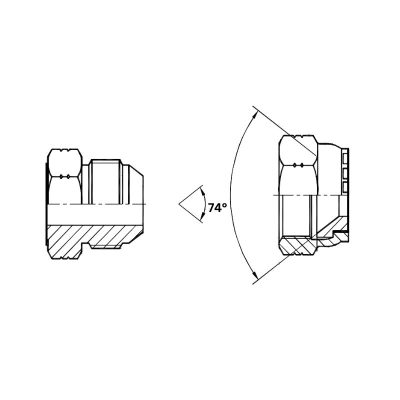
The defining feature of JIC fittings is their 37-degree flare. This design facilitates a robust metal-to-metal seal, which is crucial for preventing leaks under high-pressure conditions. The flare connection also allows for easy assembly and disassembly, making maintenance more straightforward.

Standardization:

The standardization by SAE means that JIC fittings have uniform specifications, allowing for interchangeability and compatibility across different brands and systems. This consistency is particularly important in industries where precision and reliability are paramount.

Understanding JIC Fitting Measurements

Accurate measurement of JIC fittings is essential to ensure proper fit and function. The primary parameters to consider are thread size, thread pitch, outside diameter (OD), and inside diameter (ID).

Thread Size:

  • Definition: Thread size refers to the nominal size of the threads on the fitting.
  • Importance: Correctly identifying the thread size ensures compatibility with corresponding components. Using the wrong thread size can lead to improper sealing and potential system failure.

Thread Pitch:

  • Definition: Thread pitch is the distance between threads, typically measured in threads per inch (TPI).
  • Measurement: To measure thread pitch, use a thread gauge, which helps determine the number of threads per inch. Accurate pitch measurement is critical for matching the fitting with the correct mating component.
  • Importance: Proper thread pitch ensures a secure and tight connection, preventing leaks and maintaining system integrity.

Outside Diameter (OD):

  • Definition: The outside diameter is the external width of the fitting’s threaded section.
  • Measurement: Use calipers to measure the OD accurately. Place the calipers around the threaded section, ensuring they are perpendicular to the fitting.
  • Importance: Accurate OD measurement is essential for ensuring that the fitting fits properly within the hydraulic system. An incorrect OD can cause fitting misalignment and leaks.

Inside Diameter (ID):

  • Definition: The inside diameter is the internal width of the fitting, determining the flow capacity.
  • Measurement: Measure the ID using calipers. Insert the calipers inside the fitting’s opening and expand them until they touch the internal walls.
  • Importance: Correct ID measurement ensures that the fitting allows the proper flow of hydraulic fluid. An incorrect ID can restrict flow, reducing system efficiency and causing potential damage.

Step-by-Step Guide to Measuring JIC Fittings

Accurate measurement of JIC fittings is critical for ensuring proper fit and function in hydraulic systems. Follow these detailed steps to achieve precise measurements:

Measure Thread Size and Pitch

length measure Topa

Use a Thread Gauge:

  • Select the Appropriate Gauge: Choose a thread gauge that matches the size range of the fitting you are measuring.
  • Align the Gauge: Hold the fitting firmly and align the thread gauge with the threads of the fitting. Ensure that the gauge fits snugly into the threads without forcing it.

Check for a Snug Fit:

  • Visual Inspection: Once the gauge is in place, visually inspect the fit. The threads of the gauge should align perfectly with the threads of the fitting.
  • Feel for Fit: Gently move the gauge back and forth. A proper fit will feel smooth without any wobbling or gaps.

Record the Thread Size and Pitch:

  • Documentation: Note down the thread size (e.g., 7/16-20) and the pitch (threads per inch, TPI). Accurate documentation is essential for matching the fitting with corresponding components.

Measure the Outside Diameter (OD)

Place the Calipers Around the Threaded Section:

  • Prepare the Calipers: Ensure the calipers are clean and calibrated. Open the calipers to fit around the widest part of the threaded section.
  • Position the Calipers: Place the calipers around the threaded section, ensuring they are perpendicular to the fitting for an accurate reading.

Ensure Perpendicular Alignment:

  • Correct Positioning: Hold the calipers steady and make sure they are perfectly perpendicular to the axis of the fitting. Any tilt or misalignment can result in inaccurate measurements.
  • Read the Measurement: Close the calipers gently until they touch the external surfaces of the threads. Read the measurement on the calipers’ scale and record it.

Measure the Inside Diameter (ID)

Insert the Calipers Inside the Fitting’s Opening:

  • Prepare the Calipers: Use the inside measuring jaws of the calipers. Clean the jaws to ensure no debris affects the measurement.
  • Position the Calipers: Insert the calipers inside the opening of the fitting, ensuring they are parallel to the axis of the fitting.

Expand the Calipers:

  • Expand Gently: Open the calipers slowly until the inside measuring jaws touch the internal walls of the fitting.
  • Ensure Full Contact: Make sure the jaws are making full contact with the internal surface without any gaps.

Record the Measurement:

  • Read the Scale: Read the measurement on the calipers’ scale and document the inside diameter.
  • Double-Check: For accuracy, repeat the measurement process a couple of times and ensure consistent results.

Verify Measurements

Cross-Check with Standardized Charts:

  • Use Reference Materials: Compare your measurements with standardized charts for JIC fittings. These charts provide nominal sizes, thread pitches, and diameters for various fitting sizes.
  • Confirm Accuracy: Ensure that the measured values match the standardized values within acceptable tolerances.

Re-Measure if Necessary:

  • Double-Check: If there are discrepancies, re-measure the fitting using the same steps to confirm accuracy.
  • Tool Calibration: Verify that your measurement tools are calibrated correctly. Miscalibrated tools can lead to incorrect measurements.

By following these steps meticulously, you can ensure that JIC fittings are measured accurately, preventing potential issues in hydraulic systems and ensuring reliable and durable connections. Accurate measurements are key to maintaining the integrity and performance of hydraulic systems, contributing to overall operational efficiency and safety.

Common Errors in JIC Fitting Measurements

Despite the simplicity of measuring JIC fittings, several common errors can occur that may compromise the accuracy and reliability of the measurements. Being aware of these pitfalls and knowing how to avoid them is essential for ensuring precise measurements and proper fitting performance.

Incorrect Thread Identification

Misidentifying Thread Size or Pitch:

  • Description: One of the most frequent errors is misidentifying the thread size or pitch of the JIC fitting. This mistake can lead to using incompatible fittings, resulting in poor sealing and potential leaks.
  • Cause: This error often arises from the use of incorrect or worn thread gauges, or from not recognizing the subtle differences between similar thread types (e.g., metric vs. imperial threads).

Consequences:

  • Mismatched Fittings: Using a fitting with incorrect thread size or pitch can cause thread stripping or insufficient engagement, leading to leaks or fitting failure.
  • Operational Downtime: Incorrect fittings can necessitate rework or replacement, causing delays and increased maintenance costs.

Prevention:

  • Accurate Tools: Use high-quality, precise thread gauges and ensure they are in good condition.
  • Training: Educate personnel on the differences between various thread types and the importance of accurate thread identification.
  • Verification: Always cross-check thread measurements with standardized charts and references.

Improper Caliper Use

Incorrect Measurement Techniques:

  • Description: Calipers are essential for measuring the outside and inside diameters of JIC fittings. Improper use of calipers, such as not aligning them correctly or applying inconsistent pressure, can result in inaccurate measurements.
  • Cause: This error can stem from a lack of training, rushing through the measurement process, or using damaged or misaligned calipers.

Consequences:

  • Inaccurate OD or ID Measurements: Incorrect caliper use can lead to misfit connections, causing leaks, reduced hydraulic efficiency, and potential system failures.
  • Wasted Resources: Inaccurate measurements may lead to ordering the wrong size fittings, resulting in wasted time and materials.

Prevention:

  • Proper Training: Ensure that all personnel are trained in the correct use of calipers, including proper alignment and consistent pressure application.
  • Tool Maintenance: Regularly inspect and maintain calipers to ensure they are in good working condition and correctly calibrated.
  • Careful Handling: Handle calipers carefully and store them properly to avoid damage and misalignment.

Neglecting Tool Calibration

Inaccurate Tools:

  • Description: Measurement tools, including calipers and thread gauges, must be regularly calibrated to maintain their accuracy. Neglecting calibration can result in tools that provide false readings, leading to measurement errors.
  • Cause: This issue often occurs due to a lack of a systematic calibration schedule, insufficient awareness of the importance of calibration, or using tools beyond their recommended calibration interval.

Consequences:

  • False Readings: Uncalibrated tools can give incorrect measurements, leading to mismatched fittings and potential hydraulic system failures.
  • Quality Issues: Poor measurement accuracy can compromise the quality and reliability of hydraulic connections, affecting overall system performance.

Prevention:

  • Regular Calibration: Implement a routine calibration schedule for all measurement tools. Follow the manufacturer’s recommendations for calibration intervals.
  • Documentation: Keep detailed records of calibration dates and results to track the accuracy and maintenance of each tool.
  • Quality Assurance: Incorporate tool calibration checks into the quality assurance process to ensure ongoing accuracy and reliability.

Advanced Tips for Accurate JIC Measurements

Accurately measuring JIC fittings, especially in complex scenarios involving worn or damaged fittings and different materials, requires advanced techniques and considerations. Here are detailed strategies to ensure precision in these challenging conditions.

Techniques for Measuring Worn or Damaged Fittings

Visual Inspection and Cleaning:

  • Initial Inspection: Before measuring, conduct a thorough visual inspection of the fitting. Look for signs of wear, damage, or corrosion.
  • Cleaning: Clean the fitting meticulously to remove any debris, oil, or corrosion that could affect measurement accuracy. Use a wire brush or appropriate solvent.

Using Thread Restoration Tools:

  • Thread Files: Use thread files to restore damaged threads to a more measurable condition. Carefully file the threads to remove burrs and imperfections.
  • Chasers: Thread chasers can also help in rethreading and cleaning up the threads, making it easier to take accurate measurements.

Precision Measuring Tools:

  • Digital Calipers and Micrometers: Utilize digital calipers and micrometers for their higher accuracy and ease of reading. These tools can help in obtaining precise measurements even when threads are slightly worn.
  • Thread Gauges: Use thread gauges to verify thread size and pitch. For worn threads, try multiple gauges to find the best fit and cross-reference with the most accurate one.

Rechecking and Averaging Measurements:

  • Multiple Measurements: Take multiple measurements at different points along the threads. This helps in identifying any inconsistencies caused by wear.
  • Averaging: Calculate the average of these measurements to get a more accurate overall dimension.

Adjusting Measurement Techniques:

  • Pressure Application: Apply consistent and appropriate pressure when measuring different materials. Excessive force can deform softer materials like aluminum, while insufficient force might not yield accurate readings on harder materials like steel.
  • Temperature Considerations: Be aware of temperature effects on materials. Measure in a controlled environment to prevent thermal expansion or contraction from affecting the measurements.

Regular Tool Calibration and Maintenance:

  • Calibrating for Material Differences: Regularly calibrate your tools, especially when switching between different materials. This ensures that any material-specific wear on the tools does not impact the measurement accuracy.
  • Tool Care: Maintain your tools properly, keeping them clean and free of debris that could affect measurement accuracy, particularly when switching between materials like steel and aluminum.

By applying these advanced tips, you can enhance the accuracy of your JIC fitting measurements, even in challenging conditions involving worn or damaged fittings and different material types. These practices ensure that your hydraulic systems remain reliable, efficient, and safe.

Conclusion

Accurate JIC fitting measurements are essential for maintaining the reliability and efficiency of hydraulic systems across various industries. By adhering to the detailed tips and techniques outlined in this post, professionals can avoid common measurement errors and achieve a high level of precision. Implementing proper measurement practices, using the right tools, and ensuring regular tool maintenance are key steps to enhancing accuracy. These measures not only prevent costly system failures and downtime but also contribute significantly to the overall success and longevity of your hydraulic projects. Consistent application of these principles ensures that hydraulic connections remain secure and effective, supporting smooth and safe operations.

FAQ

A JIC (Joint Industry Council) fitting is a type of flare fitting standardized by the SAE. It features a 37-degree flare seating surface, providing a strong metal-to-metal seal that can withstand high pressures.

To measure the thread size, use a thread gauge to match the threads on the fitting. Align the gauge with the threads and check for a snug fit to determine the correct size.

Essential tools for measuring JIC fittings include calipers, thread gauges, and micrometers. These tools help measure the outside diameter (OD), inside diameter (ID), and thread pitch accurately.

Regular calibration ensures that measurement tools provide accurate readings. Uncalibrated tools can give false measurements, leading to mismatched fittings and potential system failures.

Yes, you can measure worn or damaged JIC fittings using advanced techniques such as cleaning, using thread restoration tools, and taking multiple measurements to ensure accuracy.

Different materials, such as steel and aluminum, require specific measurement techniques. Use appropriate tools and apply consistent pressure to avoid deformation and ensure accurate measurements.

Different Flare Fitting Types A Comprehensive Overview

Different Flare Fitting Types: A Comprehensive Overview

Different Flare Fitting Types: A Comprehensive Overview

Table of Contents

Introduction

Flare fittings are essential components in various industries, known for their reliability and effectiveness in creating leak-free connections. Understanding the different types of flare fittings is crucial for professionals who work with hydraulic, pneumatic, gas, and refrigeration systems. This comprehensive overview will delve into the various flare fitting types, their applications, benefits, and selection criteria to help you make informed decisions for your projects.

Basics of Flare Fittings

Flare fittings are designed to connect metal tubing and create a secure, leak-free seal. They are widely used in systems that require robust, high-pressure connections, such as automotive fuel lines, HVAC systems, and industrial hydraulic systems. The primary advantage of flare fittings is their ability to withstand high pressure and prevent leakage, making them ideal for critical applications.

Key Components of Flare Fittings

Flare fittings consist of three main components: the body, the nut, and the sleeve. Each of these components plays a critical role in ensuring a secure and leak-free connection.

Body: The body is the main part of the flare fitting that connects to the tubing. It features a tapered, conical seat that matches the flare on the tubing, creating a tight seal when the connection is assembled. The body is typically made from materials such as brass, stainless steel, or aluminum, each offering distinct advantages. Brass is known for its excellent corrosion resistance and workability, making it suitable for a wide range of applications. Stainless steel offers superior strength and resistance to high temperatures and harsh environments, while aluminum is lightweight and provides good corrosion resistance.

Nut: The nut is used to tighten the connection and secure the tubing to the fitting body. When tightened, the nut compresses the sleeve around the flared end of the tubing, forcing it against the conical seat of the body. This action creates a strong mechanical seal that prevents leaks. The nut must be made from a material compatible with the rest of the fitting to ensure durability and reliability. Proper torque application is crucial when tightening the nut to avoid over-compression, which can damage the tubing and fitting, or under-compression, which can result in leaks.

Sleeve: The sleeve, also known as the ferrule, fits around the tubing and ensures a proper seal when the nut is tightened. It helps to distribute the compressive force evenly around the tubing, preventing deformation and ensuring a tight seal. The sleeve is typically made from the same material as the body to maintain compatibility and performance. Its role is vital in maintaining the integrity of the connection, especially in high-pressure systems.

Types of Flare Fittings

Flare fittings come in various types, each designed to meet specific application needs and offering distinct advantages. Understanding the differences among these types is essential for selecting the right fitting for your system.

45-Degree Flare Fittings

brass JIC flare fittings 45-degree elbow

Applications: 45-degree flare fittings are commonly used in refrigeration, air conditioning, and automotive systems. These fittings are suitable for applications where the pressure is relatively low to medium and the need for a reliable seal is paramount. They are often found in plumbing systems, gas lines, and low-pressure hydraulic systems.

Advantages: One of the main advantages of 45-degree flare fittings is their ease of installation. The flaring process is straightforward, requiring basic tools to shape the tubing end into a 45-degree angle that fits securely within the fitting body. This type of fitting provides a dependable seal that can withstand typical operating conditions in refrigeration and HVAC systems. Additionally, the availability and standardization of 45-degree flare fittings make them a popular choice for many applications.

Disadvantages: Despite their versatility, 45-degree flare fittings are not suitable for high-pressure systems. The seal, while reliable for low to medium pressures, may not hold up under the extreme conditions found in high-pressure hydraulic or industrial applications. Users must ensure that the pressure ratings of these fittings align with their system requirements to avoid potential failures.

37-Degree Flare Fittings (AN and JIC)

Applications: 37-degree flare fittings, including AN (Army-Navy) and JIC (Joint Industry Council) standards, are widely used in hydraulic systems, aerospace, and military applications. These fittings are designed to handle higher pressures and more demanding conditions, making them ideal for critical systems that require robust and reliable connections.

Advantages: The primary advantage of 37-degree flare fittings is their higher pressure ratings compared to 45-degree fittings. The 37-degree flare provides a tighter seal that can withstand higher pressures and vibration, which is crucial in hydraulic and aerospace applications. These fittings are known for their durability and ability to maintain a secure connection under harsh conditions. Additionally, AN and JIC fittings are manufactured to strict military and industrial standards, ensuring high quality and consistency.

Disadvantages: The installation of 37-degree flare fittings requires precise flaring tools to achieve the correct angle and ensure a perfect seal. This can make the installation process more complex and time-consuming compared to 45-degree fittings. Improperly flared tubing can lead to leaks and system failures, so it is essential to use the right tools and techniques.

Inverted Flare Fittings

Applications: Inverted flare fittings are commonly used in brake lines and fuel systems, where a strong, vibration-resistant seal is necessary. These fittings are designed to provide a secure connection in environments where the system is subject to constant movement and high vibration, such as in automotive and industrial machinery.

Advantages: The inverted flare design offers a robust seal that is highly resistant to vibration and movement. This makes them ideal for applications like automotive brake lines, where maintaining a secure and leak-free connection is critical for safety. The inverted flare fitting’s design ensures that the flare is fully enclosed and protected within the fitting body, reducing the risk of damage and leaks.

Disadvantages: Inverted flare fittings are more complex to install compared to standard flare fittings. The flaring process requires additional steps to achieve the inverted flare, which can be more time-consuming and require specialized tools. Despite this complexity, the benefits of a secure, vibration-resistant seal often outweigh the installation challenges.

Inverted Flare Male Fittings - Dual Master Cylinder adapter

Double Flare Fittings

Applications: Double flare fittings are suitable for high-pressure hydraulic systems and applications where extra strength and leak resistance are required. These fittings are commonly used in automotive, industrial, and marine applications, where the system operates under high pressures and needs a reliable seal.

Advantages: Double flare fittings offer enhanced strength and leak resistance due to the double flaring process. The double flare creates a reinforced connection that can withstand higher pressures and provides an additional layer of sealing security. This makes them ideal for critical systems where reliability is paramount.

Disadvantages: The installation of double flare fittings is more time-consuming and requires additional steps compared to single flare fittings. The double flaring process involves creating a second flare on the tubing end, which adds to the installation time and requires precision. However, the added effort is justified by the increased strength and reliability of the connection.

Metric Flare Fittings

Applications: Metric flare fittings are commonly used in European and Asian automotive and hydraulic systems. These fittings are designed to be compatible with metric-sized tubing and components, making them essential for applications that adhere to metric standards.

Advantages: The primary advantage of metric flare fittings is their compatibility with metric tubing and systems. This ensures that the fittings fit perfectly within systems that use metric measurements, reducing the risk of leaks and ensuring a secure connection. Metric flare fittings are widely used in international applications, particularly in regions where metric standards are prevalent.

Disadvantages: Metric flare fittings are less common in North American markets, which can make them harder to source and more expensive. Additionally, the availability of metric fittings and tools may be limited compared to their imperial counterparts, potentially complicating maintenance and repairs for systems that require metric components.

Feature 

45-Degree
Flare

37-Degree
Flare
(AN/JIC)

Inverted
Flare

Double
Flare

Metric Flare

Pressure
Rating

Low to Medium

High

Medium to
High

High

Medium to
High

Applications

Refrigeration
HVAC
Automotive

Hydraulics
Aerospace
Military

Brake Lines
Fuel
Systems

High-
Pressure
Hydraulics

Automotive
Hydraulics

Ease of
Installation

Easy

Moderate to
Difficult

Moderate

Difficult

Moderate

Compatibility

Common

Widely Used

Specific
Uses

Specific
Uses

Regional

Selection Criteria for Flare Fittings

Selecting the appropriate flare fittings for your system is crucial for ensuring optimal performance, safety, and longevity. The following factors should be carefully considered to make an informed decision:

Application Requirements

The first step in selecting the right flare fitting is to understand the specific requirements of your application. Different systems operate under varying conditions, and the fitting type must match these conditions to ensure a reliable connection. Consider the following aspects:

System Type: Determine whether the system is hydraulic, pneumatic, automotive, HVAC, or another type. Each system has unique demands that influence the choice of fittings.

Pressure Conditions: Identify the pressure levels the system will operate under. Low to medium pressure systems may be suitable for 45-degree flare fittings, while high-pressure systems often require 37-degree or double flare fittings.

Operational Environment: Consider environmental factors such as vibration, temperature fluctuations, and the presence of aggressive chemicals. These factors can affect the performance and durability of the fittings.

Pressure Ratings

Pressure ratings are critical in selecting flare fittings. The fitting must be capable of withstanding the maximum pressure exerted within the system without leaking or failing. To ensure the fitting meets the system’s pressure requirements:

Check Manufacturer Specifications: Always refer to the manufacturer’s pressure rating for the specific fitting type. This information provides the maximum pressure the fitting can safely handle.

Include Safety Margins: Factor in a safety margin beyond the system’s operating pressure to account for pressure spikes and variations. This ensures that the fitting will perform reliably under all conditions.

Material Compatibility

The material of the flare fitting must be compatible with both the tubing and the media being transported through the system. Incompatible materials can lead to corrosion, leaks, and system failures. Consider the following when choosing materials:

Tubing Material: Match the fitting material to the tubing material to ensure compatibility. Common materials include brass, stainless steel, and aluminum. For example, brass fittings are typically used with copper tubing, while stainless steel fittings are used with stainless steel tubing.

Media Characteristics: Consider the chemical properties of the media (e.g., gas, liquid, oil) being transported. Ensure that the fitting material is resistant to the media to prevent chemical reactions and corrosion.

Environmental Considerations

Environmental factors can significantly impact the performance and lifespan of flare fittings. It is essential to consider the following environmental conditions:

Temperature: High or low temperatures can affect the material properties of the fittings. Choose materials that can withstand the operating temperature range of your system. For instance, stainless steel fittings are ideal for high-temperature environments, while brass fittings work well in moderate temperatures.

Corrosion Resistance: If the system operates in a corrosive environment (e.g., exposure to saltwater, chemicals, or humid conditions), select fittings made from corrosion-resistant materials such as stainless steel or specific grades of aluminum.

Exposure to Chemicals: Some chemicals can degrade certain materials over time. Ensure the fitting material is resistant to any chemicals it may come into contact with in the system.

Industry Standards and Compliance

Industry standards are established to ensure consistency, safety, and reliability in the manufacturing and use of flare fittings. These standards define the dimensions, materials, pressure ratings, and performance requirements for fittings, providing a common framework for manufacturers and users. The most widely recognized standards for flare fittings are set by organizations such as SAE and ISO.

SAE Standards

The Society of Automotive Engineers (SAE) sets numerous standards for flare fittings, particularly in the automotive and aerospace industries. Key SAE standards include:

  1. SAE J512: Covers automotive tube fittings, including dimensions and performance requirements for 45-degree and 37-degree (JIC) flare fittings.
  2. SAE J514: Specifies the requirements for hydraulic tube fittings, including various types of flare fittings.
  3. SAE J1453: Pertains to the design and performance of 24-degree flareless bite-type fittings, commonly used in hydraulic systems.

These SAE standards ensure that flare fittings meet stringent requirements for pressure, temperature, and vibration, making them suitable for demanding applications.

ISO Standards

The International Organization for Standardization (ISO) provides global standards for flare fittings, ensuring compatibility and interoperability across international markets. Important ISO standards include:

  1. ISO 8434: Specifies the requirements for metallic tube connections for fluid power and general use, including 24-degree flareless and 37-degree flare fittings.
  2. ISO 2974: Defines the dimensions and performance requirements for 24-degree cone fittings (flare fittings) used in hydraulic systems.
  3. ISO 6162: Covers flange connections with 24-degree cone fittings for use in hydraulic fluid power and general applications.

ISO standards facilitate international trade by ensuring that products meet global quality and performance benchmarks.

Other Relevant Standards

In addition to SAE and ISO, other organizations also set standards for flare fittings:

DIN (Deutsches Institut für Normung): The German Institute for Standardization sets standards such as DIN 2353, which covers 24-degree compression fittings.

BS (British Standards): The British Standards Institution provides standards for flare fittings used in the UK, ensuring they meet specific regional requirements.

ASTM (American Society for Testing and Materials): ASTM sets material and performance standards for various types of fittings, including flare fittings.

Conclusion

In this comprehensive overview, we have explored the basics of flare fittings, the key components, various types, selection criteria, and the importance of industry standards and compliance. Choosing the right flare fitting is crucial for ensuring the safety, reliability, and efficiency of your systems. By understanding the different types and their applications, you can make informed decisions that best suit your needs. We encourage you to share your experiences or questions about flare fittings to further enhance our collective knowledge and expertise.

FAQ

Flare fittings are connectors used to create secure, leak-free seals between metal tubing in various systems, such as automotive, HVAC, and hydraulic systems.

The main types include 45-degree flare fittings, 37-degree flare fittings (AN and JIC), inverted flare fittings, double flare fittings, and metric flare fittings.

Consider factors such as the system’s pressure requirements, material compatibility, environmental conditions, and cost when selecting a flare fitting.

Flare fittings are typically made from brass, stainless steel, and aluminum, each offering specific benefits depending on the application requirements.

Compliance ensures that flare fittings meet safety, reliability, and performance requirements, reducing the risk of failures and ensuring compatibility with other system components.

Purchase from reputable manufacturers, verify specifications, implement quality control measures, stay informed about standard updates, and consider third-party certifications and audits.

Contact Topa

Have a question or suggestion? Fill out the form below to get in touch with one of our experts.

JIC Fitting Specifications What You Need to Know

JIC Fitting Specifications: What You Need to Know

JIC Fitting Specifications: What You Need to Know

Table of Contents

Introduction

Understanding JIC fitting specifications is crucial for anyone involved in the hydraulic systems industry. JIC fittings are essential components that ensure the efficiency and safety of hydraulic systems, widely used across various sectors. This post aims to provide a comprehensive guide on JIC fitting specifications, helping you make informed decisions for your applications.

What are JIC Fittings?

JIC fittings are a specific type of hydraulic fitting designed with a 37-degree flare seating surface. This unique angle is engineered to create a metal-to-metal seal, which is essential for maintaining a secure and leak-free connection, particularly in high-pressure applications. The design of JIC fittings makes them highly reliable and effective in preventing leaks, which is crucial in systems that handle high-pressure fluids. This metal-to-metal contact ensures a tight seal without the need for additional sealants, which simplifies maintenance and enhances reliability.

History and Development

The development of JIC fittings dates back to World War II. During this period, the need for standardized hydraulic connections in military equipment became apparent. The military required robust and reliable fittings that could be easily manufactured and consistently meet stringent performance standards. As a result, the Joint Industry Council was formed to create a standardized fitting that could be used across various military applications. The 37-degree flare design was chosen for its superior sealing capabilities and ease of production. Following the war, the effectiveness and reliability of JIC fittings led to their adoption in civilian industries.

Common Applications

The versatility and reliability of JIC fittings have made them a staple in many industries.

Agriculture: In the agricultural sector, JIC fittings are commonly used in hydraulic systems for tractors, harvesters, and other farm equipment.

Construction: Heavy machinery such as excavators, bulldozers, and cranes rely on hydraulic systems that incorporate JIC fittings.

Transportation: The transportation industry uses JIC fittings in the hydraulic systems of trucks, buses, and other vehicles.

Fluid Power Systems: JIC fittings are integral to fluid power systems, where they connect different components such as pumps, valves, and actuators.

Fuel Delivery Systems: In fuel delivery systems, JIC fittings ensure that fuel is transported efficiently and without leaks.

Key Specifications of JIC Fittings

Size Specifications: JIC fittings are designed to accommodate a wide range of sizes, ensuring compatibility with various hydraulic systems. The sizes are typically denoted in dash numbers (e.g., -4, -6, -8), which correspond to the fitting’s outside diameter (OD) measured in sixteenths of an inch. This standardized sizing system allows for easy identification and interchangeability. For instance, a -4 JIC fitting has an OD of 1/4 inch, a -6 fitting has an OD of 3/8 inch, and so on. This sizing convention helps streamline the selection process, ensuring that the correct fitting size is chosen for each application. Additionally, the use of dash numbers simplifies inventory management and reduces the risk of using incompatible fittings.

Pressure Ratings

The pressure rating of JIC fittings is a critical specification that varies depending on the size and material of the fitting.

Smaller Sizes: For smaller JIC fittings, such as those with dash numbers -4 or -6, the pressure ratings can be as high as 10,000 psi. These high-pressure ratings make them suitable for demanding applications in hydraulic systems that operate under extreme conditions.

Larger Sizes: Larger JIC fittings, such as those with dash numbers -12 or -16, typically have lower pressure ratings, around 6,000 psi. While still robust, these fittings are designed for applications where lower pressure thresholds are acceptable.

Temperature Ratings

JIC fittings are engineered to operate effectively across a broad temperature range, which is crucial for maintaining the integrity and performance of hydraulic systems in various environments.

General Range: Typically, JIC fittings can function in temperatures ranging from -65°F to 400°F (-54°C to 204°C). This wide range accommodates both extremely cold and hot conditions, ensuring the fittings remain reliable under diverse operating scenarios.

Material-Specific Tolerances: The material of the JIC fitting significantly influences its temperature tolerance.

Stainless Steel: Stainless steel JIC fittings have the highest temperature tolerance, making them suitable for applications that experience extreme temperature fluctuations or high-temperature conditions.

Carbon Steel and Brass: While still effective, carbon steel and brass fittings generally have lower temperature tolerances compared to stainless steel. These materials are more suitable for applications where the temperatures are within moderate ranges.

Standards and Certifications

Industry Standards

JIC fittings are designed and manufactured to adhere to strict industry standards to ensure quality, safety, and compatibility. One of the primary standards for JIC fittings is the SAE J514, which outlines the design, dimensions, and performance requirements for 37-degree flare fittings. Additionally, this standard covers the technical aspects of JIC fittings, such as material specifications, dimensional tolerances, and performance benchmarks, ensuring that all fittings meet a consistent level of quality and reliability.

Certifications

To further guarantee quality and performance, many JIC fittings are certified by internationally recognized organizations. Two of the most notable certifying bodies are the ISO (International Organization for Standardization) and ASTM (American Society for Testing and Materials).

ISO Certifications: ISO certification indicates that the JIC fittings meet international standards for quality management and environmental management systems. ISO standards, such as ISO 9001, ensure that the manufacturing processes for JIC fittings are optimized for quality control, consistency, and continuous improvement. This certification assures customers that the fittings are produced under stringent quality management systems.

ASTM Certifications: ASTM certification, such as ASTM B633, which pertains to electrodeposited coatings of zinc on iron and steel, signifies that the fittings meet specific material and performance criteria. ASTM standards ensure that the materials used in the production of JIC fittings have been rigorously tested and meet the required specifications for durability, corrosion resistance, and mechanical properties.

JIC thread hydraulic Fitting Topa

Compliance and Testing

To meet the high standards set by organizations like SAE, ISO, and ASTM, JIC fittings undergo extensive testing during and after the manufacturing process. These tests are designed to ensure that the fittings can perform reliably in various demanding applications and environments.

Pressure Tests: Pressure testing is conducted to verify that the JIC fittings can withstand the maximum specified operating pressures without failure or leakage. This involves subjecting the fittings to pressures higher than their rated capacity to ensure they have an adequate safety margin.

Temperature Cycling Tests: Temperature cycling tests expose the fittings to extreme temperatures, both hot and cold, to evaluate their performance and durability under thermal stress. This testing ensures that the fittings can maintain their integrity and sealing capabilities across a wide temperature range.

Vibration Tests: Vibration testing simulates the conditions that fittings may encounter in applications with high levels of mechanical vibration. These tests assess the fittings’ ability to maintain a secure connection without loosening or leaking under continuous vibration.

In addition to these specific tests, JIC fittings may also undergo other types of evaluations, such as corrosion resistance tests, tensile strength tests, and fatigue tests. These comprehensive testing protocols ensure that the fittings meet or exceed industry standards, providing users with confidence in their performance and reliability.

How to Identify JIC Fittings

Identification Marks

One of the easiest ways to identify JIC fittings is through the identification marks that manufacturers often imprint on the fittings. These marks usually include critical information such as the size, material, and manufacturer. For example, a fitting might be marked with “JIC-08-SS” indicating a JIC fitting, size 8 (which corresponds to 1/2 inch), made of stainless steel. These markings help ensure that the correct fitting is used for specific applications, especially in environments where multiple types of fittings might be present.

Visual Identification: Another method to identify JIC fittings is through visual inspection. The most distinctive feature of a JIC fitting is the 37-degree flare angle, which can be seen at the end of the fitting where the connection is made. This flare creates a metal-to-metal seal, which is crucial for the fitting’s performance in high-pressure applications. Additionally, JIC fittings often have a hexagonal body, allowing for easy installation and removal using standard wrenches.

Measurement Techniques

Accurate measurement is essential for identifying the correct size of JIC fittings, ensuring they fit properly and function correctly in hydraulic systems. The primary tools used for this purpose are calipers and thread pitch gauges.

Calipers: Calipers are used to measure the outside diameter (OD) of the fitting. To do this, place the caliper’s jaws around the fitting’s outer edge and read the measurement on the caliper’s scale. This measurement, typically given in inches or millimeters, will correspond to the dash number size of the fitting.

Thread Pitch Gauges: To measure the thread size accurately, a thread pitch gauge is used. This tool has multiple blades, each with a different thread pitch. To use it, match the fitting’s threads to the corresponding blade on the gauge until you find an exact fit. The thread pitch gauge will tell you the threads per inch (TPI) or the metric thread pitch, which helps verify the fitting’s thread specifications.

By using these measurement techniques, you can ensure that the correct JIC fitting is selected and installed. This process is critical for maintaining the integrity and reliability of hydraulic systems, preventing issues such as leaks, misalignment, or thread damage.

Installation and Maintenance

Proper installation of JIC fittings is essential for ensuring a secure and leak-free connection in hydraulic systems. Here’s a step-by-step guide:

Cleaning the Mating Surfaces: Before installation, thoroughly clean the mating surfaces of both the fitting and the connection point. Use a clean cloth and an appropriate solvent to remove any dirt, debris, or oils. This step is crucial to prevent contaminants from compromising the seal.

Aligning the Fitting Correctly: Ensure that the fitting and the mating part are properly aligned. Misalignment can cause undue stress on the connection, leading to leaks or fitting failure. Carefully hand-thread the fitting to check for smooth engagement before applying any torque.

Tightening to the Recommended Torque: Use a calibrated torque wrench to tighten the fitting to the manufacturer’s recommended torque specifications. Over-tightening can damage the threads or the flare, leading to leaks or fitting failure. Under-tightening can result in a weak seal, also causing leaks. Always refer to the torque specifications provided by the fitting manufacturer to ensure proper installation.

Inspection After Installation: Once installed, inspect the connection to ensure there are no visible gaps or misalignments. Check the fitting for any signs of stress or deformation, which could indicate improper installation.

Common Installation Mistakes

Avoiding common installation mistakes can significantly enhance the reliability and longevity of JIC fittings. Here are some pitfalls to watch out for:

Using the Wrong Size Fitting: Ensure you select the correct size fitting for the application. Using an incorrect size can result in poor sealing and connection issues.

Not Cleaning the Mating Surfaces: Installing fittings on dirty or contaminated surfaces can lead to leaks and compromised connections. Always clean the mating surfaces before installation.

Improper Tightening: Over-tightening can damage the fitting and the mating component, while under-tightening can lead to inadequate sealing. Use a torque wrench to apply the correct amount of torque.

Skipping Visual Inspection: Failing to visually inspect the fitting after installation can result in missed alignment issues or other problems that could compromise the connection.

Troubleshooting

Addressing common issues with JIC fittings promptly can prevent minor problems from escalating into major failures. Here are some troubleshooting tips:

Leaks: If a fitting is leaking, first check if it has been properly tightened to the recommended torque. If tightening does not resolve the leak, inspect the flare and threads for damage. Replace any damaged fittings.

Thread Damage: Damaged threads can compromise the integrity of the connection. Inspect the threads for signs of wear or cross-threading. Replace fittings with damaged threads to ensure a secure connection.

Excessive Wear: Regularly check the fittings for signs of excessive wear, which can weaken the connection and lead to leaks. Replace worn fittings promptly.

Contamination: Contaminants can cause premature wear and damage to fittings. Ensure that all components are clean during installation and maintenance. Use filters and regular fluid changes to minimize contamination.

Comparing JIC Fittings with Other Types

37 vs 45 degree

JIC vs SAE Fittings

While both JIC and SAE fittings are commonly used in hydraulic systems, they have key differences that affect their compatibility and performance in specific applications.

Flare Angle: The primary difference between JIC and SAE fittings lies in the flare angle. JIC fittings have a 37-degree flare angle, whereas SAE fittings have a 45-degree flare angle. This difference means that the two types of fittings are not interchangeable and are designed for different sealing mechanisms.

Compatibility: Because of the different flare angles, JIC and SAE fittings are not compatible with each other. Attempting to use them interchangeably can lead to poor seals, leaks, and potential system failures.

JIC vs NPT Fittings

JIC and NPT fittings have different sealing mechanisms, which influence their use and performance in hydraulic systems.

Sealing Mechanism: NPT (National Pipe Tapered) fittings rely on a tapered thread to create a seal. As the fitting is tightened, the taper compresses, creating a seal. However, this type of seal can be prone to leaks if not installed correctly and often requires the use of thread sealant or Teflon tape to ensure a tight seal.

Metal-to-Metal Seal: JIC fittings, on the other hand, provide a more reliable metal-to-metal seal through the 37-degree flare angle. This design reduces the risk of leaks, especially in high-pressure applications, by ensuring a tight and secure connection without the need for additional sealants.

JIC vs ORFS Fittings

ORFS (O-ring Face Seal) fittings and JIC fittings both offer reliable sealing solutions but are suited to different types of applications.

Sealing Mechanism: ORFS fittings use an O-ring to create a seal. The O-ring sits in a groove on the face of the fitting, and when the fitting is tightened, the O-ring is compressed against a flat face on the mating part, creating a seal. This design offers superior leak resistance, especially in high-vibration and high-pressure applications.

Leak Resistance: The O-ring in ORFS fittings provides a more robust seal compared to the metal-to-metal seal of JIC fittings. This makes ORFS fittings particularly suitable for applications where leak prevention is critical, such as in hydraulic systems subject to high-pressure spikes or constant vibration.

Conclusion

In summary, understanding JIC fitting specifications is essential for ensuring the efficiency, safety, and reliability of hydraulic systems. By familiarizing yourself with the key specifications, standards, and installation practices, you can make informed decisions and optimize your hydraulic applications. For further assistance or specific questions, feel free to reach out to Topa experts or manufacturers.

FAQ

JIC stands for Joint Industry Council, which standardized these fittings during World War II to ensure consistent, reliable hydraulic connections.

JIC fittings have a 37-degree flare angle, which creates a metal-to-metal seal for high-pressure applications.

No, JIC fittings cannot be used interchangeably with SAE fittings because SAE fittings have a 45-degree flare angle, making them incompatible.

Measure the outside diameter (OD) of the fitting and the thread pitch using calipers and a thread pitch gauge. The size is typically denoted in dash numbers representing sixteenths of an inch.

JIC fittings are commonly made from carbon steel, stainless steel, and brass. The choice of material depends on the application requirements, such as pressure, temperature, and corrosion resistance.

JIC fittings are used in various industries, including agriculture, construction, manufacturing, and transportation, for applications requiring durable, high-pressure hydraulic connections.

37 Degree Flare vs 45 Degree Flare Key Differences

37 Degree Flare vs 45 Degree Flare: Key Differences

37 Degree Flare vs 45 Degree Flare: Key Differences

Table of Contents

Introduction

Flared fittings play a crucial role in hydraulic and plumbing systems, ensuring secure and leak-free connections. Among these, 37-degree and 45-degree flare fittings are the most commonly used. This article explores the key differences between these two types, providing insights to help you select the right fitting for your applications.

Understanding Flared Fittings

Flared fittings achieve this by flaring the tube end and securing it with a corresponding flare fitting. This method creates a strong, reliable joint, ideal for high-pressure scenarios. The concept of flaring involves expanding the tube end to a specific angle, allowing it to mate perfectly with the flare fitting, creating a metal-to-metal seal. Over the years, these fittings have advanced to meet the stringent demands of various industries, including automotive, aerospace, and heavy machinery.

The Flare Fitting Process

The flaring process starts by cutting the tube to the required length and ensuring the end is smooth and free from burrs. The tube end is then expanded using a flaring tool to create the flare, which matches the angle of the fitting. The fitting is then tightened, creating a seal that is both robust and flexible, accommodating the natural movements and vibrations of the system without compromising the connection.

Advantages of Flared Fittings

Pressure Resistance: Flared fittings can handle high-pressure applications, making them ideal for hydraulic systems.

Durability: The metal-to-metal seal ensures a long-lasting connection that can withstand harsh conditions.

Versatility: They are compatible with various tube materials, including steel, stainless steel, copper, and aluminum, catering to diverse industry needs.

Detailed Overview of 37 Degree Flare Fittings

JIC 74° Topa

37-degree flare fittings, also known as JIC (Joint Industry Council) fittings, are integral to hydraulic systems, offering robust and reliable connections. The distinguishing feature of these fittings is the 37-degree angle flare that matches the tube’s flared end, providing a secure and leak-resistant joint.

Design and Construction

Materials: Typically made from stainless steel, brass, or carbon steel, ensuring durability and resistance to corrosion.

Mechanical Grip and Seal: The 37-degree angle creates a strong mechanical grip and an excellent metal-to-metal seal, essential for high-pressure applications.

Advantages

High Pressure Tolerance: These fittings can withstand pressures up to 10,000 PSI, making them suitable for demanding hydraulic systems.

Sealing Capabilities: The design minimizes the risk of leaks, ensuring reliability in critical applications.

Versatility: Suitable for a wide range of applications across various industries, including automotive, aerospace, and heavy machinery.

Limitations

Cost: 37-degree flare fittings are generally more expensive compared to some other types of fittings due to their robust design and material quality.

Compatibility: These fittings are not interchangeable with systems designed for 45-degree flare fittings, which may limit their use in certain applications.

Detailed Overview of 45 Degree Flare Fittings

45-degree flare fittings are essential components in plumbing, refrigeration, and certain automotive applications. Designed with a 45-degree flare, these fittings connect soft tubing materials, providing secure and reliable joints for lower pressure systems.

Design and Construction

Angle: The defining characteristic is the 45-degree flare angle, creating a seal by flaring the tube end to match the fitting.

Materials: Commonly made from brass and copper, chosen for their corrosion resistance and ease of installation.

Construction: These fittings feature a conical surface, which, when tightened, compresses the flared tube end against the fitting to form a tight seal.

Advantages

Versatility: 45-degree flare fittings are used in various applications, including plumbing, HVAC systems, and certain automotive contexts. They are particularly effective in systems where the pressure is lower, and flexibility is needed.

Cost-Effectiveness: Generally more affordable than 37-degree flare fittings, making them a cost-effective solution for many standard applications. Their widespread availability ensures they are easy to source and replace.

Limitations

Pressure Tolerance: These fittings typically handle lower pressures compared to 37-degree flare fittings, making them unsuitable for high-pressure hydraulic systems. They are generally rated for pressures up to 2,000 PSI, significantly lower than the 10,000 PSI tolerance of 37-degree fittings.

Potential for Leakage: In high-stress applications, 45-degree flare fittings may be more prone to leakage. The seal created by the 45-degree flare is less robust under extreme pressure or when subjected to significant vibrations and movements.

Key Differences Between 37 vs 45 Degree Flare Fittings

Comparative Analysis of Design and Construction

Design:

37-Degree Flare Fittings: These fittings feature a 37-degree flare angle, known as JIC (Joint Industry Council) fittings. The design allows for a tight metal-to-metal seal, ensuring a robust connection. Typically used in high-pressure systems, these fittings are constructed from materials like stainless steel, brass, and carbon steel, providing durability and resistance to corrosion.

45-Degree Flare Fittings: These fittings have a 45-degree flare angle and are commonly used in plumbing and HVAC systems. Constructed primarily from brass and copper, they are designed for use with softer tubing materials. The 45-degree angle provides adequate sealing for lower pressure applications but is not as robust as the 37-degree design.

Construction:

Materials: 37-degree fittings are usually made from stronger materials like stainless steel and carbon steel to handle high pressures. In contrast, 45-degree fittings are often made from brass or copper, suitable for lower pressure systems.

Mechanics: The 37-degree flare fitting offers a more substantial mechanical grip due to the steeper angle, which can withstand higher stresses. The 45-degree fitting, with its shallower angle, is easier to install but not as strong under high-pressure conditions.

Performance Under Pressure: 37 vs 45 Degrees

37 vs 45 degree

37-Degree Flare Fittings:

High Pressure Tolerance: Capable of handling pressures up to 10,000 PSI, making them ideal for high-pressure hydraulic systems.

Durability: The robust construction and stronger materials ensure longevity and reliability under extreme conditions.

Sealing Capability: Excellent sealing properties reduce the risk of leaks, even under high pressure.

45-Degree Flare Fittings:

Lower Pressure Tolerance: Generally suitable for pressures up to 2,000 PSI, these fittings are ideal for lower pressure applications such as plumbing and HVAC systems.

Performance in High-Stress Conditions: More prone to leakage and failure when subjected to high pressures and vibrations, limiting their use in more demanding environments.

Installation Process and Ease of Use

37-Degree Flare Fittings:

Installation: Requires precise flaring tools and techniques to ensure a proper seal. The higher pressure applications demand meticulous installation to avoid leaks and failures.

Ease of Use: While installation can be more complex, the robust design ensures a secure and reliable connection once properly installed.

45-Degree Flare Fittings:

Installation: Easier and quicker to install compared to 37-degree fittings. The use of softer materials like copper and brass simplifies the flaring process.

Ease of Use: More user-friendly for installers, particularly in applications where high precision is not as critical. Ideal for DIY projects and standard plumbing tasks.

Choosing the Right Flare Fitting for Your Needs

Selecting between 37-degree and 45-degree flare fittings requires careful consideration of several factors to ensure optimal performance and reliability in your fluid system. Here’s a detailed guide to help you make the right choice:

Pressure Requirements

37-Degree Fittings: Ideal for high-pressure systems, these fittings can withstand pressures up to 10,000 PSI. They are suitable for hydraulic systems, military applications, and other demanding environments.

45-Degree Fittings: Suitable for lower pressure applications, typically up to 2,000 PSI. These are commonly used in plumbing, HVAC systems, and some automotive applications where high pressure is not a concern.

Fluid or Gas Type

Compatibility: Ensure the fitting material is compatible with the fluid or gas being transported. For instance, stainless steel is excellent for corrosive fluids, while brass is suitable for non-corrosive applications.

Seal Integrity: Different fluids may require specific sealing capabilities. High-pressure hydraulic fluids need the robust sealing of 37-degree fittings, whereas refrigerants in HVAC systems can use 45-degree fittings.

Environmental Conditions

Temperature: Consider the operating temperature range of the system. High-temperature environments may require materials that can withstand thermal expansion and contraction without compromising the seal.

Corrosive Elements: Exposure to corrosive elements necessitates fittings made from corrosion-resistant materials like stainless steel or brass. The environmental conditions will dictate the longevity and maintenance needs of the fittings.

Budget

Initial Cost: 45-degree fittings are generally more affordable than 37-degree fittings due to their construction and material costs. This makes them a cost-effective choice for standard applications.

Long-Term Performance: While 37-degree fittings may have a higher initial cost, their durability, and high-pressure capabilities can lead to lower maintenance costs and longer service life, providing better value over time.

Compatibility

System Components: Ensure the selected fittings match the existing system components. Incompatibility can lead to leaks, reduced efficiency, and potential system failures.

Interchangeability: Note that 37-degree and 45-degree fittings are not interchangeable. Using the wrong type can result in improper sealing and connection issues.

Decision-Making Framework

Assess Your System’s Pressure Requirements: Identify the maximum operating pressure and choose a fitting type that can safely handle it.

Determine Fluid or Gas Compatibility: Match the fitting material to the type of fluid or gas being transported to ensure compatibility and safety.

Evaluate Environmental Factors: Consider the temperature and potential corrosive elements in the operating environment to select a fitting material that will perform reliably.

Balance Budget and Performance: Weigh the initial cost against long-term performance and maintenance needs to choose the most cost-effective solution.

Verify Compatibility with Existing Components: Ensure the fittings match the current system components to avoid any compatibility issues.

Common Mistakes to Avoid

Mismatching Fittings: Using 37-degree fittings in systems designed for 45-degree fittings (and vice versa) can lead to improper sealing and leaks.

Underestimating Pressure Needs: Selecting fittings with a lower pressure tolerance than required can cause system failures and safety hazards.

Ignoring Environmental Conditions: Failing to consider the operating environment can lead to premature fitting failure due to corrosion or thermal stress.

Choose Topa As Your Manufacturer

When selecting a manufacturer for hydraulic fittings, choosing the right partner is crucial. Topa, a leading hydraulic fittings manufacturer based in China, offers exceptional quality, customization, and service. Here’s why Topa stands out and should be your preferred choice.

Unmatched Quality and Reliability

High-Quality Materials: Topa uses top-grade materials, ensuring durability and performance.

Advanced Manufacturing Processes: State-of-the-art technology and stringent quality control measures guarantee superior products.

Proven Track Record: Consistent delivery of reliable flare hydraulic fittings that meet industry standards.

Customization and Flexibility

Tailored Solutions: Topa offers customized hydraulic fittings to meet specific client requirements, providing solutions that fit unique applications.

Wide Range of Products: From standard to specialized hydraulic fittings, Topa’s extensive inventory ensures they can cater to various needs.

Exceptional Service

Hydraulic fitting CNC machine Topa

Professional Team: With a skilled team of 50 professionals, Topa provides expert support and guidance throughout the purchasing process.

One-Stop Service: Topa offers comprehensive services, from design to delivery, ensuring a seamless experience for clients.

Competitive Advantage

Prompt Delivery: Extensive stock allows for quick turnaround times, meeting tight deadlines, and reducing downtime.

Industry Expertise: Topa’s deep understanding of the hydraulic fittings industry ensures they can address and resolve any client pain points effectively.

Global Reach and Trusted Partnerships

International Clientele: Serving clients in the United States, Europe, Asia, Australia, Germany, and the United Kingdom, Topa has built a reputation for reliability and quality worldwide.

Long-Term Relationships: Focus on building lasting relationships with distributors, retailers, maintenance providers, exporters, and production companies.

Choosing Topa as your hydraulic fittings manufacturer means partnering with a company committed to excellence, quality, and client satisfaction. Their expertise, customization capabilities, and exceptional service make them the ideal choice for all your hydraulic flare fittings needs. Trust Topa to deliver the high-quality solutions your business requires, ensuring smooth and efficient operations.

Conclusion

Choosing between 37-degree and 45-degree flare fittings depends on your specific needs and application requirements. Understanding the key differences, such as pressure tolerance, compatibility, and cost, is crucial for making an informed decision. At Topa, we provide high-quality hydraulic cylinders and fittings tailored to meet your specific requirements. Our extensive range of products, exceptional service, and industry expertise make us the ideal choice for your hydraulic needs. Visit our website or reach out to our professional team to place your order now.

FAQ

37-degree flare fittings, also known as JIC fittings, are designed for high-pressure applications up to 10,000 PSI. 45-degree flare fittings are used in lower pressure systems, typically up to 2,000 PSI, such as plumbing and HVAC systems.

For high-pressure hydraulic systems, 37-degree flare fittings are recommended due to their higher pressure tolerance and robust sealing capabilities.

No, they are not interchangeable. Using the incorrect flare fitting can lead to improper sealing, leaks, and potential system failures.

37-degree flare fittings are typically made from stainless steel, brass, or carbon steel. 45-degree flare fittings are usually made from brass or copper.

Yes, 45-degree flare fittings can be used in automotive applications, especially in fuel and coolant lines, provided the pressure requirements do not exceed the fitting’s capabilities.

Ensure the fitting material matches the fluid or gas being transported and that the fittings are designed for the specific pressure requirements and environmental conditions of your system.

How to Seal BSP Fittings

How to Seal BSP Fittings

How to Seal BSP Fittings?

Introduction

Leaks can cause inefficiencies, safety hazards, and costly repairs, making the sealing process a critical step in any installation involving BSP threads. This comprehensive guide aims to provide detailed, step-by-step instructions on how to seal both BSPP and BSPT fittings effectively. By following these guidelines, you can ensure that your BSP fittings perform optimally and maintain the integrity of your systems.

Understanding BSP Threads

BSPP vs BSPT thread

BSPP (British Standard Pipe Parallel)

Parallel Threads: BSPP threads maintain a constant diameter along their length, which makes them suitable for creating reliable connections in systems where thread engagement is not intended to form the seal.

Applications: Commonly used in low-pressure applications, BSPP threads are typically sealed using O-rings or bonded washers to ensure a leak-proof connection. These fittings are prevalent in plumbing and hydraulic systems where precise sealing is required without the need for high-pressure tolerance.

BSPT (British Standard Pipe Tapered)

Tapered Threads: BSPT threads feature a taper, meaning the thread diameter decreases along the length, which allows the threads to create a tight seal through thread engagement. This tapering effect enhances the sealing capability as the threads compress and tighten against each other.

Applications: BSPT fittings are preferred for high-pressure applications due to their inherent design, which provides a more robust seal capable of withstanding significant pressure. These fittings are essential in industries like oil and gas, where secure and leak-free connections are critical under high operational pressures.

Tools and Materials Needed

Essential Tools

Thread Sealant Tape: Also known as PTFE or Teflon tape, it is used to provide a secure and lubricated seal on threaded connections.

Pipe Dope: A thread sealant compound that offers a chemical bond, ideal for ensuring a tight seal, especially in tapered threads.

Wrenches and Spanners: Essential for tightening and securing fittings during assembly.

Cleaning Tools: Wire brush and cloth for cleaning threads, removing debris, and ensuring a clean surface for sealing.

Material Selection

Teflon Tape: Provides a physical barrier and lubrication, reducing friction during the tightening process and helping to prevent leaks.

Pipe Dope: Offers a chemical seal that is more suited for tapered threads, filling minor imperfections in the threads to create a leak-proof connection.

Preparing BSP Fittings for Sealing

Cleaning the Threads

Importance: Ensuring that the threads are clean is vital for creating a secure and leak-proof seal. Contaminants like dirt, grease, or metal shavings can prevent the sealant from adhering properly, leading to potential leaks.

Process:

Use a Wire Brush: Gently scrub the threads with a wire brush to remove any debris or corrosion. This helps to expose the metal surface and ensure the sealant can bond effectively.

Wipe Clean with a Cloth: After brushing, use a clean cloth to wipe away any remaining particles or residue. For optimal results, the threads should be free of any contaminants.

Inspecting the Threads

Check for Damage: Examine the threads closely for any signs of damage such as nicks, burrs, or imperfections. Damaged threads can compromise the integrity of the seal and lead to leaks.

Repair:

Use a Thread File: If there are minor imperfections, a thread file can be used to smooth out the threads. Carefully file away any burrs or nicks to restore the thread profile.

Use a Tap: For more significant damage, a thread tap can be used to re-cut and clean up the threads. This ensures that the threads are uniform and can engage properly.

Sealing BSPT (Tapered) Threads

Properly sealing BSPT (British Standard Pipe Tapered) threads is crucial when it comes to ensuring a leak-free connection in hydraulic systems. This process involves using either thread sealant tape (commonly known as Teflon tape) or pipe dope. Here’s a detailed guide on how to effectively seal BSPT threads, including the application methods, advantages, and tips for assembling the fittings.

Applying Thread Sealant Tape

Thread sealant tape, often called Teflon tape, is a popular choice for sealing threaded connections. It provides a reliable barrier against leaks and is easy to apply.

Application:

Preparation: Clean the male threads thoroughly to remove any dirt, oil, or debris. This ensures that the tape adheres properly.

Starting Point: Begin wrapping the Teflon tape around the male thread starting from the end of the thread closest to the fitting opening.

Direction: Wrap the tape in the same direction as the threads, which is usually clockwise. This helps the tape to stay in place when the fitting is tightened.

Number of Wraps: Typically, 3-5 wraps are sufficient to provide a good seal. Too few wraps might not cover the threads adequately, while too many can make it difficult to thread the fitting.

Coverage: Ensure even coverage of the threads without overlapping excessively. The goal is to cover the threads without creating an uneven or bulky layer.

Tips:

Avoid wrapping the tape over the first thread. This helps in starting the fitting smoothly and prevents pieces of tape from getting into the system.

Make sure the tape is tightly wrapped to prevent it from unraveling during the assembly.

Using Pipe Dope

Pipe dope, also known as pipe joint compound, is another effective sealant used for BSPT threads. It is particularly useful for filling minor imperfections in the threads and providing a more robust seal.

Application:

Preparation: As with Teflon tape, ensure the male threads are clean and free from contaminants.

Applying Pipe Dope: Using a brush or your finger, apply an even layer of pipe dope on the male threads. Make sure to cover the threads completely but avoid applying too much, as excess compound can squeeze out and enter the system.

Consistency: Pipe dope should have a thick, paste-like consistency. If it’s too thin or runny, it may not seal effectively.

Assembling the Fittings

Once the thread sealant has been applied, the next step is to assemble the fittings.

Tightening:

Initial Tightening: Begin by hand-tightening the fitting. This ensures that the threads are properly aligned and that the sealant starts to engage with the threads.

Final Tightening: Use a wrench to give the fitting an additional 1-2 turns. This provides the necessary torque to create a tight seal without over-tightening.

Avoid over-tightening:

Over-tightening can damage the threads and compromise the seal. It can also make future disassembly difficult.

Use a torque wrench if possible to apply the correct amount of torque recommended for the specific fitting and application.

Install BSP fittings

Sealing BSPP (Parallel) Threads

BSPP threads require a different approach for sealing compared to BSPT threads. The sealing of BSPP threads typically relies on the use of O-rings and washers, but thread sealant can also be applied for added security. This guide will walk you through the necessary steps to effectively seal BSPP threads, ensuring a leak-free and reliable connection.

Using O-Rings and Washers

O-rings and bonded washers are critical components in sealing BSPP threads. These elements create a mechanical seal that prevents fluid leakage.

O-Rings:

Selection: Choose an O-ring made from a material compatible with the fluid in your system and the operating temperature and pressure conditions.

Placement: Place the O-ring at the base of the male thread. Ensure it sits properly in the groove provided for the O-ring.

Inspection: Before assembly, inspect the O-ring for any signs of damage or wear. A damaged O-ring should be replaced immediately to ensure a proper seal.

Washers:

Bonded Washers: Bonded washers, which combine a metal washer with a rubber seal, provide enhanced sealing capabilities. These are particularly useful in high-pressure applications.

Placement: Position the bonded washer on the male thread, ensuring that the rubber seal is in contact with the mating surface.

Inspection: Check the washer for any deformities or damage. Replace if necessary to maintain the integrity of the seal.

Tips:

Make sure the O-ring and washers are clean and free from contaminants.

Lubricate the O-ring lightly to prevent it from pinching or tearing during assembly.

Applying Thread Sealant

While BSPP threads typically rely on O-rings and washers for sealing, thread sealant can be used for additional security, particularly in high-pressure or critical applications.

When to Use:

Thread sealant is not always necessary for BSPP threads but can provide an extra layer of protection against leaks.

It is especially useful in applications where vibration or thermal cycling may affect the seal.

Application:

Preparation: Clean the male threads to remove any dirt, oil, or debris.

Applying Sealant: Apply a thin, even layer of thread sealant to the male threads. Be careful not to apply too much, as excess sealant can interfere with the sealing components and potentially contaminate the system.

Type of Sealant: Use a thread sealant compatible with the system’s fluid and operating conditions. Anaerobic thread sealants are a common choice for metal-to-metal connections.

Tips:

Avoid applying sealant to the first few threads to ensure smooth engagement and alignment.

Allow the sealant to cure as per the manufacturer’s instructions before pressuring the system.

Assembling the Fittings

Proper assembly of BSPP fittings is crucial to achieving a leak-free seal.

Alignment:

Initial Alignment: Start by aligning the male and female threads properly before tightening. Misalignment can damage the threads and compromise the seal.

Hand-Tightening: Begin by hand-tightening the fitting to ensure that the threads engage correctly and the sealing components are properly seated.

Tightening:

Torque Specifications: Use a torque wrench to tighten the fitting to the recommended torque specifications. Over-tightening can damage the threads and O-ring, while under-tightening can result in leaks.

Checking Alignment: As you tighten, periodically check the alignment of the fitting to ensure that the O-ring and washer remain properly seated.

Tips:

If possible, follow the manufacturer’s guidelines for torque settings specific to the fitting and application.

After tightening, inspect the assembly for any signs of misalignment or damage.

Testing and Troubleshooting  

Ensuring a reliable and leak-free connection in hydraulic systems is essential. After sealing BSPP (Parallel) or BSPT (Tapered) threads, it’s crucial to test the integrity of the seal and troubleshoot any issues that arise. This guide will provide detailed steps on how to pressure test the seal, identify common issues, and re-seal if necessary.

Pressure Testing the Seal

Pressure testing is a vital step in verifying the integrity of the seal. It ensures that the system is leak-free and can withstand the operational pressures.

Importance:

Pressure testing confirms the effectiveness of the seal and ensures the system’s safety and reliability.

It helps identify any potential leaks before the system is put into operation, preventing costly repairs and downtime.

Methods:

Pressure Test Pump: Use a pressure test pump to apply pressure to the sealed connection. These pumps are designed to safely increase the pressure in the system for testing purposes.

Pressure Gauge: Attach a pressure gauge to monitor the pressure applied during the test. This allows you to measure any pressure drops accurately.

Procedure:

Connect the pressure test pump to the system.

Gradually increase the pressure to the system’s operating pressure or the recommended test pressure.

Maintain the pressure for a specified duration, typically 15-30 minutes, to ensure the seal’s integrity.

Interpreting Results:

Successful Seal: No pressure drop indicates that the seal is intact and there are no leaks.

Failed Seal: A pressure drop or visible signs of leaks (such as moisture or bubbling around the threads) indicates a failure in the seal.

Identifying Common Issues

Recognizing signs of a poor seal and understanding common mistakes can help in troubleshooting and improving the sealing process.

Signs of Poor Seal:

Leaks: Visible leaks around the threaded connections indicate a poor seal.

Moisture: Presence of moisture or wetness around the threads suggests that the seal is not holding.

Bubbling: Bubbling around the threads during a pressure test is a clear sign of air escaping, indicating a leak.

Common Mistakes:

Over-tightening: Excessive force during tightening can damage the threads and compromise the seal. Always follow the recommended torque specifications.

Insufficient Sealant: Applying too little sealant can result in gaps that allow leaks. Ensure an even and adequate application of sealant.

Dirty Threads: Contaminants on the threads can prevent the sealant from adhering properly. Always clean the threads thoroughly before applying sealant.

Troubleshooting:

Re-clean Threads: Disassemble the connection and clean the threads thoroughly to remove any dirt, oil, or debris.

Reapply Sealant: Apply a new layer of sealant, ensuring even coverage.

Reassemble: Reassemble the fitting, ensuring proper alignment and tightening to the recommended torque specifications.、

Conclusion

Proper sealing techniques for BSPT and BSPP threads are essential for achieving leak-free connections. Using the right tools and materials is crucial for a successful seal. Regular maintenance and adherence to best practices ensure the longevity and reliability of BSP fittings. Ensuring proper sealing not only enhances system efficiency but also ensures safety. By following the provided guidelines and staying informed about new sealing technologies, you can maintain reliable and durable BSP fittings. For further assistance, seek professional advice as needed.

FAQ

What is the difference between BSPP and BSPT threads?

BSPP (parallel) threads maintain a constant diameter, while BSPT (tapered) threads decrease in diameter along their length.

What tools are essential for sealing BSP fittings?

Teflon tape, pipe dope, wrenches, spanners, wire brush, and a clean cloth.

How many wraps of Teflon tape should I use?

Typically, 3-5 wraps are sufficient for creating a secure seal.

Can I use pipe dope instead of Teflon tape?

Yes, pipe dope is effective for filling minor imperfections and is ideal for tapered threads.

How do I pressure test a BSP fitting seal?

Use a pressure test pump to apply pressure and check for any drops, which indicate leaks.

What should I do if my BSP fitting is leaking?

Disassemble, clean the threads, reapply the sealant, and reassemble the fitting to ensure a proper seal.

Contact Topa

Looking for unbeatable prices, top-tier quality, or custom solutions that fit your exact needs? Contact Topa Now!