A weeping hose is a failure that has already occurred. This expert guide teaches you the systematic inspection process to identify hidden damage—from abrasion and cracks to fitting corrosion and internal fatigue—before it leads to catastrophic failure and downtime.
The Foundation: Safety and a Systematic Approach
A proper inspection is a safe inspection. Before you ever touch a hose, you must neutralize the machine’s immense power. Rushing this step can have lethal consequences. A clean machine is also essential for an effective visual check.
Lockout/Tagout: Non-Negotiable
Before any inspection:
- Start the machine and lower all attachments fully to the ground.
- Place the bucket, boom, stick, and any tools in a stable resting position.
- Shut down the engine and remove the key.
- Move the master lockout lever to the locked position.
- Hang a “Do Not Operate” tag on the controls in the cab.
This tag alerts other operators that work is in progress and the machine must stay off.

Relieve All Stored Pressure
Even with the engine off, pressure can remain trapped in the hydraulic circuits.
Hidden pressure can cause a hose to whip, fittings to move suddenly, or oil to spray.
Steps to release residual pressure:
- Sit in the operator’s seat.
- With the engine off and lockout applied, move all joysticks through their full range several times.
- Press any foot pedals and auxiliary controls repeatedly.
- Continue until the controls feel loose and move freely, with no resistance.
Once the controls feel “dead,” most of the trapped pressure has been released.
Clean First, Inspect Second
You cannot inspect damage that you cannot see.
- Use a pressure washer or steam cleaner to remove heavy mud and grease.
- Apply a suitable degreaser where oil and sludge have built up.
- Pay attention to hose bundles, clamps, around fittings, and under guards.
- Allow the machine to dry before inspection so wet surfaces do not hide cracks or leaks.
A clean surface makes cuts, blistering, wire exposure, and wet spots much easier to spot.
Safety & Preparation Checklist (Quick View)
| Step | What to Do | Why It Matters |
| Machine positioning | Lower all attachments to the ground | Prevents unexpected movement |
| Engine shutdown | Turn off engine and remove key | Stops pump flow and new pressure build-up |
| Lockout/Tagout | Lock master lever and apply “Do Not Operate” tag | Stops others from starting the machine |
| Pressure release | Cycle joysticks and pedals until they move freely | Removes trapped pressure in hoses and circuits |
| Cleaning | Wash and degrease hoses, fittings, and nearby structure | Exposes hidden cracks, cuts, and abrasion |
| Drying time | Let the machine dry before inspection | Makes leaks, rust, and surface defects visible |
The Obvious Killers: Inspecting the Hose Cover
The outer cover of a hydraulic hose is its armor. Once that armor is compromised, moisture, abrasive particles, and chemicals can reach the reinforcement layer, accelerating failure. Regular inspection of this cover is one of the simplest ways to prevent downtime and unexpected hose bursts.
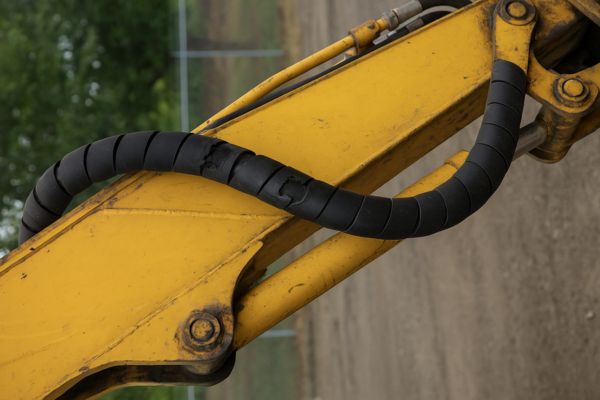
The Telltale Signs of Abrasion
Areas that look polished, smooth, or shiny are early signs that the cover has been worn down by constant rubbing against a bracket, body panel, or another hose. If the wire reinforcement is visible, the hose is already in a critical state and must be replaced immediately. Even light abrasion is enough to weaken the cover’s protective function.
Spotting Cuts, Gouges, and Blisters
Run a gloved hand carefully along the hose length. Feel for sharp damage such as cuts, nicks, or gouges—these usually come from impact with debris or metal edges. Blisters, bubbles, or soft swollen spots often indicate fluid seeping beneath the cover through a pinhole leak or a chemical reaction with incompatible fluids. These conditions signal internal damage and typically require immediate removal from service.
Detecting Cover Cracks and Weathering
Fine surface cracks—often seen on bends or exposed sections—show that the rubber has lost elasticity. UV radiation, ozone, high temperatures, or simply age can make the cover stiff and brittle. If the hose feels hard, chalky, or faded, the material can no longer protect the reinforcement and is at the end of its usable life.
Look for a web of fine cracks, especially on the outside of bends. This indicates the hose’s rubber has become brittle from age, UV exposure, or heat. A hard, faded, or inflexible cover is a clear sign the hose has reached the end of its life.
| Damage Type | Visual Signs | Likely Causes | Recommended Action |
| Abrasion | Smooth, shiny spots; exposed wire braid | Hose rubbing on machine parts or other hoses | Replace if wire is visible; add guards or reroute |
| Cuts/Gouges | Sharp surface breaks, deep marks | Impact from debris, metal edges | Replace; install shielding or adjust routing |
| Blisters/Soft Spots | Raised bubbles, spongy areas | Pinhole leaks, fluid incompatibility, internal separation | Remove from service immediately |
| Cracks/Weathering | Fine cracking, faded appearance, stiff rubber | UV, ozone, heat, aging | Replace; use UV-resistant covers or sleeves |
| Hardening | Hose feels rigid or inflexible | Long-term heat exposure or oxidation | Replace; verify temperature rating |
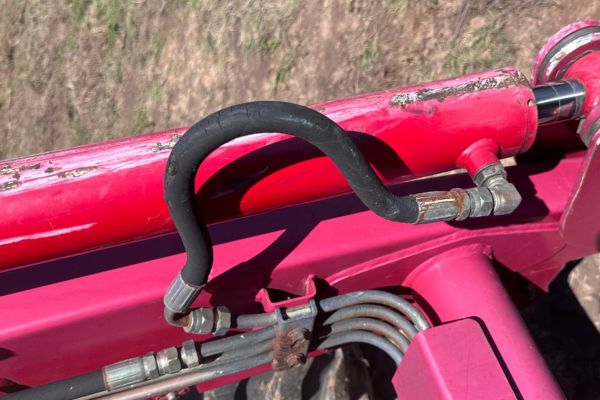
The Connection is Key: Scrutinizing Hose Fittings
Leaks almost always originate at the hose ends. The fittings are subjected to immense stress, vibration, and environmental attack. A thorough inspection of the hose-to-fitting interface is just as critical as inspecting the hose body itself.
Actively Hunting for Leaks
Don’t just look for drips on the ground. Check for wetness, dirt accumulation, or shiny oil film around the crimp shell (ferrule) and the threaded connection. Pay close attention to the underside and backside of fittings where leaks often hide.
The Threat of Corrosion
Inspect the fitting hex nuts and the crimp shell for any signs of red rust. Corrosion can compromise the structural integrity of the fitting and can indicate that moisture has penetrated the connection, potentially rusting the internal wire reinforcement.
Checking for Fitting Damage
Examine the crimp shell for any signs of cracking or slipping (where the shell has moved on the hose). Look for deep wrench marks or rounded hex corners on the nut, which indicate improper installation and potential over-torquing.
| Fitting Issue | Recommended Action |
| Moisture/Wetness Around Fitting | This is an active leak. The machine should be taken out of service immediately for repair. Do not attempt to simply tighten; the fitting must be disconnected, inspected, and re-sealed/replaced. |
| Visible Red Rust on Fitting or Crimp | Schedule the hose for replacement at the next service interval. Rust indicates the protective plating has failed and the underlying steel is degrading. The hose is on borrowed time. |
| Damaged/Rounded Hex Nut | No immediate action is required if it isn’t leaking, but it’s a sign of poor past service. Mark this hose for careful monitoring as it may have been over-stressed. |
| Crimp Shell Slippage or Cracks | TAKE OUT OF SERVICE IMMEDIATELY. This indicates a complete failure of the hose crimp. The hose could blow off the fitting under pressure at any moment. |
Reading the Signs: Hose Shape and Stiffness
The shape and flexibility of a hydraulic hose provide clear clues about its internal condition. Subtle changes—such as stiffness, flattening, or unnatural bends—often reveal hidden issues long before an external leak appears. Identifying these conditions early helps prevent unplanned downtime and costly failures.
The Danger of Kinks and Tight Bends
A properly functioning hose should maintain its natural bend radius without collapsing. Sharp bends, flattened sections, or visible kinks are critical warning signs. These distortions restrict flow, increase heat, and overload the reinforcement, causing rapid structural fatigue. Even a single kink permanently weakens the hose and makes replacement mandatory.
The “Set” and Loss of Flexibility
During inspection, gently move the hose side to side. A healthy hose should return to its natural shape and remain flexible. If it feels rigid, stays in a fixed position, or has a noticeable “memory,” the rubber has likely been damaged by prolonged heat, ozone exposure, or internal pressure cycling. A hose that has taken a “set” can no longer absorb vibration or pressure spikes, increasing the likelihood of sudden failure.
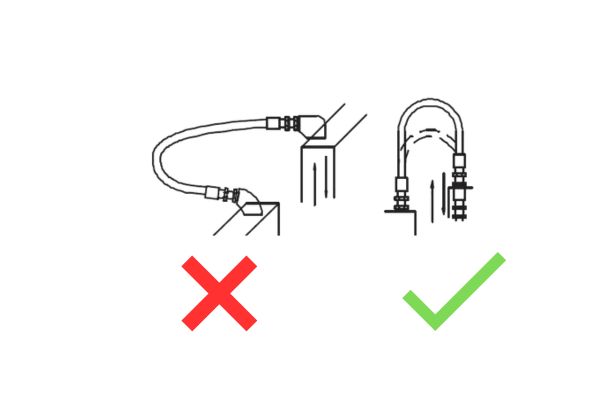
Correct Routing and Clamping
Analyze the full hose path. Proper routing prevents excessive bending and constant flexing at the same point. Missing or loose clamps allow the hose to rub against neighboring components, leading to abrasion and premature wear. A twisted hose is especially dangerous—twisting shifts the reinforcement angle and reduces pressure capacity by as much as 30%. Restoring correct routing is essential for maintaining hose longevity and machine safety.
| Issue Type | What You’ll See | Likely Cause | Mechanical Impact | Required Action |
| Kink / Flattened Section | Sharp bend, crushed area, flow restriction | Incorrect routing, tight bend radius, pulling tension | High heat, reinforcement fatigue, sudden burst risk | Replace immediately; redesign routing |
| Permanent “Set” / Hardening | Hose holds its shape and won’t flex | Heat aging, oxidation, long service life | Poor vibration absorption, cracking | Replace; evaluate heat shielding |
| Twist in Hose | Layline spirals around hose | Installation error, improper tightening | Reduced pressure rating, internal stress | Reinstall or replace; correct torqueing |
| Unsupported Span | Hose hanging or sagging between clamps | Missing/loose clamps or routing changes | Abrasion, flex fatigue | Re-clamp and reroute properly |
| Over-Bending at Fittings | Tight bend right behind ferrule | Wrong hose length or angle | Cracking at reinforcement, leakage | Replace with correct length/angle fittings |
A Comprehensive Inspection Checklist
To ensure nothing is missed, an inspection must be repeatable and thorough. Using a checklist transforms a random look-over into a professional, data-driven process that enables proactive maintenance and prevents unexpected failures.
Building a Reliable Inspection Routine
To avoid surprises, hose inspection must follow a repeatable structure—not a quick glance, not guesswork. A clear checklist turns inspection into a consistent, measurable, and preventative maintenance practice. When every operator follows the same process, problems are identified earlier and long-term hose reliability improves dramatically.
The Daily Walk-Around
This quick inspection takes less than five minutes and should be completed before the machine starts work.
Focus on highly visible warning signs:
- Fresh leaks or wet spots
- Obvious abrasion patches
- Kinks or twisted hoses
- Loose clamps or unsupported hose sections
- Hoses rubbing against boom arms, cylinders, or brackets
This is the operator’s first line of defense. Many catastrophic failures start as small, visible issues that could have been caught during this daily check.
The In-Depth Monthly Check
Once a month—preferably after cleaning the machine—perform a full, systematic examination.
Key tasks include:
- Inspecting every hose from fitting to fitting
- Feeling for soft spots, blisters, cuts, and hardening
- Checking bend radius and looking for flattening
- Examining fittings for rust, pitting, or thread damage
- Confirming that routing and clamps match the original design
- Checking for temperature-related aging
This “hands-on” approach reveals the subtle deterioration that operators often miss during daily checks.
Documenting for Proactive Maintenance
A checklist only becomes powerful when paired with documentation.
Record the following:
- The exact hose location
- The type of issue found
- The severity (minor / moderate / urgent)
- Photos of the component
- Any changes made (e.g., rerouting or replacing clamps)
This record allows maintenance teams to:
- Track wear rates
- Identify hoses that repeatedly fail
- Predict failure windows
- Replace hoses during planned downtime
A simple logbook or digital app turns reactive repairs into proactive maintenance planning—extending machine life and reducing operating cost.
| Inspection Area | Check For… |
| Hose Cover (General) | Deep cuts, gouges, blisters, or swelling. |
| Hose Cover (Abrasion) | Any spot worn smooth, shiny, or down to the wire braid. |
| Hose Cover (Aging) | Fading, hardening, stiffness, or fine surface cracks. |
| Hose Shape | Kinks, twists, flattened sections, or unnatural bends. |
| Hose Fittings (Sealing) | Oil leaks, wetness, or excessive dirt accumulation. |
| Hose Fittings (Corrosion) | Red rust on the crimp shell or threaded nut. |
| Hose Routing | Rubbing against other components; loose or missing clamps. |
Conclusion
A well-structured inspection routine turns hose maintenance from guesswork into a predictable, preventive process. By controlling safety steps, cleaning before inspecting, checking the cover, fittings, routing, and flexibility, you catch failures long before they turn into bursts, downtime, or costly component damage.
Topa supplies durable, pressure-rated hoses and protective solutions designed for harsh job-site conditions—contact us when you’re ready to upgrade your machine with reliable, factory-level hydraulic hose assemblies.
FAQ
What is the single most important thing to look for during a hose inspection?
Abrasion. Look for any spot where the hose is rubbing against something. A worn cover that exposes the wire reinforcement is the most common cause of premature hose failure and is easy to spot if you look for it.
If a hose isn’t leaking, is it still safe to use?
Not necessarily. A hose can have severe external damage (like exposed wires) or internal damage (like fatigue from millions of flex cycles) and not yet be leaking. The leak is the final stage of failure; inspection aims to find the signs before the leak starts.
How often should excavator hoses be replaced?
There is no fixed time interval. Replacement is based on condition. Hoses should be replaced whenever an inspection reveals a failure condition, such as exposed wire braid, kinking, cracking, or active leaks.
Can I repair a damaged hydraulic hose?
No. Never attempt to repair a hydraulic hose by patching it or using clamps. The only safe and proper procedure is to replace the entire hose assembly with a new one that is rated for the machine’s pressure and temperature requirements.
Why is it important to clean the machine before an inspection?
A thick layer of greasy dirt can perfectly hide dangerous conditions like deep cuts, severe cracks in the hose cover, or the beginning of a fitting leak. You cannot reliably inspect a dirty hose.
I found a hose with a small blister on it. What does that mean?
A blister or soft bubble on the hose cover typically indicates a tiny, pinhole-sized leak in the inner tube of the hose. High-pressure fluid is escaping the inner tube and is being trapped by the outer cover. This hose has failed internally and must be replaced immediately.