Hydraulic systems are vital in today’s industrial operations, yet loose fittings remain a leading cause of oil leaks—contributing to over 40% of fluid-related failures. These leaks not only waste resources but also pose safety risks, environmental concerns, and costly downtime exceeding $10,000 per hour. Frustratingly, repeated quick fixes during maintenance often fail to solve the root issue, leading to recurring problems. The good news? With proper techniques and a clear understanding of fitting mechanics, most leaks can be permanently resolved in just three minutes—breaking the costly cycle and restoring long-term system reliability.
Understanding Loose Hydraulic Fittings
Before diving into the repair process, it’s essential to understand why hydraulic fittings loosen in the first place. Recognizing the root causes of vibration-induced hydraulic fitting leakage creates the foundation for effective repairs.
Common Causes of Fitting Loosening
Hydraulic fittings rarely loosen without reason. Several factors contribute to this common problem:
Vibration effects represent perhaps the most significant challenge. Industrial equipment generates constant vibration during operation, which gradually works against threaded connections. Each vibration cycle applies microscopic forces that, over time, overcome the friction holding threads together. Heavy equipment like excavators and loaders are particularly susceptible, with studies showing vibration acceleration peaks exceeding 8g in some applications.
Thermal cycling also plays a major role in loosening fittings. As hydraulic systems heat up during operation and cool during downtime, metal components expand and contract. This continuous cycle creates minute movements in threaded connections. Systems that experience wide temperature swings—from cold morning startups to peak operating temperatures exceeding 80°C—are especially vulnerable to this phenomenon.
Improper initial installation remains a surprisingly common issue. Hydraulic fittings require specific torque values for optimal performance. Under-tightening creates obvious leak paths, but over-tightening can be equally problematic, causing thread deformation, seal damage, and paradoxically, easier loosening under vibration. Research indicates that fittings tightened 20% beyond recommended torque values show a 40% reduction in vibration resistance.
Seal degradation compounds these problems. As elastomeric seals age, they lose resilience and can no longer maintain effective sealing pressure. This degradation accelerates when systems operate at elevated temperatures or when incompatible fluids attack seal materials.
Warning Signs to Watch For
Early detection of hydraulic oil leak symptoms can prevent minor issues from developing into major failures. Recognizing these warning signs allows for timely intervention:
Visual indicators provide the most obvious clues. Fresh oil droplets or wet surfaces around fittings indicate active leaks, while dust accumulation patterns—where airborne particles stick to thin oil films—reveal slow seepage that might otherwise go unnoticed. Pay particular attention to fittings located near vibration sources or those subjected to thermal cycling.
Audible indicators can alert you to leaks even when visual inspection is difficult. A hissing sound from a fitting under pressure indicates fluid escaping through a restricted path. This sound often becomes more pronounced during pressure spikes or when the system is first pressurized after maintenance.
Performance indicators may signal leaks before they become visually apparent. Unexplained pressure drops, erratic actuator movement, or increased cycle times can all result from internal or external leakage. Modern equipment with pressure monitoring capabilities may show these symptoms through diagnostic codes or performance warnings.
The 3-Minute Emergency Repair Protocol
When a leaking hydraulic fitting threatens to halt operations, this streamlined protocol allows for quick, effective repairs. By following these five steps—each carefully timed—you can resolve most fitting leaks in just three minutes.
Step 1: Safe System Shutdown
Safe pressure relief for hydraulic system maintenance forms the critical first step in any repair process. Begin by powering down the equipment according to manufacturer guidelines. Never attempt to tighten or manipulate fittings on pressurized systems, as this can result in injection injuries or fluid burns.
Once the power source is disabled, relieve residual pressure by activating hydraulic actuators or opening relief valves. For systems with accumulators, follow specific bleed procedures to ensure complete depressurization. Verify pressure gauges read zero before proceeding.
During this step, also position containment materials to capture any fluid that may escape during the repair process. This prevents environmental contamination and creates a safer work environment by eliminating slip hazards.
Step 2: Inspection and Diagnosis
Effective hydraulic fitting leak detection methods allow for quick problem identification. Begin with visual inspection, looking for obvious signs of leakage, thread damage, or seal extrusion. Use a clean cloth to wipe the area, making small leaks more apparent.
For fittings that show no obvious damage but are suspected leak sources, apply leak detection fluid (similar to soapy water) and watch for bubbles forming under residual pressure. This technique can reveal microscopic leak paths not visible to the naked eye.
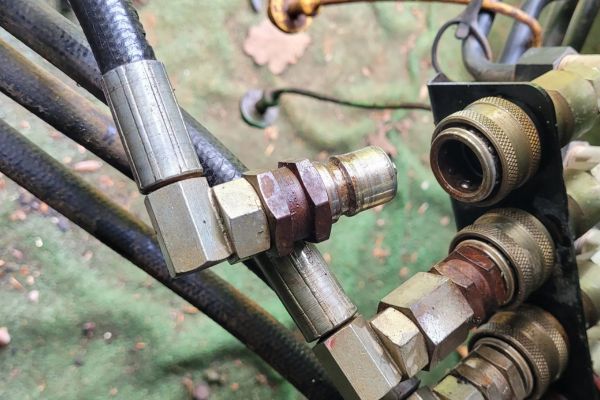
Identify the specific fitting type during this phase—whether it’s NPT/BSPT tapered thread, JIC 37° flare, ORFS (O-ring face seal), or compression type. Each requires slightly different repair approaches. Also note whether the leak occurs at the thread interface or at the sealing surface, as this distinction guides the repair strategy.
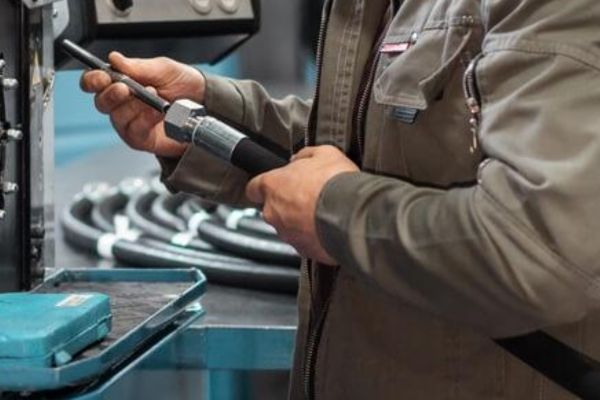
Step 3: Cleaning and Preparation
Properly preparing hydraulic fittings for leak-free connections is essential for lasting repairs. Begin by thoroughly cleaning both mating surfaces using a lint-free cloth. Remove all traces of hydraulic fluid, as even thin oil films can prevent proper thread engagement or seal compression.
For threaded connections, inspect the threads for damage, deformation, or contamination. Use a wire brush to clean external threads and compressed air (if available) to clear internal threads. Remove all old thread sealant or PTFE tape residue, as these materials can prevent proper fitting engagement when reapplied over existing layers.
For face-sealing connections like ORFS fittings, inspect the sealing surfaces for scratches, nicks, or deformation. Even minor damage to these precision surfaces can create leak paths. Clean O-rings or replace them if they show signs of damage, compression set, or chemical attack.
Step 4: Reassembly and Tightening
Understanding hydraulic fitting torque specifications to prevent leaks is crucial for effective repairs. Different fitting types require specific assembly techniques:
For NPT/BSPT tapered thread fittings, apply appropriate thread sealant or PTFE tape. When using tape, wrap in the direction of thread engagement (usually clockwise when viewing the male thread end-on) to prevent the tape from unwinding during assembly. Apply 3-4 layers for most applications, covering all engaged threads but leaving the first thread exposed to prevent sealant from entering the hydraulic system.
When tightening, use properly sized wrenches to prevent fitting or port damage. For NPT connections, the general rule is 2-3 turns past finger-tight for sizes up to 1/2 inch, with larger sizes requiring fewer turns. However, always consult specific torque specifications when available.
For JIC 37° flare fittings, ensure the sealing surfaces are clean and undamaged. Tighten until the surfaces make initial contact, then apply an additional 1/6 to 1/4 turn. Over-tightening these fittings can damage the sealing surfaces, creating leak paths rather than eliminating them.
For ORFS fittings, verify the O-ring is properly seated in its groove before assembly. Tighten until the metal surfaces make contact, then apply the manufacturer-specified torque. These fittings rely on precise O-ring compression, making proper torque critical.
Step 5: Testing and Verification
Verifying hydraulic system integrity after fitting repair requires a methodical approach. Begin with a low-pressure test by starting the system briefly and maintaining minimum pressure. Inspect the repaired fitting for any signs of leakage before proceeding to normal operating pressure.
Once the initial test confirms basic sealing, gradually increase system pressure while continuing to monitor the fitting. This progressive approach prevents sudden pressure spikes that might dislodge marginally secured connections.
For critical applications, consider marking the fitting with a torque-stripe (a paint mark across both the fitting and its mounting surface). This visual indicator makes it easy to identify if the fitting rotates or loosens during subsequent operation.
Fitting-Specific Solutions
Different hydraulic fitting types require specific approaches to ensure leak-free performance. Understanding these variations improves repair outcomes.
Threaded Connection Repairs
NPT hydraulic fitting leak prevention techniques focus on proper thread engagement and sealant application. These tapered pipe threads rely on both the thread interference and sealant material to prevent leakage. When repairing these connections, ensure threads are clean and undamaged before applying fresh sealant.
For optimal results with NPT fittings, consider using anaerobic liquid thread sealants rather than PTFE tape for high-pressure applications. These products fill microscopic gaps between threads and cure to form a pressure-resistant seal. Apply to male threads only, and avoid excess sealant that might contaminate the hydraulic system.
JIC 37° flare fittings rely on metal-to-metal contact between precisely machined surfaces. When these fittings leak, the most common cause is damage to the sealing surfaces. Inspect both the male cone and female flare for nicks, scratches, or deformation. Minor damage can sometimes be repaired using a flaring tool to recut the female surface or a fine file followed by emery cloth to smooth the male cone.
ORFS (O-Ring Face Seal) Fitting Solutions
ORFS hydraulic fitting maintenance procedures focus primarily on the O-ring and its sealing surfaces. These fittings provide excellent leak resistance but require careful handling during maintenance. When servicing ORFS connections, always replace the O-ring rather than reusing it, as these components take a compression set after initial use.
When selecting replacement O-rings, ensure material compatibility with the hydraulic fluid. Standard nitrile (NBR) O-rings work well with mineral-based hydraulic oils, but synthetic fluids or biodiesel blends may require specialized materials like FKM (Viton) or HNBR.
Proper alignment during reassembly is critical for ORFS fittings. The O-ring must seat evenly in its groove without twisting or pinching. Thread the fitting by hand until the O-ring contacts the mating surface, then apply torque according to manufacturer specifications. Over-tightening can crush the O-ring, while under-tightening may allow it to extrude under pressure.
Compression Fitting Fixes
Compression fitting leak repair for hydraulic lines requires attention to both the ferrule and tube preparation. These fittings create a seal by deforming a metal ferrule (sleeve) onto the tube surface. When leaks occur, the most common causes are improper tube preparation, incorrect assembly sequence, or damaged components.
Begin repairs by completely disassembling the fitting and inspecting the ferrule. Look for uneven deformation, cracks, or signs that the ferrule was installed backward. The ferrule should show uniform compression marks around its circumference.
Tube preparation plays a crucial role in compression fitting performance. The tube end must be cut square, deburred thoroughly, and cleaned of all contaminants. For stainless steel tubing, which has a tendency to work-harden, annealing the end before ferrule installation can improve sealing.
During reassembly, follow the correct sequence: slide the nut onto the tube first, followed by the ferrule with its tapered end facing the fitting body. Insert the tube fully into the fitting body before tightening the nut. For most hydraulic compression fittings, tighten the nut 1-1/4 turns past finger-tight for initial installation, or 1/4 turn past finger-tight when reassembling an existing connection.
Preventing Future Loosening Issues
While the 3-minute repair protocol addresses immediate leaks, implementing preventive measures creates long-term system reliability.
Preventive Maintenance Schedule
Establishing a preventive maintenance schedule for hydraulic fittings significantly reduces unexpected failures. Develop inspection routines based on equipment operating hours, with more frequent checks for components exposed to severe conditions.
During scheduled maintenance, visually inspect all accessible fittings for signs of leakage or loosening. Use calibrated torque wrenches to verify critical connections remain at specified values. Document all findings, including torque readings and observed conditions, to track patterns and predict potential failures before they occur.
For systems with historical leak problems, consider implementing ultrasonic leak detection as part of regular maintenance. This technology can identify developing leaks before they become visible, allowing for planned repairs rather than emergency responses.
Anti-Loosening Technologies
Vibration-resistant hydraulic fitting solutions provide additional security for critical connections. Thread-locking compounds offer a simple yet effective approach. These products fill the microscopic gaps between male and female threads, creating resistance to vibration-induced loosening.
Select the appropriate thread-locking compound based on application requirements. Low-strength formulations (typically blue) allow for future disassembly using hand tools, making them ideal for components requiring periodic maintenance. Medium-strength products (usually blue or green) provide greater vibration resistance while still allowing disassembly with standard tools. High-strength compounds (typically red) create nearly permanent bonds requiring heat for removal, suitable only for connections intended to remain assembled for the equipment’s lifetime.
Mechanical locking devices provide alternatives for applications where chemical thread-lockers are impractical. These include lock washers, jam nuts, safety wire, and proprietary locking systems. For critical hydraulic connections, consider combination approaches—such as proper torque application plus a mechanical locking device—to provide redundant protection against loosening.
Environmental Considerations
Understanding environmental factors affecting hydraulic oil leak development helps prevent recurrence. Temperature fluctuations represent a significant challenge, particularly for equipment operating outdoors or in variable conditions. Where possible, insulate hydraulic components to moderate temperature swings and reduce thermal expansion effects.
Vibration isolation techniques can dramatically improve fitting reliability. Identify vibration sources within the equipment and implement appropriate countermeasures. These might include flexible hose sections to decouple rigid components, rubber isolation mounts for hydraulic pumps or motors, or mass dampers to alter resonant frequencies.
Corrosion prevention strategies also play a role in long-term fitting integrity. External corrosion can damage fitting surfaces and make them difficult to remove during maintenance, while internal corrosion can affect sealing surfaces. Use appropriate protective coatings on external surfaces and maintain proper fluid cleanliness to prevent internal corrosion.
When to Call a Professional
While the 3-minute repair protocol addresses many common fitting issues, some situations require specialized expertise.
Recognizing Repair Limitations
Understanding when to seek professional hydraulic system leak repair services prevents minor problems from escalating into major failures. Complex system integration issues—particularly those involving electronic controls, multiple interconnected circuits, or specialized functions—often require expertise beyond basic mechanical skills.
High-pressure systems operating above 5,000 PSI (345 bar) demand specialized knowledge and tools. At these pressures, standard repair approaches may prove inadequate or even dangerous. Similarly, systems using specialized fittings or proprietary connection technologies may require manufacturer-specific tools and training.
Safety considerations should always guide repair decisions. If a fitting is located in a difficult-to-access area, requires special tools you don’t possess, or if the system contains hazardous fluids, consulting a professional represents the prudent choice.
Selecting Qualified Technicians
When professional assistance becomes necessary, understanding certified hydraulic system repair technician qualifications helps ensure quality results. Look for technicians with industry-recognized certifications such as those from the International Fluid Power Society (IFPS) or manufacturer-specific training programs.
Experience considerations should include both general hydraulic knowledge and familiarity with your specific equipment type. A technician with decades of experience on industrial hydraulic systems might not be the best choice for mobile equipment repairs, as these applications present unique challenges.
Equipment capabilities also matter. Professional service providers should possess proper diagnostic tools, including pressure testing equipment, contamination analysis capabilities, and precision measuring instruments. For complex systems, look for providers with simulation software that can model system behavior under various conditions.
Conclusion
True success lies in tackling both the leak and its root cause, whether it’s vibration, thermal cycling, or poor installation. This shifts maintenance from reactive to proactive. With consistent application, this approach cuts leaks, boosts reliability, and delivers major savings in cost, downtime, and environmental impact.
FAQ
What types of hydraulic fittings does this method apply to?
It is applicable to most common hydraulic system connection types such as threaded, flanged and quick release couplings.
Does it really only take 3 minutes to fix a leak?
Yes, most joint leaks can be repaired in less than 3 minutes under normal operating conditions, following standard procedures.
Do I need special tools?
No expensive equipment is required, just common hydraulic tools such as wrenches, cleaning materials and appropriate seals.
Does this method require shutting down the entire system?
For safety and effectiveness, it is recommended to operate without pressure, so a temporary shutdown is required for pressure relief and repair.
How can I ensure that there is no further leakage after the repair?
Long-term leak-free operation can be achieved by checking the root cause and taking complementary measures.
Who is suitable to operate this program?
It can be operated by maintenance technicians with basic training. The process is simple, safe and efficient, and is suitable for quick on-site treatment of leaks.