Knowing the open position of a ball valve is essential for ensuring the smooth and efficient operation of fluid or gas systems. A misidentified valve position can lead to reduced flow efficiency, leaks, or even safety hazards in high-pressure applications. Whether you’re managing a residential plumbing setup or an industrial system, understanding how to spot the ball valve’s open position helps you maintain control, prevent costly errors, and optimize performance.
Ball Valve Basics
What is a Ball Valve? Key Features and Functionality
A ball valve is a mechanical device designed to control the flow of liquids or gases through a pipeline. Its core mechanism revolves around a spherical ball with a hole (or bore) through its center. When the hole aligns with the pipeline, the valve is open, allowing unrestricted flow. A 90-degree rotation of the ball, controlled by a handle or actuator, shifts the hole out of alignment, completely blocking the flow.
Ball valves are widely regarded for their reliability, ease of operation, and versatility. They provide a tight seal when closed, which minimizes leaks even under high-pressure conditions. Key features include:
Quick Operation: The quarter-turn mechanism makes them easy to use.
Low Pressure Drop: The unobstructed flow path ensures minimal resistance.
Durability: Materials like stainless steel, brass, or PVC resist corrosion and wear, making ball valves suitable for long-term use.
From residential plumbing to industrial pipelines, ball valves are crucial for managing flow efficiently and safely.
Anatomy of a Ball Valve: Breaking Down the Components
To understand how a ball valve works, it’s important to know its main components:
Valve Body: The outer casing that houses all other parts, designed to withstand pressure and environmental conditions.
Ball: The central spherical component with a drilled hole that regulates flow. Its precise design ensures smooth operation and a tight seal.
Handle: The external part that allows manual control of the valve. By turning the handle, users rotate the ball inside.
Stem: The rod that connects the handle to the ball, transmitting motion.
Seats: Ring-shaped components that cradle the ball and form a seal to prevent leaks.
Seals and Gaskets: Ensure tight connections between the body and other components to maintain pressure integrity.
Each part works together to create a robust, user-friendly mechanism capable of handling a wide range of applications.

Ball Valve Orientation: How Position Impacts Flow
The orientation of the ball inside the valve dictates whether the flow is open, restricted, or completely blocked:
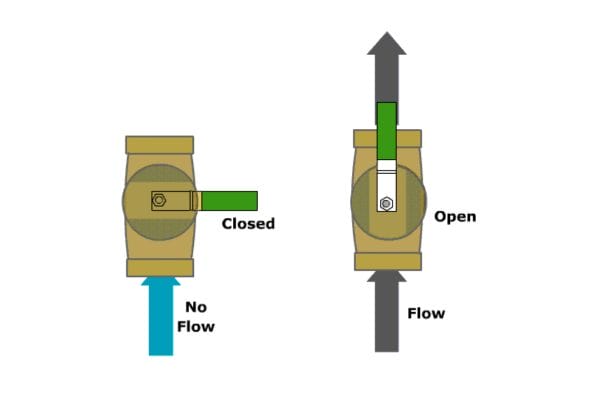
Open Position: When the ball’s hole aligns with the pipeline, the flow moves freely with little resistance. The handle is parallel to the pipeline, making the open position easy to spot.
Closed Position: A 90-degree turn rotates the solid side of the ball into the flow path, stopping fluid or gas movement entirely. In this state, the handle is perpendicular to the pipeline.
Intermediate Position: In some applications, the valve may be partially open to regulate flow. This position is less common due to potential wear on the seats.
Orientation is critical for ensuring proper system operation. Misalignment or misunderstanding of the valve’s position can lead to reduced efficiency, leakage, or system damage. Properly identifying and maintaining alignment ensures the valve functions optimally in any setting.
Identifying the Ball Valve Open Position
Handle Position: The Simplest Indicator of Valve Status
One of the most straightforward ways to determine whether a ball valve is open is by observing the handle position. Most ball valves are designed so that the handle directly indicates the valve’s status:
Open Position: The handle is aligned parallel to the pipeline. This indicates that the ball’s internal hole is in line with the flow, allowing fluids or gases to pass through freely.
Closed Position: The handle is perpendicular to the pipeline. This signals that the solid part of the ball is blocking the flow entirely.
This design makes ball valves intuitive to operate, but it’s not always foolproof. In some cases, wear and tear or installation errors can cause the handle to misalign with the valve’s true position. In such instances, other indicators must be used to confirm the status.
Decoding Flow Direction with Visual Cues
Beyond the handle, visual cues on the valve body can provide additional clarity about the flow direction and status. Manufacturers often incorporate specific features to help users identify the valve’s open position accurately:
Arrows or Directional Markings:
Many valves feature arrows on the valve body, pointing in the direction of flow. If the arrow aligns with the pipeline, the valve is likely to open.
Bidirectional valves may not have arrows, so other methods like handle alignment are necessary.
Engraved Labels:
Terms like “OPEN” and “CLOSE” are sometimes engraved near the handle or on the valve body. These serve as a clear guide when determining the position, especially in poorly lit environments.
Color Codes:
Some ball valves have color-coded elements, such as green for opening and red for closing. These are particularly useful in large systems with multiple valves, allowing operators to identify statuses at a glance.
By using these visual cues alongside the handle position, users can double-check the valve’s state and minimize errors in operation.
Using Status Indicators for Confirmation
For an added layer of certainty, many modern ball valves come equipped with status indicators. These features are especially useful in complex systems where quick and accurate identification of valve positions is essential:
Mechanical Position Markers:
Some valves have built-in markers on the stem or handle that indicate the ball’s rotation. These markers are often in the form of raised notches or engraved symbols.
A visible “O” or “C” may correspond to the open or closed position, ensuring clear communication of the valve’s state.
Visual Windows:
Certain ball valves feature small windows that display the internal ball’s orientation. When the hole inside the ball is visible through the window, it confirms the valve is open.
Digital Indicators:
In advanced setups, digital monitoring systems can provide real-time feedback on the valve’s status. Sensors attached to the valve relay information to a control panel, enabling operators to confirm the position remotely.
Spring-Loaded Position Indicators:
Some valves incorporate spring-loaded mechanisms that visibly pop up or retract based on the valve’s position. This feature is often found in high-pressure or industrial applications where precision is critical.
Practical Steps to Identify the Open Position
To ensure accuracy, combine multiple methods when checking a ball valve’s open position:
Start by observing the handle alignment with the pipeline. If it’s parallel, the valve is likely open.
Look for visual cues, such as arrows, labels, or color codes, on the valve body.
Confirm the status using built-in indicators, such as mechanical markers or visual windows.
For systems with critical operations, use flow testing to verify that fluids or gases are moving as expected through the valve.
Why Accurate Identification Matters
Correctly identifying the open position of a ball valve is crucial for ensuring system efficiency and safety. Misidentifying the position can lead to leaks, reduced performance, or even hazardous conditions in high-pressure or sensitive environments. For example:
In plumbing systems, leaving a valve partially closed can disrupt water pressure and cause damage to appliances.
In industrial settings, an incorrect valve position could lead to dangerous chemical leaks or pressure buildup.
Common Misconceptions About Ball Valve Operation
Myths About Handle Alignment: When It Can Be Deceptive
Handle alignment is often considered the gold standard for identifying a ball valve’s position, but it’s not always foolproof. Several misconceptions surround the reliability of the handle as an indicator:
Misalignment Due to Wear and Tear: Over time, the connection between the handle and the valve’s stem can loosen or degrade. This can result in the handle showing a parallel position to the pipeline, even when the valve is not fully open.
Installation Errors: During installation, improper tightening or positioning of the handle can cause it to misrepresent the actual valve position. For example, if the handle is attached slightly off-axis, it may look parallel when the valve is partially open.
Assuming All Handles Work the Same Way: Not all ball valves use the same handle design. Some may have custom configurations or designs that operate differently from standard parallel/perpendicular indicators. For instance, in certain compact systems, the handle might rotate in the opposite direction.
Blocked Internal Mechanism: Debris or internal obstructions can prevent the ball from fully opening or closing. Even if the handle indicates the valve is in the open position, the flow may still be restricted.
Key Takeaway:
While handle alignment is a valuable visual cue, always combine it with other methods—such as inspecting flow direction indicators or testing the valve function—to confirm the actual position. Relying solely on the handle can lead to operational errors, particularly in older or heavily used valves.
Understanding Bidirectional vs. Unidirectional Flow in Ball Valves
Another common misunderstanding involves the directionality of ball valves and their impact on operation:
Bidirectional Valves:
Most ball valves are designed for bidirectional flow, meaning fluid or gas can travel in either direction when the valve is open. These valves are versatile and commonly used in residential and industrial systems.
The handle position or flow indicators are the primary methods for identifying whether the valve is open, as the direction of flow does not change the function.
Unidirectional Valves:
Some specialized ball valves allow flow in only one direction. These valves often have additional features, such as arrows or markings on the valve body, to indicate the correct flow path.
Attempting to reverse flow through a unidirectional valve can lead to damage, leaks, or inefficiencies.
Misinterpretation of Markings:
Operators often mistake the presence of directional arrows on bidirectional valves as a strict flow guide. In reality, these markings may be intended to aid installation or highlight the valve’s orientation, not limit its functionality.
Conversely, ignoring directional markings on unidirectional valves can lead to improper installation and system failures.
Application-Specific Misuse:
In high-pressure or chemical systems, using a bidirectional valve where a unidirectional valve is required can result in backflow issues or increased wear on internal components.
Key Takeaway:
Understanding whether your ball valve is bidirectional or unidirectional is critical for proper operation. Always verify the valve type, check for markings, and consult the manufacturer’s specifications to avoid misuse and potential damage.
Installation Insights for Ball Valves
Common Errors During Installation and How to Avoid Them
Improper installation of ball valves can lead to operational inefficiencies, leaks, and premature wear. Avoid these common mistakes to ensure smooth functionality:
Overtightening Connections:
Excessive force when tightening the valve can distort the body or damage the threads, leading to misalignment or leaks.
Solution: Use a torque wrench and adhere to manufacturer-recommended torque values.
Incorrect Valve Orientation:
Installing a unidirectional valve backward can block the flow and damage internal components.
Solution: Check for directional arrows or markings on the valve body before installation.
Skipping Thread Sealants:
Failure to use appropriate sealants, such as Teflon tape, can result in leaks at connection points.
Solution: Apply a suitable sealant evenly to the threads, avoiding excess that might contaminate the valve interior.
Improper Pipeline Preparation:
Connecting a valve to a pipeline with debris, burrs, or misaligned ends can cause operational problems.
Solution: Clean and inspect the pipeline ends, ensuring they align with the valve inlet and outlet.
Ignoring Material Compatibility:
Using a valve made of incompatible materials for the system media can lead to corrosion or deterioration.
Solution: Confirm the valve’s material is suitable for the fluid, pressure, and temperature conditions.
Ensuring Proper Valve Alignment During Setup
Correct alignment is essential to ensure the ball valve operates smoothly and reliably. Follow these steps to achieve proper setup:
Position the Valve Correctly:
Align the valve with the pipeline to ensure that the flow path is unobstructed. Misalignment can cause stress on the connections and hinder valve operation.
Level the Handle:
Ensure the handle is parallel to the ground or in a position that allows easy access and operation. Poor positioning can make the valve difficult to use or lead to misinterpretation of its status.
Center the Valve:
Check that the valve’s inlet and outlet ports are centered with the pipeline to avoid uneven stress that can damage the valve body or seats.
Secure the Valve Firmly:
Use appropriate clamps or supports to hold the valve in place, especially for larger or heavier valves. This prevents movement due to vibrations or pressure fluctuations.
Account for Expansion and Contraction:
In high-temperature systems, allow room for thermal expansion and contraction to avoid excessive stress on the valve and connections.
Testing the Valve Post-Installation to Verify Operation
Once the valve is installed, testing is crucial to confirm proper functionality and alignment. Here’s a step-by-step guide:
Perform a Visual Inspection:
Ensure all connections are tight and that the handle is properly aligned with the pipeline. Look for any visible defects or misalignment.
Conduct a Pressure Test:
Slowly introduce pressure to the system and observe the valve for leaks around the body and connections.
If the valve leaks, tighten connections or replace damaged seals as needed.
Cycle the Valve Through Its Positions:
Rotate the handle to open and close the valve fully. This ensures the ball moves freely and aligns correctly with the pipeline.
Listen for unusual sounds, such as grinding or squeaking, which could indicate internal obstructions or misalignment.
Check for Flow Integrity:
Open the valve fully and verify that fluid or gas flows without resistance. Close the valve and confirm that the flow is completely stopped.
Confirm Indicator Functionality:
If the valve has built-in indicators, such as markings or visual windows, verify that they correspond accurately to the valve’s position.
Document Results:
Record the testing results, including pressure levels and any adjustments made. This provides a reference for future maintenance.
Maintenance for Smooth Operation
Routine Inspections: What to Check and When
Routine inspections are essential for maintaining ball valves in optimal condition and ensuring their longevity. Regular checks can help identify and address minor issues before they escalate. Here’s what to look for during inspections:
Handle Movement:
Test the handle to ensure it rotates smoothly between the open and closed positions. Stiff or restricted movement could indicate internal obstructions or mechanical wear.
Alignment Accuracy:
Verify that the handle’s alignment with the pipeline corresponds to the valve’s actual position. Misalignment could signal wear in the stem or ball mechanism.
Visible Leaks:
Inspect the valve body, connections, and seals for any signs of leaks, such as moisture, drips, or residue buildup. Leaks often indicate damaged seals or loose fittings.
Valve Surface Condition:
Look for corrosion, rust, or surface damage, especially in valves exposed to harsh environments or corrosive fluids.
System Pressure and Flow:
Monitor the system for unusual pressure drops or flow inconsistencies that could signal a partially open valve or internal blockage.
Inspection Schedule:
- Weekly to Monthly: Conduct visual inspections and test handle movement for frequently used valves.
- Annually: Perform a comprehensive check, including disassembly (if applicable) for less-used or critical valves.
Cleaning the Valve to Remove Debris and Build-Up
Over time, ball valves can accumulate debris, sediment, or mineral deposits, especially in systems with hard water or particulate-laden fluids. Cleaning the valve ensures smooth operation and prevents long-term damage.
Disassemble the Valve:
Shut off the system and relieve pressure before removing the valve. Carefully disassemble it to expose the internal ball, seats, and seals.
Remove Debris:
Use a soft, non-abrasive brush or cloth to clean the internal components, including the ball and seats. For stubborn build-up, soak the components in a cleaning solution recommended by the valve manufacturer.
Inspect Components:
Examine the ball for scratches or cracks and check the seals for wear or damage. Replace any compromised parts before reassembling the valve.
Flush the System:
After cleaning, flush the pipeline to remove any remaining debris that could reenter the valve.
Reassemble and Test:
Reassemble the valve carefully, ensuring all components are aligned correctly. Test the valve’s operation to confirm smooth movement and leak-free performance.
Pro Tip:
Schedule cleaning more frequently in systems with high contamination risks, such as industrial or untreated water lines.
Proper Lubrication for Longevity and Efficiency
Lubrication reduces friction between moving parts, ensuring smoother operation and minimizing wear. It is especially important for valves exposed to frequent use or extreme conditions.
Choose the Right Lubricant:
Use valve-specific lubricants compatible with the valve’s materials and the system’s fluid. Avoid using generic greases that may degrade seals or contaminate the system.
Apply Lubricant to Key Areas:
Focus on the stem, seats, and internal ball surface. A thin, even layer of lubricant ensures optimal movement without over-application.
Lubrication Frequency:
Lubricate during annual inspections or more frequently for high-use valves or those operating in harsh environments.
Monitor Lubricant Condition:
Check for signs of dried or degraded lubricant, which can hinder performance. Replace old lubricant with fresh applications as needed.
Benefits of Proper Lubrication:
Prevents sticking or jamming of the handle.
Reduces internal friction, extending the lifespan of components.
Protects against rust and corrosion in metallic valves.
Conclusion
By combining these practices, you can ensure optimal performance, minimize downtime, and extend the lifespan of your valves. Ready to elevate your system’s performance? Start implementing these tips today and experience the difference!
FAQ
How can I tell if a ball valve is open or closed?
If the handle is parallel to the pipeline, the valve is open. If it’s perpendicular, the valve is closed.
What do directional arrows on a ball valve mean?
Directional arrows indicate the flow direction for unidirectional valves or help confirm proper alignment for bidirectional valves.
Why is my ball valve handle hard to turn?
This may be due to corrosion, debris buildup, or a lack of lubrication. Regular maintenance can resolve and prevent this issue.
Can ball valves be used for throttling?
Ball valves are not ideal for throttling as it can cause wear on the ball and seats, reducing their lifespan.
How often should ball valves be inspected?
Ball valves should be inspected at least annually or more frequently in high-use or critical systems.
What materials are best for durable ball valves?
Stainless steel and brass are excellent choices for durability and resistance to corrosion in various applications.