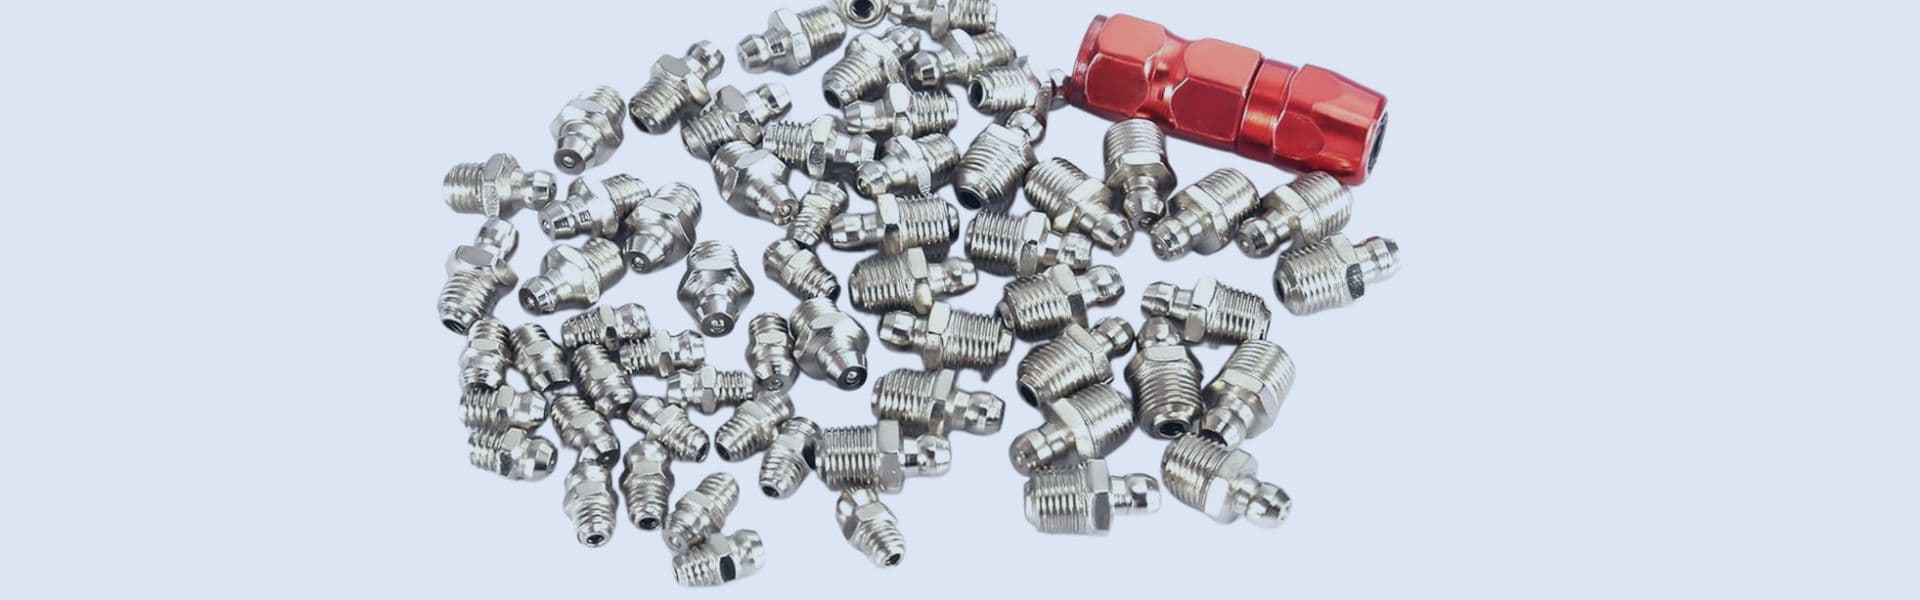
Grease Fitting Won’t Take Grease banner

Grease Fitting Won’t Take Grease? Here’s What You Can Do

Grease fittings play a crucial role in keeping machinery and equipment running smoothly by ensuring that parts receive the right amount of lubrication. Regular lubrication through grease fittings helps prevent friction, wear, and overheating, ultimately extending the lifespan of critical components like bearings, joints, and hydraulic systems. Without proper lubrication, machinery can experience costly damage, downtime, and decreased efficiency.

Why a Grease Fitting Won’t Take Grease: Top Causes

Clogged Grease Fittings: How Debris Affects Function

What Causes Clogging? Grease fittings can become clogged due to dirt, rust, or hardened grease buildup inside the fitting or grease passage. This typically happens when equipment is used in harsh environments or not regularly maintained.

Impact of Clogs on Grease Flow A clogged grease fitting prevents the proper flow of lubricant, leading to insufficient lubrication of moving parts. This can cause overheating, excessive wear, and even catastrophic failure of components that rely on grease for smooth operation.

How to Spot a Clogged Grease Fitting One of the easiest signs is when the grease gun fails to inject grease into the fitting, or the grease is leaking out around the fitting. If the fitting is visibly dirty or damaged, it’s a likely sign of a blockage.

How to Fix It Regular cleaning and inspection of grease fittings can prevent clogs. If a clog is suspected, use a grease fitting cleaner or needle to clear out debris and ensure proper grease flow.

Worn or Damaged Grease Fitting Seals

The Role of Seals in Grease Fittings Grease fitting seals are designed to create a tight barrier that prevents contaminants from entering the fitting and lubricants from leaking out. Over time, these seals can wear out due to friction, age, or exposure to extreme temperatures.

How Worn Seals Affect Performance When the seal is damaged or worn, grease may escape around the edges of the fitting, preventing proper lubrication and causing dirt or moisture to enter, which can lead to rust and corrosion.

How to Identify Worn Seals Look for signs of grease leakage around the fitting, or notice if the fitting is difficult to press into with a grease gun. Worn seals are often a primary cause of poor lubrication.

Fixing Damaged Seals Replace damaged seals with high-quality, compatible seals to ensure a proper fit and seal. Regular inspections can catch seal wear early, before it affects the fitting’s performance.

Grease Fitting Won’t Take Grease

Air Blockage: When Air Pockets Prevent Grease Flow

Understanding Air Blockages in Grease Fittings Air pockets can form inside the grease fitting, particularly when air enters the system during the initial lubrication or after maintenance. This trapped air creates resistance that blocks the flow of grease.

How Air Affects Grease Flow When air is trapped inside the grease fitting, it prevents the grease from entering the desired components. This can result in insufficient lubrication and cause parts to run dry, which may lead to increased friction and wear.

Symptoms of Air Blockage If your grease gun isn’t dispensing grease effectively or if there’s resistance when pressing the nozzle, air pockets might be preventing grease from entering the fitting properly.

How to Resolve Air Blockages To eliminate air from the system, lightly press the grease gun while holding it against the fitting, allowing the air to escape before pumping in the grease. Sometimes, manually pushing out air by using a manual grease gun purge technique is necessary.

Improper Lubricant Choice or Application

Choosing the Right Grease for Your Fitting Not all grease is created equal. Using the wrong type of lubricant (too thick or too thin) can result in grease failing to properly lubricate the components. For example, a grease that is too thick may not flow easily through the fitting, while a thin lubricant might not provide adequate protection.

How Wrong Grease Affects Performance Using improper grease or incorrectly applying it can lead to over-lubrication, under-lubrication, or poor performance. Both scenarios can cause damage to machinery and compromise component life expectancy.

How to Choose the Right Lubricant Always consult the manufacturer’s specifications to determine the correct type of grease for your equipment. Consider the environmental conditions, temperature ranges, and the type of machinery in question to select the best lubricant.

Best Practices for Grease Application Apply the grease at the correct pressure to avoid overfilling and ensure that all moving parts are evenly lubricated. Use a high-quality grease gun and make sure the nozzle is properly sealed to prevent air from entering the system.

Grease Fitting Misalignment

What Is Grease Fitting Misalignment? Misalignment occurs when the grease fitting is not properly positioned in relation to the component it’s meant to lubricate. This can happen during installation or due to physical shifts in the machinery over time.

How Misalignment Affects Grease Flow When the grease fitting is misaligned, it may not be able to make a proper connection with the grease gun, leading to difficulty in dispensing grease. Misalignment also reduces the effectiveness of lubrication, preventing grease from reaching all the necessary parts.

Symptoms of Misalignment Difficulty in attaching the grease gun to the fitting, excessive resistance during greasing, or uneven distribution of grease are signs of misalignment.

How to Fix Misalignment Ensure that grease fittings are properly installed in alignment with the lubricated components. This may involve adjusting the positioning of the fittings or replacing damaged parts. Regular maintenance and checks can help detect misalignment early on.

Identifying Grease Fitting Issues

Signs Your Grease FittingIsn’t Taking Grease

Resistance in the Grease Gun One of the first indicators that a grease fitting isn’t taking grease is difficulty in applying grease. If the grease gun is hard to pump or if it feels like there’s resistance when attempting to inject grease, this could be a sign that the fitting is clogged or otherwise obstructed.

No Grease Flow or Grease Leaks Another sign is that no grease is coming out of the fitting even after multiple attempts. In some cases, you might notice grease leaking around the fitting or from the grease gun itself, indicating improper sealing or a blockage preventing proper flow.

Grease Backing Up If grease starts to back up out of the fitting when you apply pressure, it’s a clear sign that there’s a clog or buildup preventing proper grease flow, or the fitting might be damaged.

How to Tell if the Grease Fitting Is Clogged or Damaged

Visual Inspection Examine the grease fitting for visible signs of damage or debris. Look for dirt, rust, or old grease around the fitting. A clogged or worn fitting may have visible buildup or discoloration.

Check for Blockages To check for a clog, remove the grease gun and inspect the fitting using a small wire or needle to probe inside. If you encounter resistance, it’s likely clogged. If you can’t get any grease flow, it’s time to check for a more serious obstruction deeper within the fitting or lubrication passage.

Damage to the Fitting Over time, grease fittings can wear out or get damaged due to misuse, over-tightening, or exposure to harsh environments. Look for cracks, wear marks, or bent parts that could prevent the fitting from sealing properly.

Testing Grease Flow If a small amount of grease still flows out, it might suggest a partial clog or damage, meaning that the fitting isn’t fully functional but still working in a limited capacity. A complete failure will prevent any grease from being dispensed.

Common Symptoms of a Faulty Grease Fitting

Grease Not Reaching Key Components If you’re experiencing poor lubrication in parts that rely on grease fittings, like bearings or joints, this could be a sign that the fitting isn’t functioning correctly. Without grease reaching these components, you may notice unusual wear, increased friction, or overheating.

Excessive Wear or Overheating When machinery components aren’t adequately lubricated, they can become overheated and wear out quickly. If you notice any of these signs, it’s time to inspect your grease fittings. A failure to lubricate could result in costly damage and system breakdowns.

Frequent Blockages or Leaking If you constantly experience grease leakage or clogging at the same fitting, it might be a sign of a damaged or worn-out fitting that needs replacement. Fittings should seal properly to prevent leaks while ensuring grease flow.

Troubleshooting Your Grease Fitting

Step-by-Step Troubleshooting Guide for Grease Fitting Problems

Step 1: Check the Grease Gun Before assuming the grease fitting is the problem, ensure your grease gun is in good working condition. Check for any signs of damage, such as cracks or leaks, and ensure it’s properly primed with grease. Also, verify that the nozzle is securely attached.

Step 2: Inspect the Grease Fitting for Damage or Wear Look for obvious signs of wear or damage on the fitting itself. If the fitting is cracked, worn down, or misaligned, it might not accept grease properly. In this case, a replacement is necessary.

Step 3: Examine the Grease Pathway If the fitting and grease gun appear to be functioning correctly, the issue may lie in the grease pathway. Check for blockages or obstructions in the line leading to the fitting. You may need to remove any fittings, hoses, or tubes connected to the system to inspect this thoroughly.

Step 4: Assess Grease Flow Once you’ve confirmed the grease fitting and its immediate connections are intact, proceed to check if grease flows properly when pressure is applied. If it doesn’t, this could indicate a more serious blockage or damage inside the fitting or grease passageway.

Grease Fitting Won’t Grease

Inspecting the Grease Fitting and Grease Gun Connection

Ensure Proper Fit The connection between the grease fitting and grease gun should be tight and secure. Any loose connections can lead to grease leakage or poor grease flow. If the connection seems faulty, clean both the grease fitting and gun nozzle to ensure a proper seal.

Inspect for Leaks If grease leaks around the connection while pumping, it could indicate that the fitting’s seal is compromised, or the nozzle isn’t properly attached. Check for worn seals on both the fitting and grease gun, replacing them if necessary.

Check the Nozzle and Tip The nozzle and tip of the grease gun should fit snugly onto the fitting. If the tip is too large or small, it may not form a proper seal, making it difficult to inject grease. Use the correct size nozzle for the grease fitting you’re working with.

Checking for Obstructions in the Grease Pathway

Remove the Grease Fitting If there’s no grease flow despite a proper grease gun connection, carefully remove the grease fitting using the appropriate tool. Inspect the fitting’s interior and the grease passage for any obstructions, such as hardened grease, dirt, or debris.

Clear the Pathway Use a needle or specialized grease fitting cleaner to clear any debris from the fitting. If the fitting is excessively clogged, you might need to soak it in a degreaser solution to loosen the debris. Once cleared, reassemble and test the grease flow.

Check the Grease Line If the fitting seems clear but grease still isn’t flowing, inspect the grease line (hose or tube) for potential kinks, cracks, or obstructions. Ensure that grease can freely flow all the way from the grease gun to the fitting.

How to Test Grease Flow through the Fitting

Manual Test After checking the fitting and grease gun connection, manually apply pressure to the grease gun and observe whether grease flows freely. If the grease doesn’t flow, there could be a deeper issue with the fitting or its components.

Use a Clear Grease Hose If you’re still unsure about the flow, use a clear hose to connect the grease gun to the fitting. As you apply pressure, observe whether grease is visible moving through the hose. This can help you pinpoint any blockages or resistance in the system.

Alternative Testing Methods In some cases, testing grease flow by applying a small amount of air pressure to the line can help you identify hidden blockages. However, be careful not to apply too much pressure, as this can cause damage to the fitting or the components.

How to Repair a Grease Fitting That Won’t Take Grease

Simple Repairs You Can Do Yourself

Clear Clogs with a Needle or Cleaning Tool If the grease fitting is clogged, one of the first steps is to use a grease fitting needle or cleaning tool to clear out the obstruction. Insert the needle into the fitting to break up debris or hardened grease. You can also use a specialized grease fitting cleaner that helps dislodge any buildup.

Clean and Lubricate the Fitting Sometimes, grease fittings may become stiff or sticky due to old grease or environmental debris. Clean the fitting with a wire brush or rag to remove dirt and grease. After cleaning, apply fresh grease to ensure smooth operation.

Check and Tighten the Fitting Loose fittings can prevent grease from flowing properly. Use a wrench to tighten the fitting, but be careful not to overtighten, as this could damage the fitting or the surrounding components. Ensure that the fitting is firmly connected and properly aligned.

Repair or Replace Seals If the fitting is leaking grease due to a worn seal, you may be able to repair it by replacing the seal or O-ring. Make sure the replacement is of the same size and material as the original to prevent further leaks and ensure a tight seal.

When to Replace the Grease Fitting: Signs It’s Beyond Repair

Cracks or Visible Damage If the grease fitting is cracked, deeply worn, or severely deformed, it’s likely beyond repair and needs to be replaced. Damaged fittings can lead to grease leakage, contamination, or even further damage to the equipment.

Persistent Blockages After Cleaning If the grease fitting remains clogged despite your best efforts to clean it, it may indicate that the internal pathway is permanently blocked or that there is structural damage. In this case, replacement is necessary.

Excessive Leakage If the fitting continues to leak grease even after cleaning and sealing, this suggests a more serious problem. Over time, repeated leakage can damage surrounding components, making replacement the best course of action.

How to Replace a Faulty Grease Fitting

Step 1: Prepare the Equipment Before replacing the faulty grease fitting, ensure that the equipment is turned off, and the area is safe to work in. Gather the necessary tools, including a wrench, a new grease fitting, and thread sealant if required.

Step 2: Remove the Old Fitting Use a wrench to carefully unscrew the damaged grease fitting. Be mindful not to damage the surrounding parts. If the fitting is stuck, try applying penetrating oil to loosen it before attempting to remove it again.

Step 3: Clean the Fitting Area Once the old fitting is removed, clean the area to ensure there is no debris, old grease, or rust that could affect the new fitting’s performance. You can use a rag or wire brush to clean the fitting hole.

Step 4: Install the New Grease Fitting Screw the new grease fitting into place, making sure it’s aligned correctly. Tighten it securely with a wrench, but avoid overtightening. If necessary, apply thread sealant to the threads to prevent leaks.

Step 5: Test the New Fitting Once the new fitting is installed, use your grease gun to apply grease. Ensure that grease flows smoothly and the fitting is functioning properly without any leaks or resistance.

Dealing with Grease Fitting Leakage

Understanding Grease Fitting Leakage and Its Causes

What Causes Grease Fitting Leaks? Grease fitting leakage can occur due to several factors, including worn or damaged seals, improper installation, or over-tightening of the fitting. The pressure from the grease gun can cause seals to rupture, leading to leaks around the fitting. Environmental debris, dirt, or hardened grease can also compromise the seal integrity.

Impact of Leakage on Equipment A leaking grease fitting may not only waste valuable lubricant but also lead to contamination of surrounding components. Over time, this can cause dirt and debris to enter machinery, damaging critical parts and decreasing overall performance. Regular leakage can lead to increased wear and tear, resulting in costly repairs.

Identifying Leakage Points Leakage can occur at the point of connection between the grease fitting and the grease gun, or where the fitting meets the machine. Pay attention to areas where grease seems to escape, as this can guide you to the source of the problem.

How to Fix a Leaking Grease Fitting

Step 1: Tighten the Fitting If the leak is coming from a loose connection, simply tightening the grease fitting may solve the problem. Use a wrench to secure the fitting without over-tightening, which could damage the threads or cause other issues.

Step 2: Replace Damaged Seals or O-Rings If the fitting’s seal or O-ring is worn or damaged, replacing it is the best solution. Make sure to choose the correct size and material of seal to match the manufacturer’s specifications for optimal performance and leak prevention.

Step 3: Clean and Clear Obstructions Dirt or hardened grease can compromise the seal, causing leaks. Clean the grease fitting and surrounding area thoroughly before replacing the seal. Clear any obstructions in the fitting that might prevent the seal from sitting correctly.

Step 4: Use Thread Sealant (If Necessary) For particularly stubborn leaks, you can apply a thread sealant designed for grease fittings. This will create an additional barrier to prevent grease from escaping around the fitting’s threads.

Preventing Future Leakage: Tips and Tricks

Regular Inspection and Maintenance Inspect your grease fittings regularly to ensure they remain clean and free of debris. Early detection of wear or damage can prevent future leaks and prolong the life of your equipment.

Proper Lubricant Application Avoid over-pressurizing the grease fitting with too much grease, as this can force seals to fail and cause leaks. Use the correct type and amount of lubricant to ensure optimal function without stressing the fitting.

Use High-Quality Fittings and Seals Invest in high-quality grease fittings and seals to minimize the risk of leakage. Cheaper fittings may degrade faster, leading to frequent repairs and leaks.

Ensure Proper Alignment Misaligned grease fittings are more likely to develop leaks. Ensure that all fittings are properly aligned with the lubrication path to prevent uneven pressure and leakage.

Conclusion

By staying on top of inspections and addressing issues early, you can extend the lifespan of your equipment, avoid costly repairs, and keep everything running efficiently. Regular lubrication and care for your grease fittings are essential for the long-term health of your machinery—ensuring it operates at its best and minimizes downtime.


FAQ

What should I do if my grease fitting won’t take grease?

If your grease fitting won’t take grease, start by inspecting the fitting for clogs or damage. Clean the fitting using a needle or cleaning tool to remove any obstructions. Tighten loose fittings and check for proper grease flow.

How do I know if my grease fitting is clogged?

Signs of a clogged grease fitting include resistance when using the grease gun, grease backing up or leaking, and no grease coming out when pressure is applied. If you notice these signs, inspect and clear the fitting using a needle or grease fitting cleaner.

Can I fix a leaking grease fitting myself?

Yes, you can fix a leaking grease fitting by tightening the connection, cleaning the fitting, and replacing any worn seals or O-rings. If the fitting is still leaking after these steps, it may need to be replaced.

What causes grease fittings to leak?

Grease fittings can leak due to damaged seals, worn-out fittings, improper installation, or over-tightening. External factors like dirt or debris can also compromise the seal, leading to leakage.

How often should I maintain my grease fittings?

It’s recommended to inspect and maintain your grease fittings regularly—at least once every few months, or more frequently in harsh environments. Regular maintenance helps ensure proper lubrication and prevents costly equipment damage.

When should I replace a grease fitting?

Replace a grease fitting if it’s severely damaged, cracked, or if cleaning and repairs don’t resolve the issue. If the fitting continually leaks or doesn’t allow grease to flow properly despite repairs, it’s time for a replacement.

Clogged Grease Fitting banner

Clogged Grease Fitting: Common Causes and Easy Solutions

Grease fitting is a small component in machinery where grease is injected to lubricate parts and reduce friction. When these fittings become clogged, grease cannot flow properly, leading to excessive wear, overheating, and potential failure of machinery.

Common Causes of Clogged Grease Fittings

Grease fittings are vital components in maintaining the smooth operation of machinery by ensuring that moving parts are properly lubricated. However, when these fittings become clogged, it can lead to severe performance issues and even equipment failure. There are several common causes of clogged grease fittings, each of which affects the flow of grease and ultimately impacts machine efficiency.

Grease Quality and Viscosity: Why It Matters

The quality and viscosity of the grease you use play a critical role in ensuring that your machinery stays properly lubricated. Grease with the wrong viscosity can cause flow issues in the system, while low-quality grease can degrade over time. When grease thickens or hardens, it can block grease fittings, preventing grease from flowing to critical parts.

For optimal performance, always ensure that the grease used matches the manufacturer’s specifications for viscosity. High-quality, compatible grease can prevent clogs and ensure that machinery operates smoothly and efficiently.

Environmental Factors

External environmental conditions have a significant impact on grease quality and its ability to flow through fittings. Dust, dirt, moisture, and extreme temperatures can degrade grease, causing it to thicken or harden, ultimately leading to blockages.

Dust and Dirt: These contaminants can enter the grease fitting if seals are damaged or improperly sealed, leading to contamination within the system. This can result in the grease becoming thick or gritty, obstructing the flow.

Moisture: Water ingress into the grease system can break down grease, causing it to become watery or emulsified, which reduces its effectiveness and leads to clogging.

Extreme Temperatures: Very high or low temperatures can change the consistency of grease. In cold conditions, grease can become too thick to flow properly, while high temperatures can cause it to break down faster and form sludge.

Regular maintenance and using grease that is formulated to withstand specific environmental conditions can help mitigate these issues.

Grease Fittings rust

Over-lubrication and Its Impact on Grease Flow

Over-lubricating machinery can be just as damaging as under-lubricating it. When too much grease is applied, it leads to over-pressurization in the lubrication system. Excess grease can force contaminants into the grease fitting, leading to blockages. Additionally, over-lubrication may cause the grease to harden or become difficult to pump through the system, effectively obstructing the flow.

Furthermore, over-pressurization can damage equipment seals, leading to leaks and further contamination of the lubrication system. To prevent over-lubrication, always follow manufacturer recommendations for grease amounts and reapplication frequency.

Poor Lubrication Practices: The Hidden Culprits

Incorrect lubrication practices are often overlooked but are major contributors to clogged grease fittings. These practices include:

Using the Wrong Grease: Using grease that isn’t compatible with the machinery or environment can cause blockages. For example, grease that is too thick may clog the fitting, while grease that’s too thin may fail to provide sufficient lubrication.

Inconsistent Greasing Schedule: Failing to grease machinery on a regular basis, or over-greasing, can both lead to clogged fittings. Without a consistent greasing routine, grease may harden, become contaminated, or not reach the necessary parts, leading to blockages.

Establishing a clear lubrication protocol based on manufacturer guidelines can go a long way in preventing these issues.

Inadequate Maintenance: Failing to Inspect and Clean Grease Fittings

Regular inspection and cleaning are essential for preventing clogs. Over time, dirt, hardened grease, and other debris can accumulate around the grease fitting, blocking grease flow. Without proper maintenance, grease fittings can become difficult to service, resulting in inadequate lubrication and increased wear on equipment.

Make it a habit to inspect grease fittings at regular intervals, ensuring that the fittings are clean and free of debris. Cleaning fittings before lubrication ensures that grease flows freely to where it is needed.

External Contaminants: Dust, Dirt, and Water in Your Grease System

External contaminants are one of the most common causes of clogged grease fittings. Dust, dirt, and water can easily enter the grease system if the fitting seals are compromised or if the system is improperly sealed.

Dust and Dirt: If the environment is dusty or gritty, dirt can enter the grease fitting and mix with the grease, causing it to thicken or form a sludge. This can clog the fitting and reduce lubrication efficiency.

Water: Water ingress is another major concern. Even a small amount of water can cause grease to degrade, making it less effective and prone to clogging.

Regularly inspect seals, replace damaged fittings, and use protective covers to prevent contaminants from entering the system.

Aging and Worn-Out Fittings: Time for a Replacement?

Over time, grease fittings can become worn or damaged, especially if they are frequently exposed to harsh operating conditions. As fittings age, they may corrode, rust, or develop cracks, compromising their ability to properly accept grease.

Corrosion: Corroded fittings can block grease flow and reduce the effectiveness of lubrication, leading to increased wear on equipment.

Seal Failure: Fittings that are no longer sealed properly can allow contaminants like dirt and water into the grease system, leading to clogs and lubrication issues.

If a grease fitting is damaged or corroded beyond repair, it’s crucial to replace it promptly to ensure that grease can flow freely and continue to lubricate the machinery.

Signs Your Grease Fitting is Clogged

Grease fittings are essential for maintaining smooth operation in machinery by ensuring that moving parts remain properly lubricated. When these fittings become clogged, they prevent grease from reaching critical components, leading to various operational issues. Here are some key signs that indicate a clogged hydraulic grease fitting:

Difficulty Greasing: When the Grease Gun Won’t Work

One of the most obvious signs of a clogged hydraulic grease fitting is difficulty when trying to grease the component. If the grease gun doesn’t dispense grease properly or you encounter resistance when applying grease, it likely indicates a blockage or restriction in the fitting. This could be due to hardened grease, debris, or other obstructions inside the fitting.

What to Check: Inspect the grease gun and nozzle to ensure they’re in good condition and that the fitting is aligned properly. If the grease gun is functioning correctly and the fitting is still not accepting grease, it’s time to investigate further for blockages.

Unusual Noises or Vibrations in Your Equipment

A clogged hydraulic grease fitting can prevent proper lubrication of moving parts, leading to increased friction. When parts rub against each other without sufficient grease, they can produce unusual noises such as squeaks, grinding sounds, or vibrations. These noises often signal that the components are under stress, which can lead to accelerated wear and eventual failure.

What to Listen For: Pay attention to any changes in sound or vibrations coming from the machinery. Unusual sounds are a clear indication that the lubrication system is not functioning as it should, often due to a clogged fitting.

Grease Leakage Around the Fitting

If a grease fitting is clogged, it can cause excessive pressure to build up within the lubrication system. This pressure buildup can force grease to leak out from around the fitting, resulting in grease spills or visible leakage. A properly functioning fitting should accept the grease without forcing it out.

What to Look For: Inspect the area around the grease fitting for signs of grease leakage. If you notice grease oozing out from the fitting, it’s a sign that the fitting is not properly accepting grease, likely due to a blockage or damage.

Visible Blockages or Residue Around the Fitting

Clogged hydraulic grease fittings may exhibit visible signs of buildup. If you notice hardened grease, dirt, or residue accumulating around the fitting, it’s an indication that the grease flow has been obstructed. This is often caused by old or contaminated grease, dirt ingress, or lack of regular maintenance.

What to Check: Clean the grease fitting to inspect for hardened or contaminated grease. If you find that grease is not flowing freely, or if you see visible obstructions, it’s time to clear the fitting and restore proper lubrication.

Reduced Equipment Performance and Increased Wear

When grease fittings are clogged, machinery often operates with insufficient lubrication, leading to increased friction between moving parts. This can result in reduced equipment performance, slower operation, or even complete breakdowns due to excessive wear. Over time, a clogged hydraulic grease fitting will cause parts to wear out faster, leading to more frequent repairs and costly downtime.

What to Observe: Monitor the overall performance of the equipment. If the machinery shows signs of reduced speed, efficiency, or responsiveness, combined with higher-than-usual temperatures, it may be due to inadequate lubrication from a clogged hydraulic grease fitting. This can also lead to visible wear on bearings, joints, or other moving parts.

Preventing Clogged Grease Fittings

Clogged hydraulic grease fittings are a common problem that can significantly affect the performance and longevity of machinery. Preventing clogs before they occur requires a proactive approach to maintenance, proper lubrication practices, and selecting the right components for the job.

Establishing a Regular Grease Fitting Maintenance Routine

A consistent maintenance routine is the foundation for preventing clogged hydraulic grease fittings. By making inspection and cleaning a regular part of your equipment maintenance schedule, you ensure that grease fittings remain free from debris and function properly. A maintenance routine can include:

Inspecting fittings for visible damage, cracks, or signs of wear.

Cleaning fittings before lubrication to remove any accumulated dirt or hardened grease.

Checking for proper grease flow to ensure that grease is being distributed evenly and without resistance.

By staying on top of these tasks, you can catch potential issues early and prevent more severe blockages or wear.

Selecting the Right Grease for Your Machinery

Not all grease is created equal, and using the wrong type can contribute to clogging issues. The grease you choose should be carefully selected based on the specific requirements of your machinery. Key factors to consider include:

Viscosity: Choose grease with the correct thickness to match your machine’s operating conditions. Grease that is too thick can clog fittings, while grease that is too thin may not provide sufficient lubrication.

Temperature Resistance: Consider the operating temperature range of your machinery. Grease that isn’t temperature-resistant enough may degrade or thicken over time, causing blockages.

Material Compatibility: Ensure the grease is compatible with the materials used in your equipment, such as seals, bearings, and metal components. Incompatible grease can cause damage to parts or lead to clogging.

Using the correct grease helps ensure consistent lubrication and reduces the risk of clogging due to grease degradation.

fix Clogged Grease Fitting

Importance of Grease Fitting Inspection and Cleaning

Routine inspection and cleaning of grease fittings are crucial steps in preventing clogs. Regularly checking fittings for any signs of blockage, damage, or contamination will help you catch issues before they escalate. Here’s why it’s important:

Signs of Damage: Look for cracks or worn-out fittings that may allow contaminants to enter the grease system.

Preventing Contamination: Clean grease fittings before applying new grease to remove any old or contaminated grease, dirt, or debris.

Ensuring Proper Flow: Inspect fittings to ensure they allow grease to flow freely without resistance, ensuring all components are adequately lubricated.

By cleaning the fittings and inspecting for damage, you can keep the grease system running at peak performance and prevent clogs from developing.

Using Automatic Lubrication Systems to Minimize Human Error

Automatic lubrication systems are designed to deliver precise, consistent amounts of grease to each fitting, reducing the chances of clogging caused by human error. These systems help by:

Eliminating Over-greasing: Automatic systems are calibrated to apply the right amount of grease, preventing over-pressurization and the risk of forcing contaminants into the fitting.

Reducing Under-greasing: Automated systems ensure that each part gets lubricated at the correct frequency, preventing parts from running dry and wearing out.

Using the Right Grease: Automatic systems can be set up to use the correct type of grease for different machinery, ensuring compatibility and reducing the risk of clogging.

While automatic lubrication systems are an investment, they can significantly reduce maintenance costs and improve equipment performance over time by ensuring that grease is applied correctly and consistently.

Proper Grease Gun Usage to Avoid Over-pressurization

When using a grease gun, it’s important to apply the right amount of pressure to avoid over-pressurizing the system. Over-pressurization can force contaminants into the grease fitting, cause the grease to leak, or even damage seals and components. To avoid these issues:

Avoid Excessive Force: Apply grease at a steady, controlled pressure. If resistance is encountered, stop and check for possible blockages or damaged fittings before continuing.

Monitor Pressure: Use a grease gun with a pressure gauge to monitor and control the amount of pressure being applied, ensuring that the fitting does not become over-pressurized.

Follow Manufacturer Recommendations: Always adhere to the equipment manufacturer’s specifications for grease application pressure, as applying too much force can cause serious damage.

By using the grease gun correctly and carefully, you can prevent issues such as grease leakage and clogged fittings that result from over-pressurization.

Avoiding Contaminants: Protecting Your Grease System from Dirt and Water

Contaminants like dirt and moisture can quickly degrade the quality of grease, leading to clogs and system failures. To prevent these contaminants from entering the grease system, take the following precautions:

Inspect Seals Regularly: Ensure that the seals on grease fittings are intact and not worn out. Damaged seals allow dirt and water to infiltrate the lubrication system, causing contamination.

Keep the System Clean: Always clean the area around the grease fitting before applying grease to avoid introducing dirt or dust into the system.

Use Protective Covers: Consider using protective covers for grease fittings to shield them from dirt, dust, and moisture, especially when machinery is used in harsh environments.

Step-by-Step Guide

When a grease fitting becomes clogged, it can lead to inadequate lubrication, causing friction, wear, and potential damage to your equipment. Fixing a clogged hydraulic grease fitting requires a systematic approach to safely clear the blockage and restore the proper flow of grease.

Step 1: Identify the Problem and Assess the Damage

Before taking any action, it’s essential to confirm that the grease fitting is indeed clogged. Common signs of a clogged hydraulic grease fitting include:

Difficulty greasing: If you’re having trouble applying grease or the grease gun doesn’t dispense grease properly, the fitting may be obstructed.

Leakage: Excessive pressure buildup due to a clog can cause grease to leak around the fitting.

Unusual equipment behavior: If your equipment is making unusual noises, vibrating, or experiencing reduced performance, it may be a result of inadequate lubrication due to a clogged hydraulic grease fitting.

Once you identify the issue, assess whether the blockage is recent or has been building up over time. This can help you determine how severe the clog might be.

Step 2: Use a Grease Gun to Apply Pressure and Clear the Blockage

The first attempt to fix the clog is to apply pressure using a grease gun. This is a simple and effective method for clearing minor blockages. Here’s how to do it:

Prepare the grease gun: Ensure the grease gun is filled with the correct type of grease for your equipment.

Attach the nozzle to the fitting: Ensure a tight seal between the grease gun and the grease fitting.

Apply steady pressure: Begin pumping grease into the fitting. The force of the grease should help push the blockage out. Be careful not to over-pressurize the fitting, as this can damage seals or cause grease to leak.

Monitor the grease flow: If the grease starts flowing freely, the blockage is cleared. If it doesn’t, proceed to the next step.

Step 3: Apply Heat to Loosen Clogged Grease

If the grease fitting is still clogged after attempting to use the grease gun, the blockage may be caused by hardened grease. Applying heat can soften the grease and make it easier to clear. Here’s how to safely apply heat:

Use a heat gun or torch: Aim the heat at the clogged fitting and surrounding areas. Be cautious with the amount of heat to avoid damaging the fitting or surrounding parts.

Heat the fitting for a few minutes: Gradually warm the fitting and the surrounding area to soften the hardened grease inside.

Test the grease gun again: After applying heat, try pumping grease through the fitting once more. The softened grease should help clear the blockage.

Step 4: Use a Solvent or Grease Removal Tools for Stubborn Blockages

If heat doesn’t work, you may need to use a solvent or specialized tools to break up and remove the blockage. Here’s how to proceed:

Apply a grease solvent: Use a lubricant or solvent specifically designed to dissolve hardened grease. Apply the solvent to the fitting and allow it to penetrate the clog for several minutes.

Use a grease fitting cleaning tool: If the solvent isn’t effective, you can use a grease fitting cleaning tool or a small wire brush to carefully clear the blockage.

Clean out the fitting: Gently scrub and clear the fitting until grease flows freely. Be cautious not to damage the fitting or introduce new contaminants during this process.

Step 5: Inspect the Fitting for Damage and Replace if Necessary

Once the blockage is cleared, it’s time to inspect the grease fitting to ensure it is in good working condition. Here’s what you should look for:

Cracks or damage: If the fitting is cracked, worn out, or corroded, it may need to be replaced. A damaged fitting can cause leaks or further blockages.

Seal integrity: Check that the seal around the fitting is intact to prevent dirt or moisture from entering the lubrication system.

Smooth operation: Ensure that the fitting allows grease to flow smoothly and doesn’t offer resistance.

Conclusion

Proactive care, including timely inspections and routine cleaning of grease fittings, will help prolong the lifespan of your equipment, reduce repair costs, and maintain high performance. By staying on top of your grease fitting maintenance, you’ll avoid costly disruptions and keep your machinery running at its best.


FAQ

What is a grease fitting?

A grease fitting, also known as a Zerk fitting, is a small, threaded metal part that allows for easy injection of grease into machinery components, such as bearings or joints, to ensure smooth operation and prevent wear.

How do I know if my grease fitting is clogged?

Signs of a clogged hydraulic grease fitting include difficulty greasing, leakage around the fitting, unusual equipment noises or vibrations, visible residue or grease buildup around the fitting, and reduced equipment performance.

Can I fix a clogged hydraulic grease fitting myself?

Yes, clogged hydraulic grease fittings can often be fixed with simple tools. You can apply pressure with a grease gun, use heat to loosen hardened grease, or use a solvent or cleaning tool to clear stubborn blockages. If the fitting is damaged, it may need to be replaced.

How often should I inspect my grease fittings?

It’s recommended to inspect your grease fittings regularly as part of your equipment maintenance routine—typically every few weeks or according to the manufacturer’s maintenance schedule.

Can using the wrong grease cause clogs?

Yes, using the wrong type of grease, such as one with incorrect viscosity or incompatible with your equipment, can cause blockages in the fittings. Always choose the grease recommended by the manufacturer.

How can I prevent grease fitting clogs in the future?

To prevent clogs, establish a regular maintenance routine, use the correct grease, keep grease fittings clean and dry, and consider using automatic lubrication systems to ensure proper grease application. Regular inspections and cleaning are key to avoiding blockages.

Preventing Broken Grease Fittings banner

Preventing Broken Grease Fittings: Common Causes and Fixes

Grease fittings are typically located at the joints or pivot points where parts move or rotate, which are susceptible to friction. Without these grease fittings, friction and wear would increase significantly, leading to premature breakdowns and frequent repairs.

Understanding Grease Fittings

A. What are Grease Fittings?

Definition and Purpose in Machinery

A grease fitting (also known as a zerk fitting, grease nipple, or lubrication fitting) is a small mechanical component used to inject lubricating grease into various parts of a machine. The fitting is designed to connect to a grease gun, enabling the technician or operator to deliver the appropriate amount of lubricant to components such as bearings, joints, and other moving parts that require regular lubrication to reduce friction and wear.

Grease fittings’ primary purpose is to ensure that machinery operates smoothly by maintaining optimal lubrication levels at critical points. By allowing easy grease injection into hard-to-reach areas, grease fittings help extend the lifespan of mechanical components, reduce wear and tear, prevent overheating, and ensure that the system runs efficiently without causing excessive damage to the equipment.

Types of Grease Fittings

Standard Grease Fitting: The most commonly used type of grease fitting, often referred to as a “Zerk fitting,” features a straight nozzle and can be used in various applications. It is widely used in automotive and industrial machinery.

Angled Grease Fitting: This fitting has a 45° or 90° angle, making it easier to grease components that are difficult to access. It is ideal for tight spaces or when the fitting is mounted in a location that is not easily reached with a straight fitting.

Button Head Grease Fitting: A button-shaped fitting, typically used in situations where space is extremely limited or where it may need to be flush against a surface. These are ideal for industrial and automotive applications where space is a concern.

Rotary Grease Fittings are used in rotating components, such as machinery where parts are continuously turned, such as axles or wheels. The rotating motion ensures that the grease fitting doesn’t obstruct the machinery’s operation.

Straight Grease Fitting: This type has a simple straight design and is used for standard applications where the fitting can be easily accessed. It is the most common and widely recognized style.

Each type of grease fitting has been designed with specific applications and equipment in mind, ensuring the correct flow of lubricant to critical components in the machinery.

high pressure grease fittings supplier

B. Common Materials and Construction

Material Selection for Durability

Grease fittings are typically made from durable metals designed to withstand high pressures and exposure to the harsh conditions they often face in machinery environments. The most common materials used for grease fittings include:

Steel: The most common material for grease fittings, steel offers a good balance of strength and cost-effectiveness. It is capable of handling high-pressure grease flow and is resistant to wear and tear.

Stainless Steel: For more demanding environments, such as those with high humidity, corrosive substances, or high temperatures, stainless steel grease fittings are used. These fittings are highly resistant to rust, corrosion, and wear, making them ideal for heavy-duty and harsh working conditions.

Brass: Brass is sometimes used for grease fittings in low-pressure applications. It is more resistant to corrosion than steel but may not be as durable or pressure-resistant for heavy machinery.

Zinc-Plated Steel: Zinc plating offers additional protection against corrosion, making it suitable for applications where grease fittings are exposed to moisture or outdoor environments.

Aluminum: In applications where weight is a concern, aluminum fittings may be used. However, they are generally not as durable as steel or stainless steel and are better suited for light-duty applications.

Material selection is essential to ensure that the grease fitting can handle the specific pressure requirements and environmental conditions where it will be used. The material must also be resistant to corrosion, wear, and impact damage to ensure a long lifespan.

Why Proper Fitting Choice Matters in Different Machinery Environments

Choosing the right grease fitting depends on several factors, including the type of machinery, the operating environment, and the required lubrication. Proper fitting selection is crucial because an incompatible or inappropriate fitting can lead to:

Premature Failure: Using a fitting that is not suited for the operating pressures or environment may cause it to break, leak, or become clogged, which would ultimately affect the entire lubrication system.

Corrosion: In corrosive environments (e.g., exposure to saltwater or harsh chemicals), using a fitting made from low-grade material such as standard steel might result in rusting, leakage, and premature failure.

Inadequate Lubrication: If a grease fitting is poorly designed or constructed, it might not allow proper grease flow, leading to inadequate lubrication and resulting in increased friction, wear, and potential damage to machinery.

Common Causes of Broken Grease Fittings

A. Over-tightening or Under-tightening

How Incorrect Torque Can Damage Fittings

Grease fittings require precise torque to ensure a secure and effective seal without causing damage. Over-tightening or under-tightening the fitting can cause serious issues:

Over-tightening: When a grease fitting is tightened beyond the recommended torque, it can lead to several problems. The excessive pressure can crack or deform the fitting, potentially making it difficult to attach the grease gun or causing it to break under pressure. Over-tightening can also distort the thread, which might lead to leaks or an inability to properly deliver grease.

Under-tightening: On the other hand, under-tightening a grease fitting can prevent it from creating a proper seal, resulting in grease leakage. Inadequate sealing also compromises the flow of lubrication to the system’s moving parts, which can cause friction and premature wear of components.

Signs of Improper Tightening and Risks Involved

Visible Cracks or Deformation: A fitting that has been over-tightened may show signs of cracks or deformities around the threads or the head.

Leakage: If a fitting is under-tightened, you may notice grease leaking around the fitting during lubrication.

Grease Infiltration Issues: A poorly tightened fitting may fail to deliver adequate lubrication to the necessary components, leading to increased friction and eventual component failure.

The risks involved include reduced equipment lifespan, frequent downtime, and potential damage to both the fitting and the surrounding machinery, leading to costly repairs.

Grease Fitting Clogged

B. Corrosion and Wear

Environmental Factors Leading to Corrosion

Grease fittings are often exposed to harsh environmental conditions, which can lead to corrosion over time. Some of the most common environmental factors contributing to fitting degradation include:

Humidity: In moist or humid environments, moisture can accumulate on the fittings, leading to rust and corrosion, especially in metal fittings that are not corrosion-resistant. This weakens the fitting material and reduces its lifespan.

Chemical Exposure: Chemicals, including acids, salts, or industrial cleaners, can accelerate the corrosion process. These substances can break down the metal, causing pitting and weakening the fitting structure.

Extreme Temperatures: High heat can cause metal to expand, leading to cracks or deformities, while extreme cold can make fittings brittle and more prone to cracking or breaking when force is applied.

How Regular Wear Affects Grease Fittings Over Time

Over time, grease fittings can wear out due to the constant pressure applied by the grease gun, exposure to contaminants, and environmental elements. As a result:

The fitting’s sealing ability can degrade, leading to grease leakage or loss of pressure during lubrication.

The fitting can become clogged with dirt, grease residue, or other debris, obstructing the flow of lubricant.

Wear and tear from constant movement or vibration can loosen or damage the fitting, causing it to fail and require replacement.

Regular inspection and maintenance are essential to detect early signs of wear and prevent more serious problems from developing.

C. Impact Damage

External Factors

Grease fittings are small, often located in tight spaces, and are vulnerable to impact damage. Common sources of impact include:

Tools: Mishandling tools, such as using the wrong size grease gun nozzle or applying excessive force, can cause the fitting to break or become misaligned.

Equipment: In high-impact areas, such as machinery that experiences vibration or machinery that undergoes frequent starts and stops, grease fittings can be subjected to physical forces that lead to cracks or dislodgement.

Rough Handling: During maintenance or repairs, grease fittings may get damaged due to improper handling or accidental impact when moving parts of the system.

Effects of Sudden Pressure Spikes or System Surges

Pressure Surges: In some hydraulic systems, pressure surges can occur when there is a sudden increase in system pressure due to system irregularities or malfunctioning components. These pressure spikes can damage fittings by causing them to dislodge, crack, or become misaligned.

Impact from Vibration: In systems subject to constant vibration or jolts (e.g., on trucks, construction machinery), fittings can be subjected to repeated impacts that weaken the fitting’s structure over time, causing them to break or fail unexpectedly.

D. Inadequate Lubrication

Poor Grease Quality or Improper Grease Application

Grease fittings rely on the proper quality and quantity of grease to lubricate machinery components effectively. Using poor-quality grease or the wrong type of lubricant for the specific application can cause several issues:

Inadequate Lubrication: Using grease that is too thick or too thin can lead to poor lubrication, increasing friction and wear on moving parts.

Contaminated Grease: A grease that contains contaminants like dirt or moisture can clog the grease fitting or cause abrasive wear on components.

Improper Application: Fittings that are not adequately greased may suffer from early signs of wear and tear. Over-greasing, on the other hand, can cause the grease to seep out and lead to contamination or loss of pressure.

How Lack of Maintenance Accelerates Fitting Failure

Without regular maintenance, grease fittings can become clogged, worn, or damaged. Over time, this lack of attention can cause the fitting to fail. For instance:

Clogging: If a fitting isn’t regularly lubricated or maintained, debris can accumulate in the fitting, causing it to become clogged and preventing the proper flow of grease.

Lack of Pressure: As grease degrades or if the lubrication system is neglected, the amount of pressure required to deliver grease through the fitting decreases, leading to inadequate lubrication and increased friction.

Neglecting to maintain grease fittings often accelerates the wear process, causing the fitting to fail prematurely and potentially leading to more severe machinery issues.

E. Poor Installation or Faulty Fittings

Manufacturing Defects in Fittings

Not all broken grease fittings are the result of wear or external factors. Manufacturing defects can contribute to fitting failures. Common defects include:

Incorrect Threading: Fittings with improperly threaded parts may not fit securely, leading to leaks or failures in sealing.

Weak Material: Some fittings may be made with materials that aren’t up to standard or poorly processed, leading to a weakened structure that can break or deform easily.

Defective Seals: Fittings that lack proper seals or gaskets may leak grease, causing inadequate lubrication and eventual breakdown of the fitting.

Mistakes During the Initial Installation Process

During installation, several mistakes can compromise the functionality of grease fittings, such as:

Misalignment: If a grease fitting is not aligned properly with the lubrication point, it may not provide adequate grease flow, leading to lubrication failure.

Sealing Issues: If the fitting’s seal isn’t properly secured, it may leak grease or fail to maintain adequate pressure, causing premature failure of both the fitting and the surrounding components.

Incorrect Size or Type: Installing the wrong size or type of fitting for a specific application can cause it to malfunction, especially if the fitting doesn’t fit properly with the system’s lubrication channels or if it is incompatible with the type of grease used.

Preventative Measures for Avoiding Broken Grease Fittings

A. Correct Installation Practices

Ensuring Proper Fitting Selection for Specific Equipment

The first step in preventing broken grease fittings is ensuring the right type of fitting is selected for each specific application. Different machinery and operating environments have varying lubrication needs, which dictate the fitting type and material:

Type Selection: Choose fittings based on the operational needs of the equipment. For instance, use angled or rotary fittings for hard-to-reach areas, button-head fittings in tight spaces, and straight fittings where they can be easily accessed.

Material Selection: Depending on the environment, you should opt for corrosion-resistant materials like stainless steel or zinc-plated fittings if the equipment is exposed to moisture, chemicals, or extreme temperatures.

Ensuring that fittings are designed to handle the expected pressure and environmental conditions helps reduce the risk of fitting failure.

Step-by-Step Guide on Installing Grease Fittings Correctly

Check Compatibility: Verify that the selected grease fitting matches the equipment and is compatible with the intended grease type.

Clean the Installation Area: Ensure the area where the fitting will be installed is clean and free of debris to prevent contamination that could affect the seal.

Align the Fitting: Ensure the fitting is properly aligned with the lubrication point. This ensures that grease is delivered efficiently without excess force.

Install the Fitting: Thread the fitting into place carefully by hand to avoid cross-threading. Use the appropriate tool to tighten it securely.

Torque Application: Apply the correct torque to avoid over-tightening or under-tightening, both of which can lead to fitting damage or failure.

Inspect for Leaks: Once installed, check the fitting for leaks to ensure that it is sealed correctly.

By following proper installation practices, you can significantly extend the life of the grease fitting and ensure that the lubrication system functions properly.

B. Regular Inspection and Maintenance

Developing a Maintenance Schedule for Checking Grease Fittings

Regular inspection is critical to identifying issues early and preventing broken grease fittings. Develop a comprehensive maintenance schedule that includes:

Routine Inspections: Check grease fittings at least every few weeks or months depending on the machine’s usage. Look for signs of damage, wear, corrosion, or leakage.

Lubrication Monitoring: Ensure that grease is applied at regular intervals. If grease fittings are clogged, damaged, or leaking, address them immediately.

Monitoring Pressure: Ensure that the system’s pressure is within the manufacturer’s recommended levels to avoid stress on the fittings.

Using Diagnostic Tools to Monitor Fitting Conditions

In addition to visual inspection, diagnostic tools can be used to assess the condition of grease fittings:

Grease Pressure Testers: These tools can help determine if the grease is being delivered properly through the fitting and if there are any blockages or pressure anomalies.

Infrared Thermometers: Use infrared thermometers to monitor temperature changes around fittings, as unusual temperature rises could indicate problems with lubrication or a failing fitting.

Ultrasonic Testing: For advanced diagnostics, ultrasonic sensors can detect signs of wear, corrosion, or vibration that might suggest a failing grease fitting.

By regularly inspecting and maintaining grease fittings, you can catch minor issues before they become major problems, reducing downtime and repair costs.

grease Fittings install Topa

C. Use of Quality Materials

Choosing Corrosion-Resistant and Durable Materials for Fittings

The material used for grease fittings plays a significant role in their durability and resistance to environmental factors. Selecting the appropriate material for fittings can prevent premature failure caused by corrosion, wear, and stress:

Stainless Steel: Ideal for harsh environments, stainless steel is resistant to corrosion from chemicals, moisture, and high temperatures, making it a top choice for heavy-duty machinery.

Zinc-Plated Steel: Provides additional corrosion resistance for environments that may experience rust, but it’s still affordable and effective for less demanding conditions.

Brass: While softer than steel, brass is used in applications where low pressure and light-duty use are required.

Durable Seals and Gaskets: Ensure that fittings come with high-quality seals or gaskets that can withstand heat, pressure, and contaminants.

The Role of High-Quality Grease in Prolonging Fitting Life

Using high-quality grease is just as important as selecting durable fittings. High-quality grease provides better lubrication, reduces friction more effectively, and prevents the buildup of contaminants. Choose grease specifically formulated for the equipment and operating conditions:

Consistency: Choose grease with the correct viscosity for the application. Grease that is too thick may cause clogging, while grease that is too thin may leak or fail to provide proper lubrication.

Additives: High-quality greases contain additives that help protect against oxidation, corrosion, and wear, which extends the life of the grease fitting and the components being lubricated.

D. Proper Torque Application

How to Use Torque Wrenches and Avoid Over-tightening

Torque application is critical when installing grease fittings, as both over-tightening and under-tightening can lead to issues. To avoid damage:

Use a Torque Wrench: Always use a torque wrench to apply the specified torque when installing a grease fitting. This ensures that the fitting is neither too tight nor too loose.

Avoid Over-tightening: Over-tightening a fitting can distort or crack the fitting, causing leaks, excessive stress on components, and possible fitting failure. The torque should be applied according to the manufacturer’s specifications, typically between 10 and 30 foot-pounds.

Proper Re-tightening: For fittings that may need periodic re-tightening, ensure that the torque specification is followed carefully to avoid damaging the fitting or surrounding parts.

Recommended Torque Specifications for Different Fitting Types

Torque specifications vary depending on the fitting type and size. It is essential to follow manufacturer guidelines for each type of fitting to avoid common issues:

Standard Grease Fittings: Typically, these require around 10–20 ft-lbs of torque.

Angled or Button Head Fittings: These fittings might require slightly less torque due to their design but should be tightened to the specifications provided by the manufacturer.

Heavy-Duty Fittings: Larger, heavy-duty fittings for industrial or agricultural machinery may require up to 30 ft-lbs of torque.

Following the correct torque specifications reduces the likelihood of damage and ensures that the fittings maintain their seal and pressure.

E. Environmental Considerations

Preventing Exposure to Harmful Elements Like Water, Salt, and Chemicals

Exposure to environmental factors such as water, salt, chemicals, or extreme temperatures can accelerate the breakdown of grease fittings. To prevent environmental damage:

Protect Fittings from Moisture: Ensure that grease fittings are kept dry and protected from excessive moisture or standing water, which can cause corrosion.

Use Protective Covers or Shields: Install protective covers or shields to shield grease fittings from external elements like dust, dirt, salt, and chemicals. This is particularly important for machinery used in marine environments or outdoors.

Regularly Clean Fittings: Clean grease fittings periodically to remove any accumulated debris, dirt, or grease buildup that might attract moisture or contaminants.

Implementing Protective Covers or Shields

Protective covers or boots can be used to shield grease fittings from damage in harsh environments. These covers protect the fitting from direct exposure to the elements, reducing the risk of corrosion, wear, and contamination. Use covers that are durable and specifically designed for grease fittings to ensure they remain effective over time.

Conclusion

We encourage you to prioritize grease fitting maintenance in your routine equipment care. Ensure that your fittings are in top condition, replace any worn-out or damaged parts, and don’t hesitate to reach out to professionals for assistance when needed.


FAQ

What are grease fittings and why are they important?

Grease fittings, also known as grease nipples, are components used to inject lubricants into machinery to reduce friction and wear. They are crucial for maintaining equipment, ensuring smooth operation, and extending the lifespan of moving parts.

What causes grease fittings to break?

Common causes include over-tightening or under-tightening, corrosion from environmental factors, impact damage, inadequate lubrication, and poor installation.

How can I prevent my grease fittings from breaking?

Preventative measures include using the correct fittings, applying the proper torque, regular inspections, using quality materials, and protecting fittings from environmental damage.

How often should I inspect grease fittings?

It is recommended to inspect grease fittings regularly, at least once a month or every few weeks depending on usage and environmental conditions. Routine checks can catch issues early.

What should I do if a grease fitting is damaged or leaking?

If a grease fitting is damaged or leaking, replace it immediately. Continuing to use a damaged fitting can lead to equipment failure or inefficiency in the lubrication system.

Can I install grease fittings myself?

Yes, as long as the proper installation procedures are followed. Ensure the fitting is aligned, torqued correctly, and compatible with the machinery. If you’re unsure, consulting a professional is a good idea.

Grease Fitting Replacement banner

Grease Fitting Replacement: How Often and Why

In hydraulic systems, grease fittings are typically used to keep pistons, valves, and joints properly lubricated, reducing friction and the risk of overheating. The grease helps protect the system’s components from corrosion and wear, ensuring a longer lifespan and maintaining the overall efficiency of the system.

What is a Grease Fitting?

A grease fitting, also known as a Zerk fitting or grease nipple, is a small but vital component in mechanical and hydraulic systems that allows for the injection of lubricants into machinery. These fittings are essential for ensuring that moving parts, such as bearings, joints, and other mechanical elements, are properly lubricated to reduce friction, wear, and corrosion. They act as a conduit for grease, making it easier to maintain the lubrication of hard-to-reach areas, ultimately extending the lifespan and efficiency of equipment.

Types of Grease Fittings

Standard Grease Fittings: These are the most common type and are typically used in general machinery, automotive applications, and light-duty systems. They are simple, reliable, and often threaded to fit the lubrication points on machines.

Heavy-Duty Grease Fittings: Designed for use in industrial, construction, or agricultural machinery, heavy-duty fittings are built to withstand more demanding environments. They are often made from tougher materials to handle high-pressure conditions and the presence of harsh contaminants like dirt or moisture.

Quick-Connect Grease Fittings: These fittings feature a design that allows for easy and fast connection to a grease gun, facilitating quick lubrication without the need for threading or screwing in the fitting. This type is particularly useful in applications where time is critical, such as in high-production environments.

grease Fittings drawing Topa

Key Components of a Grease Fitting

A grease fitting typically consists of three main components:

Body: The main structure of the grease fitting, usually made of steel or brass, which holds the fitting in place. The body is threaded to allow the fitting to be securely attached to the machine or equipment.

Fitting: The nipple-like part that accepts the grease gun’s nozzle. It allows the grease to be injected directly into the component it’s lubricating. The fitting can be ball-shaped, making it easy for a grease gun to connect and deliver lubrication.

Grease Port: The small opening where the grease is injected into the system. Over time, this port may become clogged with hardened grease or debris, which is why regular maintenance is crucial.

Common Applications

Grease fittings are widely used across many industries, ensuring the smooth operation of a variety of systems:

Automotive: In vehicles, grease fittings are used to lubricate suspension parts, steering components, and wheel bearings. Regular maintenance of these fittings helps to reduce wear and avoid expensive repairs.

Industrial Machinery: Heavy machines, such as presses, conveyors, and pumps, rely on grease fittings to maintain smooth operation and avoid damage due to friction. These fittings are used in bearings, gears, and other moving parts.

Hydraulic Systems: In hydraulic systems, grease fittings are employed in valves, cylinders, and piston joints to ensure that the hydraulic components stay properly lubricated and operate efficiently, especially in high-pressure environments.

Why Grease Fittings Need to Be Replaced

Grease fittings, though small, are critical to maintaining the smooth operation of hydraulic systems and machinery. However, like all mechanical components, they can wear out over time due to a variety of factors. The continuous exposure to grease, environmental stressors, and the demands of the equipment can take a toll on these fittings.

Wear and Tear

Grease fittings are regularly exposed to high-pressure grease injection, particularly in systems that require frequent lubrication. Over time, this constant exposure can cause wear on the internal components of the fitting, including the ball valve inside the fitting that controls the flow of grease. The internal ball valve can wear down, losing its ability to form a proper seal and allowing grease to leak out.

Moreover, the continuous pressure and repeated lubrication cycles can also lead to physical degradation of the fitting body. As the fitting becomes more worn, the threads may become damaged, leading to a loss of integrity when installing a new fitting or grease gun. This wear can eventually make the fitting less effective at delivering grease into the system, which can result in insufficient lubrication and cause friction, overheating, and even catastrophic failure in more severe cases.

Blockage or Clogging

One of the most common issues that necessitates the replacement of grease fittings is blockage or clogging. Over time, grease can harden or accumulate inside the fitting or the surrounding piping, especially if the lubrication is contaminated with dirt, debris, or moisture. The grease port can become obstructed, making it difficult or impossible to properly inject lubricant into the system.

When a grease fitting becomes blocked, lubrication efficiency suffers. Without adequate grease flow, moving parts in machinery and hydraulic systems can experience increased friction, leading to excessive wear, overheating, and eventual failure of critical components. Furthermore, the grease that does manage to make it through the fitting may not reach all the necessary lubrication points, leaving certain areas under-lubricated and vulnerable to damage. In such cases, replacement of the grease fitting is the only way to restore full lubrication and protect the equipment.

Grease Fittings rust

Corrosion

Grease fittings are often exposed to harsh environmental conditions, particularly in outdoor or industrial environments where moisture, dust, salt, and other corrosive substances are prevalent. When exposed to moisture, particularly in humid or wet environments, the steel body of the fitting can begin to corrode, weakening the structure and causing it to fail. Saltwater, commonly found in marine or coastal environments, can accelerate corrosion, as salt acts as a catalyst for the breakdown of metals.

Corrosion can have several negative effects on grease fittings:

The fitting may become difficult to connect with a grease gun, leading to improper lubrication.

The internal mechanism of the fitting, including the ball valve, can become stuck, rendering it unusable.

Rust and other corrosion products can enter the lubrication system, contaminating the grease and potentially causing more damage to sensitive components inside the system.

Once corrosion sets in, it is often more cost-effective to replace the fitting entirely rather than attempting repairs. Preventative maintenance, such as the use of corrosion-resistant fittings or protective covers, can help mitigate these issues, but eventually, all fittings will need to be replaced due to wear from environmental exposure.

Damage to Seals and Threads

Frequent use of grease fittings can also cause damage to their seals and threads. The seals inside a grease fitting ensure that grease is injected properly and that there is no leakage. Over time, these seals can degrade due to repeated grease injections and the mechanical forces applied during installation and use. As seals wear down, they may no longer provide a secure seal, leading to grease leaks. This not only reduces lubrication efficiency but can also cause contamination of the surrounding environment or machinery.

How Often Should Grease Fittings Be Replaced?

Manufacturer Recommendations and General Guidelines

Most manufacturers of machinery, hydraulic systems, and grease fittings will provide specific recommendations regarding the lifespan of grease fittings. These guidelines typically outline the expected maintenance intervals based on the type of machinery and the operating conditions under which it will be used. For example, equipment used in heavy-duty applications, such as mining or construction, may require more frequent grease fitting replacements than equipment used in light-duty or low-intensity applications.

Manufacturer recommendations typically include:

Routine inspection schedules: How often to check grease fittings for wear, damage, or blockage.

Replacement intervals: A suggested timeframe (e.g., every 12–18 months) for replacing grease fittings, depending on system usage and type.

Lubricant recommendations: The type of grease that should be used to prevent clogging, corrosion, or degradation of the fittings.

However, these recommendations are just a starting point. It’s important to assess your system’s actual operating conditions and use them to refine your maintenance schedule.

Factors Affecting Replacement Frequency

Several factors can influence how often grease fittings need to be replaced, including:

Operating Conditions (Temperature, Pressure, Exposure to Contaminants)

Operating conditions play a crucial role in the longevity of grease fittings. Extreme temperature variations, both high and low, can degrade the materials of the fitting and its seals, leading to premature failure. High-pressure systems put added strain on grease fittings, causing more rapid wear due to the constant stress and volume of grease being pumped through the fitting.

Additionally, environments with high levels of contaminants—such as dirt, moisture, salt, or chemicals—accelerate the wear and corrosion of grease fittings. In these harsh conditions, fittings are more likely to degrade, clog, or fail. For instance:

High-pressure systems require more durable fittings and might necessitate more frequent replacement.

Outdoor or marine environments where fittings are exposed to saltwater or humidity may require more frequent inspection and replacement due to corrosion.

Frequency and Type of Grease Used

The type of grease used and how frequently the lubrication is applied also impact the replacement schedule for grease fittings. If high-quality, non-contaminated grease is used regularly, fittings will likely last longer. However, low-quality grease, or grease mixed with dirt or debris, can clog fittings or cause them to corrode more quickly.

Systems that require frequent lubrication (e.g., daily, weekly) are subject to higher wear, requiring grease fittings to be replaced more often. On the other hand, equipment that receives less frequent lubrication may have fittings that last longer, provided they are not exposed to extreme conditions.

Equipment Type and Usage Intensity (Light, Medium, Heavy-Duty)

The type of equipment and the intensity of its use significantly influence the frequency of grease fitting replacement. Equipment used in light-duty applications, such as small agricultural machines or light trucks, may only need grease fitting replacement every few years.

For heavy-duty applications, such as mining equipment, construction machinery, or large industrial machines, grease fittings are subjected to much higher stress and more extreme conditions. These applications often require more frequent replacement to maintain optimal performance. In these cases, fittings should be inspected and replaced based on specific manufacturer guidelines and observed wear patterns.

Signs That Indicate Grease Fitting Replacement

Even with a set replacement schedule, it’s important to recognize the signs that a grease fitting may need to be replaced before its scheduled time. Below are the key indicators that grease fittings are no longer functioning optimally:

Leaking or Oozing Grease

One of the first and most noticeable signs that a grease fitting needs to be replaced is grease leakage. If grease begins to ooze around the fitting, it suggests that the seal is compromised, or the fitting itself is cracked or worn. Leakage can lead to grease loss, which means your equipment isn’t being properly lubricated, and can also create a mess, attracting dirt and contaminants.

If you notice that grease is consistently leaking from a fitting during routine inspections or after lubrication, it is time to replace it.

Difficulty in Grease Application

If you experience difficulty when trying to grease the fitting—such as resistance while applying grease or the inability to inject grease properly—it may be a sign that the fitting is clogged or the internal mechanism has become damaged. This could be caused by a blockage or corrosion inside the fitting that prevents grease from flowing smoothly.

Difficulties in grease application also indicate that the lubrication points are not being properly serviced, which can lead to increased friction and accelerated wear in the equipment.

Visible Cracks or Damage

Inspect grease fittings regularly for visible signs of physical damage. Cracks, deformation, or other damage to the fitting body, threads, or nozzle are clear indicators that the fitting needs replacement. Cracks may result from excessive wear, corrosion, or impact, and they compromise the fitting’s integrity, leading to leaks or even complete failure.

It’s especially important to replace any fitting that shows damage that could lead to a broken connection or unsafe operation of your machinery.

Increased Friction or Equipment Malfunction

If equipment is operating with insufficient lubrication, the friction between moving parts increases, which can lead to overheating, premature wear, and eventual breakdowns. This is often a result of a failing or blocked grease fitting that isn’t delivering adequate lubrication. When friction increases or if you begin to notice equipment malfunctions, it’s time to check the grease fittings. Regular replacement and maintenance can prevent such issues from escalating into more serious, costly problems.

The Grease Fitting Replacement Process

Replacing grease fittings is an essential part of hydraulic and mechanical system maintenance, ensuring that the equipment continues to operate efficiently and reliably. The process involves removing worn or damaged fittings and installing new ones, along with proper lubrication to ensure smooth operation.

Step-by-Step Guide to Replacement

Tools and Equipment Needed

Before you begin the replacement process, make sure you have the necessary tools and equipment. Here’s a list of items you will need:

Grease Fitting Tool (Zerk Fitting Tool): This tool is specifically designed for removing and installing grease fittings. It helps grip and remove the old fitting without damaging the surrounding area.

Wrenches: Adjustable wrenches or a socket wrench may be required to remove or install the fitting if it’s tightly secured.

Clean Cloth or Rag: To clean the area around the fitting and remove excess grease or debris.

Replacement Grease Fitting: Ensure you have the correct size and type of grease fitting for your equipment (standard, heavy-duty, quick-connect, etc.).

Grease Gun: To apply the grease after the new fitting is installed.

Thread Sealing Compound (optional): Some installations may require thread sealant to prevent leaks, though many grease fittings have built-in seals.

Grease Fitting Replacement

Removing the Old Fitting

The first step in replacing a grease fitting is removing the old, worn, or damaged fitting. This step requires care to avoid damaging the surrounding equipment and to prevent contamination of the system.

Precautionary Measures: Before beginning, always shut off the equipment and relieve any system pressure. If the equipment is under pressure or if hydraulic systems are involved, failure to do so could lead to grease leakage or potential injury.

Clean the Area: Use a clean cloth to wipe away any grease or dirt around the fitting. This is crucial to avoid contaminants entering the system when the fitting is removed.

Loosen the Old Fitting: Use the grease fitting tool or a wrench to loosen and remove the old fitting. Be sure to rotate the fitting counterclockwise to unscrew it. If the fitting is stuck or hard to remove, apply a small amount of penetrating oil to loosen the threads. Allow it to sit for a few minutes before attempting removal again.

Avoid Contamination: During this process, ensure that no dirt, debris, or moisture gets inside the open hole. Contamination could lead to blockages or damage to the lubrication system. Cover the hole with a clean cloth or tape to protect it temporarily until the new fitting is installed.

Installing the New Fitting

Once the old fitting is removed, it’s time to install the new one. Proper installation is critical to ensure a secure connection and optimal performance of the new grease fitting.

Check the Fitting Type: Make sure that the replacement fitting matches the type and size of the original fitting (e.g., standard, heavy-duty, or quick-connect). Mismatched fittings could result in improper lubrication or even damage to the system.

Insert the New Fitting: Thread the new fitting into the hole carefully by hand, ensuring it’s aligned properly. You can use a small amount of thread sealant on the threads to prevent any potential leakage, though many modern grease fittings come pre-sealed.

Tighten the Fitting: Once the fitting is hand-tight, use a wrench or grease fitting tool to tighten it further. Be sure to tighten it to the manufacturer’s recommended torque specifications. Over-tightening the fitting can damage the threads or the fitting itself, while under-tightening may lead to leaks or a loose connection.

Greasing the Fitting Properly

After the new fitting is securely installed, the next step is to grease it properly to ensure lubrication flows smoothly into the system.

Connect the Grease Gun: Attach the nozzle of the grease gun to the grease fitting. Make sure the connection is firm to avoid leaks when applying the grease.

Apply Grease: Pump grease into the fitting until you see it begin to emerge from the component it’s meant to lubricate. This ensures that grease is flowing through the fitting and is reaching the intended areas. You may need to pump several times to fully lubricate the part, depending on the size of the system.

Check for Leaks: After greasing, check around the fitting for any signs of leaks. If the fitting is leaking grease, it may not have been installed properly or there could be an issue with the fitting itself. If leakage occurs, remove the fitting, check for debris or damage, and reinstall.

Tips for Proper Maintenance After Installation

To ensure the grease fitting continues to perform efficiently, it’s important to follow some best practices for post-installation care:

Cleanliness: Always keep grease fittings and surrounding areas clean to prevent dirt and contaminants from entering the lubrication system. Regularly wipe off excess grease to prevent buildup.

Correct Torque: Avoid over-tightening or under-tightening the fitting. Use a torque wrench to ensure the correct torque specifications are followed. Over-tightening can damage the fitting, while under-tightening may lead to leakage or loosening over time.

Avoid Over-Greasing: Over-greasing can lead to grease leakage or damage to seals. Apply grease only as necessary to maintain proper lubrication, following the equipment manufacturer’s recommended grease volumes and intervals.

Common Mistakes to Avoid During Replacement

While replacing grease fittings is a straightforward process, there are a few common mistakes that should be avoided to ensure the job is done correctly:

Using Incorrect Fittings: Always double-check the type and size of the grease fitting to make sure it’s the right match for your equipment. Using an incorrect fitting can lead to poor lubrication and possible damage.

Not Cleaning the Area: Failing to clean the surrounding area before removing the old fitting can introduce contaminants into the system, resulting in blockages or damage.

Over-Tightening the Fitting: It’s tempting to tighten the fitting as much as possible to ensure a good seal, but over-tightening can damage the threads, break the fitting, or cause undue stress on the equipment. Follow manufacturer specifications for torque settings.

Ignoring Leaks: If you notice grease leaks after installation, don’t ignore them. Leaks are a sign that the fitting was not installed correctly, or there is a defect in the fitting. Immediate attention is necessary to prevent further damage.

Conclusion

Regular inspections, proper lubrication practices, and a proactive approach to replacement will not only prevent costly issues but also ensure that your equipment performs at its best for years to come.

If you need any grease fittings, just contact Topa!


FAQ

What is a grease fitting?

A grease fitting, also known as a Zerk fitting or grease nipple, is a small metal fitting used to deliver lubricating grease into machinery parts, such as bearings and joints, to reduce friction and wear.

How do I know when to replace a grease fitting?

You should replace a grease fitting if you notice signs such as leaking grease, difficulty applying grease, visible cracks or damage, or increased friction in the equipment indicating poor lubrication.

How often should grease fittings be replaced?

The replacement frequency depends on operating conditions, equipment type, and grease usage. On average, grease fittings should be inspected every 6–12 months, with replacement recommended when damage or wear is noticed.

Can I replace a grease fitting myself?

Yes, replacing a grease fitting is a simple process that requires basic tools such as a grease fitting tool, wrenches, and a new fitting. However, make sure to follow the correct installation steps and torque specifications to ensure a proper seal.

What happens if a grease fitting is not replaced on time?

If a grease fitting is not replaced when needed, it can lead to improper lubrication, increased friction, overheating, and eventual equipment failure, which can result in costly downtime and repairs.

Are there different types of grease fittings?

Yes, there are several types of grease fittings, including standard, heavy-duty, and quick-connect fittings. The choice depends on the application, equipment type, and operating conditions.

Grease Fitting Leaking Troubleshooting Guide

Grease Fitting Leaking? Troubleshooting Guide

Grease Fitting Leaking? Troubleshooting Guide

Table of Contents

Introduction

Leaking grease fittings can pose significant problems for machinery and operations. When grease fittings leak, the lubrication intended for the internal components is lost, leading to inadequate lubrication and increased friction. This can result in accelerated wear and tear, overheating, and even failure of critical machinery parts. The impacts of such failures can be costly, causing downtime, expensive repairs, and potential safety hazards. Addressing grease fitting leaks promptly is essential to maintain the integrity and efficiency of machinery, ensuring continuous and reliable operation.

Causes of Grease Fitting Leaks

Worn or Damaged Fittings

Identification of Wear and Tear:

Regular inspections should be conducted to identify any signs of wear and tear on grease fittings. Look for visible cracks, which can compromise the integrity of the fitting and lead to leaks.

Corrosion is another indicator, often caused by exposure to harsh environments or chemicals. Corroded fittings may not provide a proper seal, resulting in grease leakage.

Deformation, such as bending or warping, can occur due to mechanical stress or impact. This physical damage can prevent the fitting from functioning correctly.

Common Signs of Damage:

Leaking Grease: One of the most apparent signs is the presence of grease around the fitting or on nearby components. This indicates that the fitting is not sealing properly.

Difficulty in Applying Grease: If it’s hard to inject grease into the fitting, it might be blocked or damaged. This can be due to internal blockages or a malfunctioning check valve.

The Fitting Not Accepting Grease: If grease cannot be applied at all, the fitting might be severely damaged or clogged, necessitating replacement.

rust Grease Fitting Topa

Improper Installation

Techniques for Proper Installation:

Ensure the Fitting is Clean: Before installation, clean both the fitting and the receiving port to remove any debris or contaminants. This ensures a proper seal and prevents contaminants from entering the lubrication system.

Use the Correct Tools: Specialized tools such as grease fitting installers or wrenches should be used to avoid damaging the fitting during installation. Avoid using improper tools that can cause deformation.

Follow Manufacturer Guidelines: Each type of fitting may have specific installation procedures. Adhering to the manufacturer’s guidelines ensures that the fitting is installed correctly and functions as intended.

Consequences of Incorrect Installation:

Leaks: Incorrect installation can result in poor sealing, causing grease to leak out of the fitting.

Improper Lubrication: If a fitting is not installed correctly, grease may not reach the intended parts, leading to inadequate lubrication and increased wear on machinery components.

Potential Damage to Machinery: Improperly installed fittings can lead to mechanical failures, increased friction, and overheating, causing severe damage to the machinery over time.

Contaminated Grease

How Contaminants Enter the System:

Through Damaged Fittings: Damaged or improperly sealed fittings can allow dirt, water, and other contaminants to enter the lubrication system.

Improper Storage: Storing grease in open or unsealed containers can lead to contamination. Always store grease in clean, sealed containers to maintain its purity.

Dirty Application Tools: Using dirty grease guns or other tools can introduce contaminants directly into the fittings and lubrication system.

Effects of Contaminated Grease on Fittings:

Clogging: Contaminants can clog the fitting or the lubrication channels, preventing grease from reaching critical components.

Increased Wear: Contaminated grease can act as an abrasive, accelerating wear and tear on both the fittings and the machinery.

Potential Damage to the Machinery: The presence of contaminants can lead to corrosion, increased friction, and ultimately mechanical failures, compromising the reliability and lifespan of the equipment.

remove Stuck Grease Fitting

Over-Pressurization

Understanding Pressure Limits:

Each grease fitting has a maximum pressure rating that should not be exceeded. This rating ensures the fitting can handle the pressure required to inject grease without failing.

Effects of Exceeding Pressure Limits:

Damaged Fittings: Excessive pressure can cause the fitting to crack or deform, resulting in leaks.

Burst Hoses: Over-pressurization can also cause the hoses connected to the fittings to burst, leading to grease spills and potential hazards.

Leaks: The excessive pressure can force grease past seals and gaskets, creating leaks and reducing the efficiency of the lubrication system.

Aging and Deterioration

Natural Wear Over Time:

Over time, the materials used in grease fittings can degrade due to continuous use and exposure to environmental factors.

Signs of Aging in Grease Fittings:

Cracks: Aging fittings may develop cracks, which can compromise their ability to seal properly and lead to leaks.

Corrosion: Long-term exposure to moisture, chemicals, or harsh environments can cause corrosion, weakening the fittings and making them prone to leaks.

Reduced Efficiency in Accepting Grease: As fittings age, their internal components, such as the check valve, can wear out, making it harder to inject grease and reducing the effectiveness of lubrication.

Troubleshooting Steps

Visual Inspection

Visible Signs of Damage: Examine the grease fittings for any visible cracks, corrosion, or deformation. Look for physical damage that might compromise the fitting’s integrity and sealing ability.

Leaks: Check for any grease leakage around the fitting or on nearby components. The grease should be contained within the fitting; any external grease indicates a problem.

Wear: Look for signs of wear, such as thinning material, pitting, or areas that appear polished due to friction. These signs indicate that the fitting may not be providing adequate lubrication.

Testing for Leaks

Methods to Test Grease Fittings:

Apply Grease and Check for Leaks: After cleaning the fitting, apply grease and observe whether it stays within the fitting or leaks out. Leaks indicate a problem with the fitting or its installation.

Use Leak Detection Fluids: Specialized fluids or sprays can help identify small leaks that are not immediately visible. Apply the fluid around the fitting and look for bubbles or changes in color, which indicate leakage.

Use of Leak Detection Fluids and Equipment:

Leak Detection Fluids: These are available in various forms, such as sprays, gels, or liquids. They work by forming bubbles or changing color when they come into contact with escaping grease.

Equipment: Leak detection kits may include UV lights or dyes that react under specific conditions, making it easier to spot leaks.

Identifying the Source

Pinpointing the Exact Location of the Leak:

Check Around the Fitting and Nearby Components: Carefully inspect the area surrounding the fitting, including hoses, seals, and joints. Leaks can sometimes appear to be from the fitting but originate from nearby components.

Use of Leak Detection Tools: Tools such as dye injectors or ultrasonic leak detectors can help pinpoint the exact location of the leak more accurately than visual inspection alone.

Differentiating Between Fitting and System Leaks:

Isolate the Fitting: Temporarily disconnect or cap the fitting to see if the leak persists. If the leak stops, it’s likely originating from the fitting. If not, it may be from another part of the system.

Inspect the System: Look for signs of wear or damage in the surrounding system components. Hoses, seals, and other connections should be checked to rule out other potential sources of leaks.

Common Fixes

Tightening Loose Fittings:

Procedure: Use the appropriate wrench or tool to tighten the fitting. Ensure you do not over-tighten, as this can cause damage or deformation. Tighten until the fitting is secure and there is no movement.

Checking for Leaks: After tightening, apply grease again and check for any signs of leaks to ensure the fitting is properly sealed.

Replacing Worn or Damaged Fittings:

Removal: Use the correct tools to carefully remove the damaged fitting. Clean the area thoroughly to ensure no debris remains.

Installation: Install a new fitting of the same type and size. Follow manufacturer guidelines for installation, ensuring it is properly secured and sealed.

Testing: Apply grease to the new fitting and check for leaks to confirm proper installation.

Cleaning and Flushing the System:

System Flushing: If contaminated grease is suspected, flush the entire lubrication system to remove old, contaminated grease. Use a compatible flushing fluid to ensure all contaminants are removed.

Cleaning Fittings: Clean the fittings using appropriate solvents or cleaning solutions. Ensure they are thoroughly dried before reapplying grease.

Reapplication of Grease: Use high-quality, uncontaminated grease to refill the system. Ensure all fittings are properly lubricated and free of contaminants.

Preventative Measures

Regular Maintenance Routine

Set a Schedule for Regular Checks: Establish a routine maintenance schedule based on the operational demands of your machinery. For heavily used equipment, more frequent inspections may be necessary. A common schedule might include weekly, monthly, and quarterly checks.

Consistency: Consistency in maintenance is key to catching potential issues early. Use a calendar or maintenance management software to keep track of inspection dates and ensure nothing is missed.

Checklist for Maintenance Activities:

Inspect Fittings: Check all grease fittings for signs of wear, damage, and leaks. This includes looking for cracks, corrosion, and proper sealing.

Apply Grease: Ensure that all fittings are properly lubricated according to the manufacturer’s specifications. Use the appropriate amount of grease to avoid under- or over-lubrication.

Check for Leaks: After applying grease, inspect the fittings and surrounding areas for any signs of leakage.

Replace as Necessary: If any fittings are found to be damaged or worn, replace them immediately to maintain the integrity of the lubrication system.

Using Quality Grease and Fittings

Importance of High-Quality Materials:

Ensures Durability and Reliable Performance: High-quality grease and fittings are less likely to fail under stress and provide longer service life. They also perform better under various environmental conditions, reducing the frequency of replacements and maintenance.

Reduces Downtime and Maintenance Costs: Using superior materials can reduce the frequency of breakdowns and repairs, leading to less downtime and lower overall maintenance costs.

Recommended Brands and Products:

Trusted Brands: Opt for grease and fittings from well-known and reputable brands that are recognized for their quality and reliability. Brands like Lincoln, Alemite, and SKF are often recommended for their superior products.

Product Specifications: Choose products that meet or exceed the specifications required for your machinery. Ensure compatibility with the operating conditions, such as temperature range, load-bearing capacity, and environmental exposure.

Proper Installation Techniques

fix Stuck Grease Fitting

Step-by-Step Guide to Installing Grease Fittings:

Clean the Area: Thoroughly clean the area where the fitting will be installed. Remove any old grease, dirt, and debris to ensure a clean surface.

Apply Thread Sealant: Use a suitable thread sealant to ensure a leak-free installation. Apply the sealant evenly to the threads of the fitting.

Install the Fitting Using the Correct Tools: Carefully screw the fitting into place using the appropriate wrench or installation tool. Follow the manufacturer’s guidelines for torque specifications to avoid over-tightening.

Tips for Ensuring a Secure and Leak-Free Fit:

Do Not Over-Tighten: Over-tightening can damage the threads and the fitting itself, leading to potential leaks. Tighten just enough to secure the fitting without causing deformation.

Ensure Proper Alignment: Make sure the fitting is aligned correctly with the grease port. Misalignment can cause leaks and make it difficult to apply grease properly.

Monitoring and Adjusting Pressure

How to Monitor System Pressure:

Use Pressure Gauges and Sensors: Install pressure gauges and sensors at key points in the lubrication system to monitor the pressure levels continuously. Digital sensors can provide real-time data and alerts if the pressure deviates from the optimal range.

Regular Checks: Include pressure checks in your regular maintenance routine to ensure the system operates within the recommended pressure limits.

Adjusting Pressure to Prevent Over-Pressurization:

Ensure the System Operates Within the Recommended Pressure Range: Refer to the manufacturer’s guidelines for the maximum allowable pressure for your grease fittings and lubrication system. Avoid exceeding these limits to prevent damage.

Use Pressure Regulators: If necessary, install pressure regulators to control and maintain the appropriate pressure levels within the system. This helps to prevent over-pressurization and the associated risks of fitting damage and leaks.

Regular Calibration: Ensure that all pressure gauges and sensors are regularly calibrated to maintain accuracy. Inaccurate readings can lead to improper pressure adjustments, risking over-pressurization.

By implementing these preventative measures, you can significantly reduce the risk of grease fitting leaks and extend the lifespan of your machinery. Regular maintenance, high-quality materials, proper installation, and diligent pressure monitoring are key strategies for maintaining an efficient and reliable lubrication system.

Conclusion

In summary, grease fitting leaks can result from worn or damaged fittings, improper installation, contaminated grease, over-pressurization, and natural aging. Proactive maintenance, including regular checks and the use of high-quality materials, significantly reduces downtime and repair costs while improving machinery performance and longevity. To prevent costly repairs and ensure your equipment’s optimal condition, schedule regular inspections and adhere to a maintenance routine. If you need expert assistance, contact our experienced technicians for support in maintaining your lubrication system.

FAQ

A grease fitting, also known as a Zerk fitting, is a small component used in machinery to allow for the easy and efficient delivery of grease to lubrication points, ensuring smooth operation and reducing wear.

It is recommended to inspect grease fittings regularly, typically every few weeks for high-use machinery and at least once a month for less frequently used equipment. Regular inspections help identify and address issues before they lead to significant problems.

Common signs of a leaking grease fitting include visible grease around the fitting, difficulty in applying grease, the fitting not accepting grease, and unusual wear or damage on the fitting itself.

Grease fittings can leak due to worn or damaged fittings, improper installation, contaminated grease, over-pressurization, and natural aging or deterioration of the fitting materials.

It is important to use the correct type of grease recommended by the machinery manufacturer. Using the wrong type of grease can lead to improper lubrication, increased wear, and potential damage to the fittings and machinery.

Preventing grease fitting leaks involves regular inspections, proper installation techniques, using high-quality grease and fittings, monitoring and adjusting system pressure, and maintaining a consistent maintenance routine. Taking these proactive steps ensures the reliability and longevity of your machinery.

How to Grease a Ball Joint Without Grease Fitting

How to Grease a Ball Joint Without Grease Fitting

How to Grease a Ball Joint Without Grease Fitting

Introduction

Maintaining ball joints is crucial for ensuring the smooth operation and safety of your vehicle. Ball joints are essential components of the suspension system, allowing for controlled movement and providing stability. However, many ball joints lack grease fittings, making maintenance a bit more challenging. This guide will cover the common issues associated with ball joints without grease fittings and provide detailed, step-by-step instructions on how to properly grease them. By following this guide, you’ll be able to maintain your ball joints effectively, extending their lifespan and enhancing the overall performance of your vehicle.

Understanding Ball Joints

What Are Ball Joints?

Ball joints are spherical bearings that connect the control arms to the steering knuckles in a vehicle’s suspension system. They function similarly to the ball-and-socket joint in the human hip, allowing for a range of movements in different directions. This flexibility enables the wheels to move up and down with the road surface while also allowing the vehicle to be steered. There are two main types of ball joints in a vehicle: upper and lower ball joints. The upper ball joints are typically used to connect the upper control arm to the steering knuckle, while the lower ball joints connect the lower control arm to the steering knuckle. Each type plays a crucial role in maintaining the alignment and handling of the vehicle, ensuring a smooth and stable ride.

Grease a Ball Joint

Types of Ball Joints Without Grease Fittings

Sealed Ball Joints: Sealed ball joints are designed to be maintenance-free, containing a permanent lubrication that should last for the lifespan of the joint. These joints are completely sealed to prevent dirt, water, and other contaminants from entering and compromising the lubrication. However, once the lubrication deteriorates or the joint wears out, the entire ball joint must be replaced, as there is no way to re-grease it.

Tools and Materials Needed

List of Tools

Needle Adapter: A needle adapter is essential for this task as it allows you to inject grease into the ball joint through small openings or seals. It provides precise application, ensuring the grease reaches the necessary components inside the ball joint.

Grease Gun: A grease gun is a tool used to apply grease to specific areas. For greasing ball joints, a manual or pneumatic grease gun equipped with a needle adapter is highly effective.

Jack and Jack Stands: A hydraulic jack is used to lift the vehicle off the ground, providing access to the ball joints. Jack stands are then placed under the vehicle to ensure it remains stable and secure while you work.

Wrenches and Sockets: Various wrenches and sockets are required to remove the wheels and access the ball joints. Having a comprehensive set of tools will help in handling different sizes and types of fasteners.

Types of Grease

Recommended Grease Types for Ball Joints: High-quality lithium-based or synthetic greases are typically recommended for ball joints. These greases provide excellent lubrication, withstand high pressures, and resist water washout, ensuring the longevity of the ball joints.

Benefits of Using High-Quality Grease: Using high-quality grease ensures optimal performance of the ball joints by reducing friction and wear. It also enhances the protection against contaminants and extreme temperatures, thereby extending the lifespan of the ball joints and maintaining vehicle safety and performance.

Preparation

Safety Precautions

Ensuring the Vehicle is on a Flat, Stable Surface: Before starting any work, ensure that your vehicle is parked on a flat and stable surface. This prevents the vehicle from rolling or shifting, which could cause accidents.

Using Jack Stands Correctly: Once the vehicle is lifted with the hydraulic jack, place the jack stands under the vehicle at appropriate points. Ensure that the jack stands are positioned correctly and that the vehicle is securely resting on them before you begin working.

Wearing Appropriate Safety Gear: Always wear protective gear, including gloves to protect your hands from grease and sharp edges, safety glasses to shield your eyes from debris, and possibly a dust mask if there is a lot of dust or dirt present.

Vehicle Setup

Lifting the Vehicle: Use the hydraulic jack to lift the vehicle to a height that allows you to comfortably access the ball joints. Follow the manufacturer’s guidelines for jack placement to avoid damaging the vehicle.

Removing the Wheel for Access: Once the vehicle is securely lifted and supported by jack stands, use the appropriate wrenches and sockets to remove the lug nuts and take off the wheel. This will provide you with the necessary access to the ball joints for the greasing process.

Step-by-Step Guide

Accessing the Ball Joint

Locating the Ball Joint on the Vehicle

Begin by identifying the ball joints on your vehicle. Typically, they are located where the steering knuckles meet the control arms. Depending on your vehicle’s make and model, you might have both upper and lower ball joints. Consult your vehicle’s manual if you’re unsure about their exact location.

Raise the vehicle using a hydraulic jack and secure it with jack stands. Ensure the vehicle is stable and won’t move while you’re working on it.

Identifying if It’s Upper or Lower

Determine whether you are working on the upper or lower ball joint. Upper ball joints are usually found at the top of the steering knuckle and connect to the upper control arm, while lower ball joints are at the bottom and connect to the lower control arm.

This distinction is important because the wear patterns and accessibility might differ between the upper and lower ball joints.

Cleaning the Ball Joint Area

Removing Dirt and Debris

Before you begin greasing the ball joint, it’s crucial to clean the area thoroughly. Use a stiff brush or a rag to remove any loose dirt, debris, and grime from the ball joint area. This prevents contaminants from entering the joint when you inject the grease.

Pay special attention to the joint’s seals and surrounding areas, ensuring that no particles can interfere with the lubrication process.

Using Appropriate Cleaning Agents

Use a suitable cleaning agent, such as a brake cleaner or a degreaser, to clean the ball joint area. Spray the cleaner on the ball joint and let it sit for a few minutes to break down any stubborn grease or grime.

Wipe away the cleaner with a clean cloth, making sure the area is completely dry before proceeding. This ensures that the grease adheres properly and penetrates the joint without contamination.

Grease a Ball Joint

Using a Needle Adapter

Attaching the Needle Adapter to the Grease Gun

Prepare your grease gun by attaching the needle adapter. This adapter is essential for injecting grease into sealed ball joints as it allows for precise application through small openings.

Ensure the grease gun is filled with high-quality grease recommended for ball joints. Securely attach the needle adapter to the nozzle of the grease gun, making sure it’s tightly fitted to avoid any leaks.

Proper Insertion Technique to Avoid Damaging the Ball Joint

Carefully insert the needle adapter into the rubber boot or seal of the ball joint. Be gentle to avoid puncturing or tearing the boot, which could lead to contamination and damage.

Insert the needle at an angle that allows the grease to flow into the joint without causing damage. If you encounter resistance, reposition the needle and try again, ensuring it’s properly aligned.

Applying the Grease

Amount of Grease to Apply

Apply a moderate amount of grease. Start by injecting a small amount and gradually increase until you see the boot slightly expand. Overgreasing can cause the boot to burst or the grease to spill out, which can attract dirt and debris.

Typically, a few pumps of the grease gun should suffice. Monitor the joint as you apply the grease to avoid overfilling.

Ensuring Even Distribution Within the Ball Joint

After applying the grease, gently manipulate the ball joint by moving the steering knuckle or control arm. This helps distribute the grease evenly within the joint, ensuring all components are adequately lubricated.

Wipe away any excess grease that might have leaked out during the process. Ensure the area around the ball joint is clean to prevent any contaminants from sticking to the grease.

Testing the Ball Joint

Checking for Proper Movement and Lubrication

Test the ball joint by moving the steering knuckle or control arm. It should move smoothly without any resistance or grinding noises. Properly lubricated ball joints will have a noticeable improvement in movement.

Reattach the wheel and lower the vehicle. Perform a quick test drive to ensure the suspension and steering respond correctly. Listen for any unusual noises that might indicate improper lubrication.

Observing Any Leaks or Issues

After the test drive, inspect the ball joint area for any signs of leaks. If you notice grease leaking from the boot, it may indicate over-greasing or a damaged boot. Address any leaks immediately to prevent further issues.

Regularly check the ball joints during your routine maintenance schedule. Keeping an eye on their condition ensures they remain in good working order and helps identify potential problems early on.

Alternative Methods

Using a Syringe

How to Use a Syringe for Greasing

Preparation: Gather a heavy-duty syringe, high-quality grease suitable for ball joints, and a fine needle attachment. Ensure the syringe is clean and free from any contaminants that could harm the ball joint.

Filling the Syringe: Fill the syringe with the appropriate grease. Be careful to avoid introducing air bubbles, as they can hinder the greasing process. If possible, use a syringe specifically designed for automotive greasing to ensure durability and effectiveness.

Accessing the Ball Joint: Locate the ball joint and clean the area thoroughly to remove any dirt and debris. This step is crucial to prevent contaminants from entering the ball joint.

Injection: Carefully insert the needle attachment into the rubber boot or seal of the ball joint. Inject the grease slowly to ensure it penetrates the joint properly. Observe the boot for slight expansion to gauge the amount of grease being applied.

Post-Injection: Remove the syringe and gently manipulate the ball joint to distribute the grease evenly. Wipe away any excess grease from the joint and surrounding area to keep it clean.

Drilling and Adding a Grease Fitting

Detailed Steps for Adding a Grease Fitting

Assessment: Evaluate the ball joint to determine the best location for the grease fitting. Typically, this is on the side of the ball joint where the least stress is applied.

Preparation: Gather necessary tools, including a drill, a drill bit suitable for metal, a tap set for threading, a grease fitting, a grease gun, and safety equipment. Ensure all tools are in good condition and appropriate for the task.

Drilling: Secure the vehicle on jack stands and remove the wheel for access. Use a center punch to mark the exact spot for drilling. This helps prevent the drill bit from slipping. Carefully drill a small pilot hole at the marked spot, then gradually increase the drill bit size to match the diameter of the grease fitting.

Tapping: After drilling the hole, use a tap set to create threads inside the hole. Apply cutting oil to the tap to facilitate smooth threading and reduce friction. Turn the tap slowly and steadily to avoid breaking it.

Installing the Grease Fitting: Screw the grease fitting into the newly tapped hole. Ensure it is securely tightened without over-torquing, which could strip the threads or damage the fitting.

Greasing: Attach the grease gun to the newly installed fitting and apply grease until it begins to seep out slightly from the boot. This indicates the joint is fully greased. Clean any excess grease and inspect the area for proper installation.

Conclusion

Regular maintenance of ball joints is essential for the safety and performance of your vehicle. Properly greased ball joints ensure smooth steering and handling, reduce wear and tear on suspension components, and extend the lifespan of your vehicle’s suspension system. By understanding how to grease ball joints without grease fittings, you can prevent common issues such as premature wear and poor vehicle handling, ultimately saving time and money on repairs and replacements.

FAQ

It’s generally recommended to check and grease your ball joints every 5,000 to 10,000 miles or during routine maintenance. However, always refer to your vehicle’s owner manual for specific guidelines.

High-quality lithium-based or synthetic grease is ideal for ball joints. These types of grease offer excellent lubrication, withstand high pressures, and resist water washout.

While it is possible, removing the wheel provides better access to the ball joint and allows for a more thorough greasing process. For best results, lift the vehicle and remove the wheel.

Over-greasing can cause the boot to burst or grease to spill out, which attracts dirt and debris. Apply grease until you see the boot slightly expand and then stop to avoid over-greasing.

Signs that your ball joints need greasing include squeaking noises, uneven tire wear, poor handling, and visible wear on the ball joint boot. Regular inspection during maintenance checks can help identify these issues early.

Adding a grease fitting is not necessary but can be beneficial. It allows for regular maintenance and can extend the lifespan of the ball joint. However, this process involves drilling and tapping, which requires precision and care.

How to Drill and Tap for Grease Fitting

How to Drill and Tap for Grease Fitting

How to Drill and Tap for Grease Fitting

Introduction

Proper lubrication is crucial for the smooth operation and longevity of machinery. Without it, equipment can suffer from increased friction, overheating, and premature wear, leading to costly repairs and downtime. Grease fittings play a vital role in ensuring that lubrication reaches all the necessary components. These small but essential parts provide a pathway for grease to flow directly into the bearings and moving parts of machinery, maintaining optimal performance. In this post, we will provide a detailed, step-by-step guide on how to drill and tap for grease fittings, helping you ensure that your machinery remains well-lubricated and in top working condition.

Preparation for Drilling and Tapping

Tools and Materials Needed

Before beginning the process of drilling and tapping for grease fittings, it is essential to gather all the necessary tools and materials. Having everything prepared will ensure a smooth and efficient workflow.

Drill and Appropriate Drill Bits: A power drill is needed to create the hole for the grease fitting. Ensure you have a set of drill bits that match the size required for the fitting.

Tapping Tools: Taps are used to cut threads into the drilled hole. A tap wrench or tap holder will also be needed to turn the tap.

Grease Fittings: Choose high-quality grease fittings that match the requirements of your machinery.

Thread Sealant or Tape: To prevent leaks and ensure a secure fit, thread sealant or tape is necessary.

Safety Equipment: Safety should always be a priority. Equip yourself with gloves to protect your hands, goggles to shield your eyes from debris, and any other necessary protective gear.

Tools Drill and Tap for Grease Fitting

Safety Precautions

Taking proper safety measures is crucial when working with drilling and tapping tools. Here’s why safety is paramount and how to handle the tools correctly:

Importance of Safety Measures: Drilling and tapping involve high-speed tools that can cause injury if not handled properly. Safety measures prevent accidents and ensure a safe working environment.

Proper Handling of Tools and Equipment:

Always read and follow the manufacturer’s instructions for each tool.

Secure your workpiece firmly to prevent it from moving during drilling and tapping.

Use both hands to control the drill and tap wrench, ensuring steady and accurate movements.

Keep your workspace clean and free of obstructions to avoid accidents.

Selecting the Right Grease Fitting

Choosing the correct grease fitting is critical for ensuring effective lubrication. Consider the following factors when selecting a grease fitting:

Factors to Consider (Size, Type, Application):

Size: The fitting must match the size of the hole and the threads you will create. Measure the diameter and thread pitch to ensure compatibility.

Type: Different types of grease fittings are suited for various applications. Standard, button-head, and flush-type are common options. Choose the type that best suits your machinery’s needs.

Application: Consider the specific application and environment where the grease fitting will be used. For example, high-temperature environments may require specialized fittings.

Step-by-Step Guide to Drilling

Marking the Spot

Identifying the Correct Location for the Grease Fitting:

The first step in drilling for a grease fitting is to identify the precise location where the fitting should be installed. This spot should be on a part of the machinery that requires regular lubrication and is accessible for maintenance.

Look for existing ports or designated areas on the machinery’s maintenance manual where grease fittings are recommended. If this information is not available, consult with a machinery specialist to determine the optimal location.

The chosen spot should be free from obstructions and should allow easy access for a grease gun. Avoid areas that are prone to excessive dirt or debris accumulation as this can interfere with the lubrication process.

Using a Center Punch to Mark the Spot:

Once the location is identified, use a center punch to mark the exact spot where you will drill the hole. The center punch creates a small indentation in the metal, which helps to guide the drill bit and prevents it from wandering.

Hold the center punch firmly against the metal surface at the marked location. Using a hammer, tap the punch lightly to create a small dimple. This dimple will act as a guide for the drill bit, ensuring accurate drilling.

Drilling the Hole

Drill Grease Fitting

Choosing the Right Drill Bit Size:

Selecting the correct drill bit size is crucial for creating a hole that matches the size of your grease fitting. Refer to the grease fitting’s specifications to determine the appropriate drill bit diameter.

Typically, the drill bit size should be slightly smaller than the outer diameter of the tap you will use. This ensures that the threads will be properly formed during the tapping process.

If you are unsure about the drill bit size, use a drill bit gauge to measure and compare the bit to the fitting.

Proper Drilling Technique:

Secure the workpiece firmly using a vice or clamps to prevent movement during drilling. Ensuring the piece is stable is critical for accuracy and safety.

Insert the selected drill bit into the drill and tighten the chuck to hold it securely. Make sure the drill bit is straight and properly aligned.

Apply a small amount of cutting oil to the drill bit to reduce friction and heat build-up during drilling. This will also prolong the life of the drill bit and result in a cleaner hole.

Position the drill bit over the center punch mark, ensuring it is perpendicular to the surface. This will help in creating a straight hole.

Ensuring the Hole is Straight and Clean:

Start the drill at a low speed to prevent the bit from slipping out of position. Gradually increase the speed as the bit begins to cut into the metal.

Apply steady, even pressure to the drill, allowing the bit to do the work. Avoid pushing too hard, as this can cause the bit to overheat or break.

Periodically withdraw the drill bit to remove metal shavings from the hole. This helps to maintain a clear path for the bit and prevents clogging.

Once the hole is drilled to the desired depth, remove the drill bit and inspect the hole. Ensure it is straight and free of burrs or rough edges. If necessary, use a deburring tool to clean up the edges of the hole.

Tapping the Hole

Choosing the Right Tap

Matching the Tap to the Grease Fitting Size:

The first step in tapping the hole is to select the correct tap. The tap size must match the grease fitting size to ensure a secure and leak-free fit.

Refer to the specifications of your grease fitting to determine the appropriate tap size. This information is usually provided by the manufacturer and can also be found in technical charts.

It’s crucial to choose a tap that matches the thread pitch and diameter of the grease fitting. Using a mismatched tap can result in poor threading, leading to potential leaks or fitting failures.

Types of Taps (Taper, Plug, Bottoming):

Taper Tap: This tap has a gradual taper to its cutting edges, making it ideal for starting threads. It is typically used when tapping a hole for the first time as it is easier to start and aligns well.

Plug Tap: This tap has a less pronounced taper and is often used after the initial threading with a taper tap. It can cut deeper threads and is suitable for through holes or when threading to the bottom of a blind hole.

Bottoming Tap: This tap has almost no taper and is used to cut threads to the bottom of a blind hole. It is typically used as the final step in threading to ensure maximum thread engagement.

Tapping Procedure

Applying Cutting Fluid:

Before starting the tapping process, apply cutting fluid to both the tap and the hole. Cutting fluid reduces friction and heat, making the tapping process smoother and prolonging the life of the tap.

The cutting fluid also helps to produce cleaner threads by flushing out metal shavings as you tap.

Starting the Tap Straight:

Position the tap perpendicular to the hole, ensuring it is aligned correctly. Starting the tap straight is crucial for creating precise and accurate threads.

Use a tap wrench to hold the tap. Place the tap’s tip into the drilled hole and apply gentle downward pressure while turning the tap wrench clockwise.

Turning the Tap and Backing Off to Clear Chips:

Begin turning the tap slowly and steadily. As the tap cuts into the metal, it will produce chips (small pieces of metal). It’s important to clear these chips regularly to prevent them from clogging the threads.

After every half-turn forward, turn the tap back slightly (a quarter turn) to break and clear the chips. This back-and-forth motion ensures that the threads are clean and reduces the risk of damaging the tap or the workpiece.

Continue this process until the tap has cut threads to the desired depth. Be patient and avoid forcing the tap, as this can lead to broken taps or damaged threads.

Ensuring Threads are Clean and Precise:

Once you have finished tapping the hole, remove the tap and inspect the threads. The threads should be clean, sharp, and free of burrs or metal shavings.

Use a small brush or compressed air to clean out any remaining chips from the threaded hole.

Check the fit of the grease fitting by threading it into the tapped hole. The fitting should screw in smoothly and securely without any wobble or resistance. If the threads are not clean or precise, consider running the tap through the hole again to improve the threading.

Installing the Grease Fitting

Thread Preparation

Applying Thread Sealant or Tape:

Before installing the grease fitting, it’s essential to prepare the threads to ensure a secure and leak-free connection. Applying a thread sealant or tape helps achieve this.

Thread Sealant: Apply a thin, even layer of thread sealant to the threads of the grease fitting. Use a brush or the applicator provided with the sealant to coat the threads evenly. Thread sealants are designed to fill any small gaps between the threads, preventing leaks and ensuring a tight fit.

Thread Tape: Alternatively, you can use PTFE (Teflon) thread tape. Wrap the tape around the threads of the grease fitting in a clockwise direction, ensuring that it overlaps slightly on each pass. The tape should cover the threads completely without bunching up or overlapping excessively. Thread tape also helps create a tight seal by filling in the gaps between the threads.

Ensuring a Proper Seal:

Whether you use thread sealant or tape, the goal is to create a tight seal that prevents grease from leaking out during lubrication. Make sure the sealant or tape is applied evenly and smoothly.

Avoid using too much sealant or tape, as this can create excess material that may interfere with the fitting’s installation. Just enough to cover the threads is sufficient for a secure seal.

fix Stuck Grease Fitting

Screwing in the Fitting

Using the Correct Torque:

Once the threads are prepared, screw the grease fitting into the tapped hole. Begin by hand-threading the fitting to ensure it goes in straight and engages the threads correctly.

After hand-tightening, use a wrench to secure the fitting. It is crucial to use the correct torque when tightening the grease fitting. Over-tightening can strip the threads or damage the fitting, while under-tightening can result in leaks.

Consult the manufacturer’s specifications for the recommended torque value for your grease fitting. Using a torque wrench, apply the specified amount of torque to achieve a secure fit.

Avoiding Over-Tightening:

Over-tightening the grease fitting can cause significant damage to both the fitting and the threaded hole. It can strip the threads, making it difficult to achieve a proper seal, or even break the fitting.

To avoid over-tightening, stop applying torque as soon as the fitting feels secure and snug. If using a torque wrench, adhere strictly to the recommended torque value.

Testing the Installation

Checking for Leaks:

After installing the grease fitting, it’s essential to check for any leaks to ensure a proper seal. Attach a grease gun to the fitting and apply a small amount of grease.

Observe the fitting and the surrounding area for any signs of grease leaking out. If you notice any leaks, the fitting may not be tight enough, or the thread sealant/tape may not have been applied correctly.

If a leak is detected, try tightening the fitting slightly. If the leak persists, you may need to remove the fitting, reapply the thread sealant or tape, and reinstall it.

Ensuring the Fitting is Secure:

Once you’ve confirmed that there are no leaks, ensure the grease fitting is securely in place. The fitting should not wobble or move when touched.

Give the fitting a gentle wiggle to ensure it is firmly seated. A secure fitting is crucial for effective lubrication and long-term maintenance of your machinery.

If the fitting feels loose, remove it and inspect the threads for any damage. Re-tap the hole if necessary and reapply the thread sealant or tape before reinstalling the fitting.

Conclusion

In this guide, we’ve walked through the essential steps for drilling and tapping for grease fittings, emphasizing the importance of precision and proper technique. Correctly installing grease fittings ensures effective lubrication, which is vital for the smooth operation and longevity of your machinery. By following the step-by-step instructions, from marking the spot to testing the installation, you can confidently perform this task and enhance your equipment’s maintenance regimen. Regular lubrication not only keeps your machinery running efficiently but also prevents costly repairs and downtime, contributing to long-term performance and reliability. 

FAQ

The drill bit size should be slightly smaller than the outer diameter of the tap you will use. Refer to the grease fitting’s specifications or use a drill bit gauge to ensure the correct size.

It’s best to use a thread sealant specifically designed for metal threads. PTFE (Teflon) tape is also a good option. Avoid using too much to prevent interference with the fitting’s installation.

Apply cutting fluid to reduce friction and use a tap wrench to turn the tap slowly and steadily. Make sure to back off regularly to clear metal chips, and don’t force the tap if it meets resistance.

First, try tightening the fitting slightly. If the leak persists, remove the fitting, reapply thread sealant or tape, and reinstall it. Make sure the threads are clean and properly aligned.

The lubrication frequency depends on the machinery and its operating conditions. Consult the machinery’s maintenance manual for specific recommendations and follow a regular lubrication schedule to ensure optimal performance.

Generally, it’s best to use a new grease fitting to ensure a proper seal. However, if the fitting and threads are in good condition, you can reuse it after thoroughly cleaning it and applying fresh thread sealant or tape.

Grease Fitting Sizes How to Choose the Right One

Grease Fitting Sizes: How to Choose the Right One

Grease Fitting Sizes: How to Choose the Right One

Table of Contents

Introduction

The primary purpose of grease fittings is to provide a safe and convenient point of lubrication for bearings, joints, and other areas that require lubrication to minimize friction and wear. Correct sizing ensures proper fit and effective sealing, preventing leaks and ensuring grease reaches the intended area. Incorrect sizing can lead to a variety of problems, including inadequate lubrication, increased friction, accelerated wear, and potential equipment failure. Therefore, knowing and selecting the proper grease fitting size will keep equipment in top condition, minimize downtime, and extend the life of critical components.

What Are Grease Fittings?

Grease fittings, also known as Zerk fittings, grease nipples, or Alemite fittings, are specialized connectors used in machinery to enable the application of lubricants such as grease to moving parts. These fittings typically consist of a small, threaded metal body with a ball check mechanism that allows grease to be injected into a bearing or joint while preventing contaminants from entering. The fittings are designed to be robust and durable, withstanding high pressures and ensuring that lubrication can be delivered precisely and efficiently.

Types of Grease Fittings

Standard Straight Fittings: The most common type, used in various general applications.

Angled Fittings: Available in 45-degree and 90-degree angles for use in hard-to-reach places.

Drive-Type Fittings: Designed to be driven into untapped holes.

Flush-Type Fittings: Sit flush with the surface, ideal for applications where protrusion is not acceptable.

Button Head Fittings: Feature a larger head for high-volume grease applications.

Pin-Type Fittings: Utilize a pin mechanism for grease delivery in specific applications.

Measure Metric Grease Fitting drawing

How Do Grease Fittings Work?

Functionality and Mechanics:

Grease fittings work by providing a secure and accessible point for introducing grease into a bearing, joint, or other lubricated component. When a grease gun is attached to the fitting, grease is forced through the fitting’s ball check valve and into the machinery part. The ball check valve prevents contaminants from entering and retains the grease inside the component. The pressurized grease then spreads throughout the lubricated area, reducing friction and wear by maintaining a layer of lubricant between moving parts.

Applications in Various Industries:

Grease fittings are used across numerous industries due to their effectiveness in maintaining the functionality and longevity of machinery. Some common applications include:

Automotive Industry: Used in vehicles for lubricating suspension components, steering linkages, and drive shafts.

Industrial Machinery: Essential for maintaining bearings, gears, and joints in manufacturing and processing equipment.

Agriculture: Used in farm equipment such as tractors and harvesters to ensure smooth operation and reduce wear.

Construction: Applied in heavy machinery like excavators and loaders to maintain performance under harsh conditions.

Aviation: Critical for lubricating moving parts in aircraft to ensure safety and reliability.

Standard Grease Fitting Sizes

Metric vs Imperial Sizes

Grease fittings come in both metric and imperial sizes, catering to different industry standards and regional preferences. Metric sizes are commonly used in European and Asian markets, while imperial sizes are predominant in North America.

Metric Sizes: Typically measured in millimeters (mm). Common sizes include M6, M8, M10, and M12, where “M” stands for metric.

Imperial Sizes: Measured in inches. Common sizes include 1/8″, 1/4″, 5/16″, and 3/8″.

Size Chart and Standard Dimensions

A size chart provides a reference for selecting the appropriate grease fitting size based on thread diameter, pitch, and length. Here are some standard dimensions:

Metric Size

Thread Diameter (mm)

Thread Pitch (mm)

Common Applications

M6

6

1.0

Small machinery, bicycles

M8

8

1.25

Light vehicles, household tools

M10

10

1.5

Medium vehicles, industrial tools

M12

12

1.75

Heavy machinery, construction

Imperial Size

 Thread Diameter (inches)

Thread Pitch(TPI)

  Common Applications

1/8″

  0.125

27

Light vehicles, garden equipment

1/4

  0.25

18

Medium vehicles, industrial tools

5/16″

  0.3125

24

Heavy vehicles, agricultural tools

3/8″

  0.375

24

Heavy machinery, construction

Factors to Consider When Choosing Grease Fitting Sizes

Equipment Requirements

Manufacturer Specifications:

When selecting grease fitting sizes, it is crucial to follow the specifications provided by the equipment manufacturer. These specifications ensure that the fittings are compatible with the machinery’s design and operational needs. Manufacturers often specify the exact size, type, and material of grease fittings required to maintain optimal performance and longevity of the equipment.

Compatibility with Existing Systems:

Assess the compatibility of the grease fittings with existing systems and components. This includes matching thread sizes and types, and ensuring the fitting can be securely attached without causing damage or leaks. Compatibility extends to the lubrication system as well, ensuring that the grease can be effectively delivered to the required parts.

Operational Environment

Temperature, Pressure, and Environmental Factors:

The operational environment significantly impacts the selection of grease fitting sizes. Consider the following factors:

Temperature: Extreme temperatures can affect the performance of grease fittings. High temperatures may cause grease to thin and leak, while low temperatures can cause grease to harden, obstructing flow. Select fittings designed to withstand the specific temperature range of the operational environment.

Pressure: The pressure within the lubrication system must be considered. High-pressure environments require robust fittings that can handle the force without failing. Ensure that the selected fittings are rated for the maximum operating pressure of the system.

Environmental Factors: Factors such as moisture, dust, chemicals, and exposure to outdoor elements can impact the durability and functionality of grease fittings. Choose fittings with appropriate seals and protective coatings to withstand these conditions.

Corrosion Resistance and Durability:

Grease fittings should be made from materials that offer high corrosion resistance and durability, especially in harsh environments. Common materials include stainless steel, brass, and zinc-plated steel. Stainless steel is particularly effective for applications exposed to moisture and corrosive substances, while brass and zinc-plated steel provide adequate resistance for less demanding conditions.

Type of Grease Used

Viscosity and Flow Rate Considerations:

The type of grease used in the lubrication system affects the choice of grease fitting sizes. Grease viscosity, which refers to the thickness and flow characteristics of the grease, must match the fitting’s ability to allow smooth passage. High-viscosity greases require fittings with larger openings to ensure proper flow, while low-viscosity greases can use smaller fittings without issues.

Impact on Fitting Size and Selection:

Flow Rate: The flow rate of the grease is determined by both its viscosity and the pressure applied during lubrication. Ensure that the fitting size accommodates the required flow rate to deliver sufficient grease to the components without causing blockages or excessive pressure build-up.

Compatibility: Ensure that the grease fitting material is compatible with the type of grease used to prevent chemical reactions that could degrade the fitting or the grease itself.

Measuring and Identifying Grease Fitting Sizes

Tools and Techniques for Accurate Measurement

Calipers:

Calipers are versatile tools that can measure the diameter and length of grease fittings accurately. Both digital and manual calipers can be used to measure external and internal dimensions, ensuring precise readings.

Thread Gauges:

Thread gauges are essential for measuring the thread pitch and size of grease fittings. These tools come in sets with various sizes and pitches, allowing you to match the fitting threads accurately.

Other Tools:

Rulers and Measuring Tapes: Useful for quick and rough measurements.

Thread Pitch Comparators: Help in identifying the thread pitch by comparing it with known standards.

Micrometers: Provide highly precise measurements for small dimensions.

Step-by-Step Measurement Process

Grease Fitting Sizes

Remove the Fitting:

Carefully remove the grease fitting from the machinery using an appropriate wrench or socket. Ensure the area is clean to avoid contamination.

Measure the Thread Diameter:

Use a caliper to measure the outer diameter of the fitting’s threaded section. Ensure the caliper is perpendicular to the fitting to get an accurate measurement.

Note the measurement, typically in millimeters (for metric fittings) or inches (for imperial fittings).

Determine the Thread Pitch:

Select a thread gauge that closely matches the fitting’s threads.

Align the threads of the gauge with those of the fitting. The correct gauge will fit snugly without gaps.

Record the thread pitch, measured in threads per inch (TPI) for imperial or in millimeters for metric.

Measure the Length:

Use a ruler or caliper to measure the overall length of the grease fitting, from the tip to the base.

If the fitting has a ball check valve, measure up to the point where the valve begins.

Identify the Fitting Type:

Examine the fitting to identify its type (e.g., straight, angled, flush).

Look for any markings or codes on the fitting that indicate its size or type.

Verify with Size Charts:

Compare your measurements with standard size charts for grease fittings.

Ensure the measured dimensions match the standard dimensions listed for specific sizes.

Selecting the Right Grease Fitting for Your Needs

Step-by-Step Selection Process

Assessing Equipment and Application Requirements:

Identify Lubrication Points: Determine all the points in your equipment that require lubrication. This includes bearings, joints, and other moving parts.

Check Manufacturer’s Guidelines: Review the equipment manufacturer’s manual or specifications to find recommended grease fitting types and sizes.

Consider the Lubricant Used: Identify the type of grease used in your equipment, focusing on its viscosity and compatibility with different fitting materials.

Matching Fittings to Specific Needs

Determine Thread Type and Size

Accurately determining the thread type and size of your grease fittings is fundamental to ensuring proper fit and functionality. This process begins with measuring the diameter and thread pitch of existing fittings or consulting the manufacturer’s specifications for your equipment. Thread types are typically categorized into metric or imperial systems. Metric threads are measured in millimeters and are commonly used in European and Asian markets, while imperial threads, measured in inches, are standard in North America.

Select the Fitting Type

Choosing the appropriate fitting type for your application is crucial to ensure efficient lubrication. Different types of grease fittings serve various functions and are designed to meet specific needs.

Consider Environmental Conditions

Environmental conditions play a significant role in the selection of grease fittings. Factors such as temperature extremes, moisture, dust, and exposure to chemicals can affect the durability and performance of the fittings.

Evaluate Pressure Requirements

The pressure within the lubrication system must be considered when selecting grease fittings. High-pressure environments demand fittings that can withstand the applied force without failure.

Key Pressure Considerations:

Pressure Rating: Ensure the selected fittings are rated for the maximum operating pressure of your lubrication system.

Reinforced Seals: In high-pressure systems, choose fittings with reinforced seals to prevent leaks and ensure a secure fit.

Special Designs: Some applications may require specially designed fittings to handle extreme pressures or unique lubrication challenges.

Verify Compatibility:

Match with Existing System: Confirm that the new fittings are compatible with the existing lubrication system, including grease guns and delivery methods.

Check for Interference: Ensure that the fitting size and type will not interfere with other components or access points on the equipment.

Common Mistakes to Avoid

Misinterpretation of Size Charts:

Incorrect Measurements: Ensure precise measurements of thread diameter, pitch, and length using appropriate tools. Avoid estimation and double-check measurements to prevent errors.

Mismatched Threads: Pay attention to thread types (e.g., NPT vs. BSP) and ensure the selected fitting matches the threading standard used in the equipment.

Overlooking Compatibility and Environmental Factors:

Ignoring Manufacturer Specifications: Always adhere to the equipment manufacturer’s specifications for grease fittings. Using non-recommended fittings can lead to poor performance and potential damage.

Neglecting Environmental Conditions: Consider the operational environment when selecting fittings. Corrosive environments, high temperatures, and exposure to contaminants require fittings made from suitable materials and with proper coatings.

Failure to Account for Pressure: Ensure the fitting can handle the system’s pressure. High-pressure systems require fittings rated for such conditions to avoid leaks or blowouts.

Conclusion

Choosing the right grease fitting size is essential for maintaining the efficiency and longevity of machinery. Properly sized grease fittings ensure that lubrication reaches critical components, reducing friction and wear. Key points to remember include understanding the types of grease fittings, measuring and identifying fitting sizes accurately, considering equipment and environmental requirements, and adhering to industry standards and specifications. By following a systematic selection process and avoiding common mistakes, you can ensure that your equipment remains well-lubricated and performs optimally.

FAQ

Grease fittings, also known as Zerk fittings, are used to lubricate bearings, joints, and other moving parts in machinery. They provide an accessible point for introducing grease, ensuring smooth operation and reducing wear.

To measure a grease fitting, use a caliper to measure the thread diameter and a thread gauge to determine the thread pitch. This will help you identify the correct size and type, whether metric or imperial.

Metric grease fittings are measured in millimeters and commonly used in Europe and Asia, while imperial grease fittings are measured in inches and are standard in North America. The choice depends on the regional standards and equipment specifications.

Consider the accessibility of the lubrication point, the volume of grease needed, and the environmental conditions. Common types include straight, angled, flush, button head, and pin-type fittings.

Grease fittings are typically made from stainless steel, brass, or zinc-plated steel. The material choice matters because it affects the fitting’s durability and resistance to corrosion, especially in harsh environments.

Using the correct size ensures a proper fit, prevents leaks, and guarantees that grease reaches the intended areas. Incorrect sizes can lead to inadequate lubrication, increased wear, and potential equipment failure.

Grease Fitting Repair 101 Everything You Need to Know

Grease Fitting Repair 101: Everything You Need to Know

Grease Fitting Repair 101: Everything You Need to Know

Introduction

Grease fittings play a vital but often overlooked role in keeping machinery running smoothly and lasting long. These small parts ensure that critical moving parts are properly lubricated, thereby reducing friction and wear. However, grease fittings are often the source of frustrating problems such as clogs, leaks, or breaks, which can lead to costly downtime and repairs if not addressed in a timely manner. This article is designed to provide a comprehensive guide to grease fitting repair, offering step-by-step instructions and practical tips.

Causes of Grease Fitting Leaks

Clogged Grease Fittings

Causes of Clogging

Clogging in grease fittings is a prevalent issue that can arise due to several factors. One primary cause is the buildup of dirt, debris, or hardened grease within the fitting. Over time, contaminants can infiltrate the fitting and obstruct the flow of grease. Another common cause is the use of inappropriate or poor-quality grease, which can harden or become contaminated, leading to blockages. Additionally, lack of regular maintenance and infrequent lubrication cycles can contribute to clogging as grease solidifies and obstructs the pathway.

Signs of a Clogged Fitting

Identifying a clogged grease fitting is crucial to preventing further damage to machinery. One of the most obvious signs is difficulty in pumping grease through the fitting. If significant resistance is felt when using a grease gun, the fitting is likely clogged. Another indicator is the presence of dry or squeaky moving parts, suggesting that lubrication is not reaching the necessary components. In some cases, visible buildup of dirt or hardened grease around the fitting can also signal a clog.

Leaking Grease Fittings

Causes of Leaks

Leaks in grease fittings can occur due to a variety of reasons. One common cause is improper installation or insufficient tightening of the fitting, which allows grease to escape. Over-tightening can also damage the threads, leading to leaks. Another frequent cause is worn-out or damaged seals and O-rings within the fitting, which can deteriorate over time due to exposure to harsh operating conditions. Additionally, excessive pressure during lubrication can force grease out through weak points, causing leaks.

Impact of Leaks on Machinery Performance

Leaking grease fittings can have significant negative impacts on machinery performance. When grease leaks out, it fails to reach the intended moving parts, leading to increased friction and wear. This can result in overheating, accelerated component wear, and ultimately, mechanical failure. Leaks also create messy work environments and can attract dirt and debris, further exacerbating lubrication issues. In the long run, neglected leaks can lead to expensive repairs and prolonged downtime.

Grease Fittings rust

Broken or Damaged Grease Fittings

Causes of Damage

Grease fittings can become damaged due to several factors. Mechanical impact or accidental hits during maintenance or operation can break or bend the fittings. Corrosion is another common cause of damage, especially in environments exposed to moisture or corrosive substances. Additionally, improper tools or excessive force during installation and removal can weaken or fracture the fittings. Wear and tear from regular use can also lead to gradual deterioration and eventual failure.

Identifying Broken Fittings

Recognizing broken or damaged grease fittings is essential for timely repair and maintenance. Visible signs of damage include bent, cracked, or broken fittings, which are often evident upon inspection. If grease fittings are missing or show signs of corrosion, they likely need replacement. Difficulty in attaching a grease gun or achieving a secure connection can also indicate damage. Additionally, frequent lubrication failures or unexplained grease leakage may be symptoms of compromised fittings.

Tools and Materials Needed for Repair

Tools

Grease Gun

A grease gun is an essential tool for any grease fitting repair. It is used to apply lubricant through the grease fitting and into the machinery’s lubrication points. Grease guns come in various types, including manual, pneumatic, and battery-operated models, each suited for different applications and preferences.

Wrenches and Pliers

Wrenches and pliers are crucial for removing and installing grease fittings. Adjustable wrenches can accommodate various sizes of fittings, while pliers can grip and twist fittings for removal or installation.

Needle Adapters

Needle adapters are specialized attachments for grease guns that allow precise application of grease into tight or hard-to-reach areas. They are particularly useful for fittings that are recessed or located in confined spaces where standard grease gun nozzles cannot reach.

Specialized Tools

Grease Fitting Cleaning Tools

Grease fitting cleaning tools are designed to clear blockages and contaminants from clogged grease fittings. These tools typically include small, specialized brushes and reamers that can clean the interior of the fittings without damaging them.  

Grease Fitting Replacement Kits

Grease fitting replacement kits provide all the necessary components to replace damaged or worn-out grease fittings. These kits often include various sizes and types of fittings, seals, and installation tools.  

Materials

Replacement Grease Fittings

Replacement grease fittings are essential for addressing broken or damaged fittings. It is important to have a variety of sizes and types available to match the specific needs of different machinery.  

Grease Fitting Caps

Grease fitting caps protect fittings from dirt, debris, and moisture, which can cause clogging and corrosion. These caps are especially useful in harsh operating environments where contaminants are prevalent.

Lubricants and Solvents

It is important to select the appropriate type of grease for your specific application, considering factors such as temperature, load, and environment. Solvents are used to clean fittings and surrounding areas, removing old grease, dirt, and contaminants to prepare for new lubrication.

Step-by-Step Guide to Grease Fitting Repair

Preparation

Before starting any grease fitting repair, it is essential to prioritize safety. Wear appropriate personal protective equipment (PPE) such as gloves, safety glasses, and protective clothing to prevent injuries from sharp edges, chemicals, and grease. Ensure that the machinery is turned off and properly secured to prevent accidental movements. If the repair involves working on elevated equipment, use fall protection gear as necessary. Additionally, read and follow any manufacturer-specific safety guidelines for your machinery and tools.

Assembling Necessary Tools and Materials

Gather all the tools and materials required for the repair before beginning. This includes basic tools like a grease gun, wrenches, and pliers, as well as specialized tools such as grease fitting cleaning tools and replacement kits. Ensure you have the appropriate replacement grease fittings, grease fitting caps, lubricants, and solvents on hand. Having everything prepared in advance will streamline the repair process and reduce downtime.

Repairing Clogged Grease Fittings

Removing and Cleaning the Fitting

Use a wrench or pliers to carefully remove the clogged grease fitting from the machinery. Be cautious not to damage the fitting or surrounding components.

Once removed, inspect the fitting for visible blockages or hardened grease.

Use grease fitting cleaning tools, such as small brushes or reamers, to thoroughly clean the interior of the fitting. Remove all debris and old grease.

If necessary, soak the fitting in a solvent to dissolve stubborn grease and contaminants. Ensure it is completely dry before reinstalling.

Reinstalling and Testing

Reinstall the cleaned grease fitting into its original position, using a wrench or pliers to secure it tightly but without over-tightening.

Attach the grease gun to the fitting and pump grease into it to ensure it is functioning correctly. Observe if the grease flows smoothly through the fitting.

If the fitting is still clogged, repeat the cleaning process or consider replacing the fitting with a new one.

Fixing Leaking Grease Fittings

Tightening Loose Fittings

Inspect the leaking grease fitting to determine if it is loose. Use a wrench to tighten the fitting securely.

Be careful not to over-tighten, as this can damage the fitting or threads.

Replacing Seals and O-Rings

If tightening the fitting does not stop the leak, remove the fitting using a wrench or pliers.

Inspect the seals and O-rings for wear or damage. Replace them with new ones if necessary.

Reinstall the fitting with the new seals and O-rings, ensuring a snug fit.

Grease Fitting Repair 101

Replacing Broken or Damaged Grease Fittings

Removing the Damaged Fitting

Use a wrench or pliers to carefully remove the broken or damaged grease fitting. Be gentle to avoid damaging the threads or surrounding components.

If the fitting is severely damaged and difficult to remove, consider using specialized extraction tools.

Installing a New Fitting

Select a new grease fitting that matches the size and type of the original.

Apply a small amount of lubricant to the threads of the new fitting to ensure smooth installation.

Carefully screw the new fitting into place using a wrench or pliers, ensuring it is securely tightened.

Test the new fitting by attaching the grease gun and pumping grease through it to confirm proper operation.

Preventive Maintenance Tips

Regular Inspection

To maintain optimal performance of your machinery, it is crucial to conduct regular inspections of grease fittings. The frequency of these checks can vary based on the operational environment and usage intensity of the equipment. However, a general guideline is to perform inspections at least once a month. For machinery operating under harsh conditions or high usage, more frequent inspections, such as bi-weekly or even weekly, may be necessary.

What to Look for During Inspections

During inspections, focus on several key areas to ensure that grease fittings are in good working condition:

Visual Inspection: Check for visible signs of wear, corrosion, or damage to the grease fittings. Look for any grease leakage or buildup around the fittings, which may indicate a problem.

Functional Testing: Use a grease gun to pump a small amount of grease into each fitting. Ensure that the grease flows smoothly and reaches the intended lubrication points without resistance.

Tightness Check: Verify that all fittings are securely tightened. Loose fittings can cause leaks and prevent proper lubrication.

Seal Integrity: Inspect the seals and O-rings around the fittings for signs of wear or damage. Replace any that appear to be compromised.

Cleanliness: Ensure that the fittings and surrounding areas are clean and free from dirt and debris, which can lead to clogging and contamination.

Proper Lubrication Practices

Choosing the Right Grease

Selecting the appropriate grease is essential for effective lubrication. Consider the following factors when choosing grease:

Viscosity: Choose a grease with the right viscosity for your specific application. Higher viscosity greases are suitable for high-load applications, while lower-viscosity greases are better for high-speed applications.

Temperature Range: Ensure that the grease can operate effectively within the temperature range of your machinery. For extreme temperatures, consider using specialized greases designed for high or low-temperature conditions.

Compatibility: Use grease that is compatible with the materials of your machinery and existing lubricants. Mixing incompatible greases can lead to reduced lubrication effectiveness and potential damage.

Correct Application Techniques

Proper application of grease is crucial to ensure effective lubrication:

Clean the Fitting: Before applying grease, clean the fitting and surrounding area to remove any dirt or debris that could contaminate the grease.

Use the Right Amount: Apply the appropriate amount of grease to avoid over-greasing or under-greasing. Over-greasing can cause excess pressure and potential damage, while under-greasing can lead to insufficient lubrication.

Distribute Evenly: Ensure that the grease is evenly distributed within the lubrication points. Use a grease gun with a flexible hose or needle adapter to reach tight or hard-to-access areas.

Monitor for Issues: After applying grease, monitor the equipment for any signs of lubrication problems, such as noise, heat, or abnormal operation.

Storage and Handling of Grease Fittings

Preventing contamination is key to maintaining the integrity of grease fittings:

Use Caps: Always use grease fitting caps to protect the fittings from dirt, moisture, and debris when not in use. Caps help prevent contamination and extend the life of the fittings.

Clean Tools: Ensure that all tools used for lubrication, such as grease guns and cleaning tools, are clean and free from contaminants before use.

Work in Clean Environments: Perform lubrication and maintenance tasks in clean environments to minimize the risk of introducing contaminants to the fittings and grease.

Conclusion

Maintaining grease fittings is crucial for ensuring the smooth operation and longevity of your machinery. Regular maintenance prevents common issues like clogging, leaks, and damage, which can lead to costly repairs and downtime. Would you like any additional information or tips on specific aspects of grease fitting maintenance? Contact Topa for more information!

FAQ

It is recommended to inspect grease fittings at least once a month. For machinery operating under harsh conditions or heavy use, consider more frequent inspections, such as bi-weekly or weekly.

Signs of a clogged grease fitting include difficulty in pumping grease through the fitting, dry or squeaky moving parts, and visible buildup of dirt or hardened grease around the fitting.

Choose grease based on viscosity, temperature range, and compatibility with your machinery and existing lubricants. Higher viscosity greases are suitable for high-load applications, while lower viscosity greases are better for high-speed applications.

First, try tightening the fitting. If the leak persists, remove the fitting and inspect the seals and O-rings for damage. Replace any worn-out seals and reinstall the fitting securely.

It is generally not recommended to mix different types of grease, as they may be incompatible and reduce lubrication effectiveness. Always use the same type of grease or ensure compatibility before mixing.

Use grease fitting caps to cover the fittings when not in use, clean tools before use, and perform maintenance tasks in clean environments to prevent dirt, moisture, and debris from contaminating the fittings and grease.

Broken Grease Fitting Troubleshooting Tips and Solutions

Broken Grease Fitting: Troubleshooting Tips and Solutions

Broken Grease Fitting: Troubleshooting Tips and Solutions

Table of Contents

Introduction

Grease fittings play a critical role in the maintenance of machinery by ensuring proper lubrication of moving parts, which is essential for their smooth operation and longevity. Despite their importance, grease fittings are prone to various issues that can compromise their functionality and lead to costly repairs or downtime. This post aims to provide comprehensive troubleshooting tips and practical solutions for dealing with broken grease fittings.

Causes of Broken Grease Fittings

Wear and Tear from Regular Use

Continuous use of machinery inevitably leads to natural wear and tear on all components, including grease fittings. Over time, the repetitive stress of operation can cause these small yet crucial parts to weaken. This gradual degradation can manifest in several ways, such as the development of tiny cracks or the bending of the fitting itself. Such wear compromises the fitting’s structural integrity, making it more prone to breaking under the mechanical pressures of normal operation. Regular inspection and timely replacement of worn fittings can help mitigate this issue, ensuring the machinery remains in optimal working condition.

Broken Grease Fittings

Dirt and Debris Accumulation

Grease fittings often operate in environments where dirt, dust, and other debris are prevalent. These particles can accumulate around the fittings, causing abrasion and mechanical wear. Over time, this abrasion can create tiny grooves and scratches on the surface of the fittings, leading to weakened structural integrity. Furthermore, accumulated debris can obstruct the flow of grease, preventing it from reaching the necessary components and causing increased friction and wear within the machinery. Regular cleaning of fittings and surrounding areas can help mitigate these issues, ensuring that the fittings remain free from obstructive materials and maintain their functional integrity.

Moisture and Corrosion

Moisture is one of the most damaging environmental factors for grease fittings. Whether it comes from rain, washing, or ambient humidity, moisture can lead to rust and corrosion. When metal fittings corrode, they become brittle and less capable of withstanding the pressures of normal operation. Corrosion not only weakens the metal but also can lead to pitting, where small holes form on the surface of the fitting. These pits can trap additional moisture and debris, accelerating the deterioration process. Using grease fittings made from corrosion-resistant materials, such as stainless steel or brass, and applying protective coatings can significantly reduce the impact of moisture and extend the lifespan of the fittings.

Extreme Temperatures

Temperature extremes pose a significant challenge to the durability of grease fittings. High temperatures can cause the metal to expand, which may lead to deformation and weakening of the fittings. On the other hand, low temperatures can make the metal more brittle and prone to cracking. In environments where temperatures fluctuate widely, the repeated expansion and contraction cycles can further stress the fittings, leading to premature failure. To combat this, it is essential to select grease fittings that are designed to withstand the specific temperature ranges they will be exposed to. Additionally, applying thermal insulation or using temperature-resistant grease can help protect the fittings from extreme temperature effects.

Fluctuating Temperature Effects

In many industrial environments, temperatures can vary significantly throughout the day or between seasons. This constant fluctuation causes the materials of grease fittings to expand and contract repeatedly. Such thermal cycling can lead to fatigue in the metal, causing it to crack or break over time. This is particularly problematic for fittings made from materials that do not handle thermal stress well. Selecting fittings made from materials with a high tolerance for thermal cycling and ensuring that they are appropriately rated for the specific application can help mitigate the effects of temperature fluctuations. Regular inspections and timely replacements of fittings showing signs of thermal fatigue are also crucial in maintaining machinery reliability.

Improper Installation or Maintenance Practices

Over-Tightening

One common issue with the installation of grease fittings is over-tightening. When fittings are over-tightened, it can strip the threads, causing them to lose their grip and potentially leading to leaks. Over-tightening can also result in misalignment, which hinders the effective flow of grease. This misalignment creates stress points that are prone to breaking under the mechanical pressures of normal operation.

Under-Tightening

On the opposite end of the spectrum, under-tightening grease fittings can also cause significant issues. When fittings are not tightened enough, they can become loose over time, eventually falling out or failing to provide a proper seal. This lack of a secure seal can lead to contamination of the grease with dirt and moisture, compromising the lubrication and leading to increased wear and tear on the machinery. To avoid under-tightening, it’s essential to ensure that fittings are securely fastened according to the recommended specifications.

Misalignment

Proper alignment of grease fittings is crucial for the effective flow of grease to the intended parts of the machinery. Misaligned fittings can obstruct the flow, preventing grease from reaching critical areas and causing increased friction and wear. Misalignment can occur during installation if fittings are not positioned correctly or if the connecting parts are not properly aligned. To prevent misalignment, it’s important to carefully follow the installation guidelines provided by the manufacturer and to double-check the alignment before finalizing the installation. Using alignment tools and techniques can help ensure that fittings are properly positioned.

Neglecting Regular Maintenance

Regular maintenance of grease fittings is essential to their longevity and performance. Neglecting maintenance can allow minor issues to escalate into major problems. For instance, a partially blocked fitting may go unnoticed until it completely obstructs grease flow, leading to inadequate lubrication and excessive wear on machinery parts. Regular inspections should include checking for blockages, ensuring proper alignment, and verifying that fittings are securely tightened. Implementing a consistent maintenance schedule and keeping detailed records of maintenance activities can help prevent issues from being overlooked.

Stuck Grease Fitting

Blockages and Obstructions

Blockages in grease fittings can occur due to the accumulation of dirt, debris, or hardened grease. These obstructions can prevent the proper flow of grease, leading to insufficient lubrication of the machinery. To address blockages, it’s important to regularly clean fittings and use appropriate tools to clear any obstructions. Additionally, using high-quality, compatible grease that is less likely to harden and clog the fittings can help maintain a clear flow path.

Signs and Symptoms of a Broken Grease Fitting

Visual Inspection Techniques

Regular visual inspections are a fundamental part of maintaining grease fittings and ensuring their optimal performance. During these inspections, look for visible signs of damage, such as:

Cracks: Cracks can develop due to stress, impact, or environmental factors. Even small cracks can compromise the integrity of the fitting and lead to leaks or complete failure.

Bends: Bending can occur if the fitting is subjected to mechanical stress or improper handling. A bent fitting may not allow grease to flow properly and can indicate underlying damage.

Corrosion: Corrosion is a common issue, especially in harsh environments. Rust or other forms of corrosion weaken the metal, making the fitting brittle and more likely to break. Corrosion can also indicate that moisture is penetrating the fitting, which can lead to further damage.

Perform these inspections under good lighting conditions and consider using magnification tools for a closer look at the fittings. Regular inspections can help catch these issues early before they lead to more significant problems.

Functional Indicators

Lubrication Failure

One of the most telling signs of a broken grease fitting is lubrication failure. This occurs when grease does not adequately reach the machinery parts it is meant to lubricate. Without proper lubrication, moving parts can grind against each other, leading to increased wear and potential failure. Signs of lubrication failure include:

Dry Bearings or Joints: Parts that appear dry or have minimal grease residue may not be receiving adequate lubrication.

Grease Leakage: Grease leaking around the fitting instead of being properly injected can indicate a malfunctioning or broken fitting.

Noise

Unusual sounds coming from machinery are often an indicator of lubrication issues. When grease fittings fail, parts may not receive enough lubrication, leading to increased friction. This friction can produce various noises, such as:

Grinding: A harsh, grinding sound typically indicates metal-on-metal contact due to insufficient lubrication.

Squeaking: High-pitched squeaking can occur when parts are moving without enough grease to cushion the interaction.

Clunking: Irregular clunking noises can result from parts moving erratically due to a lack of smooth lubrication.

Heat

Excessive heat is another critical functional indicator of a broken grease fitting. Increased friction from insufficient lubrication generates heat, which can be detected by:

Touch: If machinery parts feel unusually warm or hot to the touch, it could indicate poor lubrication.

Infrared Thermometers: Using an infrared thermometer can provide precise temperature readings, helping to identify overheating components.

Thermal Imaging Cameras: These devices can offer a comprehensive view of temperature distribution across machinery parts, highlighting areas of excessive heat.

Troubleshooting Broken Grease Fittings

Step-by-Step Inspection Process

Visual Examination for Damage

Begin by visually inspecting the grease fittings for any obvious signs of damage. Look closely for:

Cracks: These can appear as fine lines or larger splits in the fitting. Cracks compromise the fitting’s structural integrity and can lead to leaks.

Bends: Check if the fittings are bent or misshaped, which can occur from impact or improper handling.

Corrosion: Look for rust or other signs of corrosion that weaken the metal, making it more prone to breaking.

Checking Lubrication Flow and Consistency

Next, ensure that grease is reaching the intended parts of the machinery:

Grease Path: Inspect the path from the fitting to the bearing or joint to confirm that grease is flowing unobstructed.

Grease Consistency: Check the consistency of the grease being dispensed. It should be smooth and even; irregularities can indicate a blockage or other issue.

Testing Functionality with Grease Gun

Use a grease gun to test the functionality of the fitting:

Grease Flow: Attach the grease gun to the fitting and pump it. Observe whether grease flows through the fitting properly.

Resistance: Pay attention to any resistance while pumping. Excessive resistance can indicate a blockage or misalignment.

Broken Grease Fitting repair

Identifying Specific Issues

Cracks

If you identify any cracks during the visual examination:

Immediate Replacement: Replace cracked fittings immediately to prevent grease leakage and ensure proper lubrication.

Inspection of Surrounding Areas: Check nearby fittings and components for similar issues, as cracks can sometimes be a sign of widespread stress or damage.

Blockages

If there is an obstruction in the grease flow:

Clearing Obstructions: Use appropriate tools, such as a small wire or pin, to clear any blockages. For more stubborn obstructions, a specialized fitting cleaner may be required.

Flushing: Sometimes flushing the fitting with a solvent can help remove hardened grease or debris.

Regular Cleaning: Implement a routine cleaning schedule to prevent future blockages.

Misalignment

If the fitting is not properly aligned:

Realigning Fittings: Adjust the fitting to ensure it aligns correctly with the grease path. This might involve loosening and repositioning the fitting or replacing it if it’s permanently bent.

Ensuring Proper Installation: When reinstalling, make sure to follow the manufacturer’s specifications to avoid over-tightening or under-tightening, which can cause misalignment.

Preventive Measures and Best Practices

To avoid issues with grease fittings and maintain their optimal performance, consider the following preventive measures and best practices:

Regular Inspections: Schedule regular inspections to catch any signs of damage or wear early.

Proper Installation: Always follow manufacturer guidelines during installation to ensure fittings are properly aligned and securely fastened.

Quality Materials: Use high-quality, corrosion-resistant materials for fittings, especially in harsh environmental conditions.

By following these troubleshooting steps and preventive measures, you can ensure that grease fittings remain in good working condition, providing effective lubrication and extending the life of your machinery.

Conclusion

In this comprehensive guide, we explored the critical role grease fittings play in the maintenance and efficient operation of machinery. We delved into the common causes of broken grease fittings, such as wear and tear, environmental factors, and improper installation or maintenance practices. Recognizing the signs of broken grease fittings, including visual damage, lubrication failure, unusual noises, and excessive heat, is crucial for early detection and prevention of further issues. We provided detailed troubleshooting steps to identify and address specific problems like cracks, blockages, and misalignment. By adhering to these guidelines, you can enhance the longevity and reliability of your grease fittings, ensuring optimal performance of your machinery and reducing the risk of costly repairs and downtime.

FAQ

Grease fittings, also known as Zerk fittings, are small metal components used to inject grease into bearings and other moving parts of machinery. They are crucial for ensuring proper lubrication, which reduces friction and wear, extends the lifespan of equipment, and prevents mechanical failures.

Common signs of a broken grease fitting include visible cracks, bends, or corrosion, lack of grease flow to machinery parts, unusual noises such as grinding or squeaking, and excessive heat due to increased friction.

To prevent grease fittings from breaking, ensure proper installation by following manufacturer guidelines, use high-quality materials, regularly inspect and clean fittings, avoid over-tightening or under-tightening, and conduct routine maintenance to catch and address issues early.

If you find a blockage in a grease fitting, use a small wire or pin to clear the obstruction, flush the fitting with a solvent if necessary, and regularly clean the fittings to prevent future blockages.

It is recommended to inspect grease fittings regularly as part of your routine maintenance schedule. The frequency can vary depending on the operating conditions and the specific machinery, but a general guideline is to inspect them at least once a month.

While many minor issues with grease fittings can be addressed with basic DIY techniques, such as replacing damaged fittings or clearing blockages, it is advisable to consult a professional for more complex repairs or if you are unsure about the correct procedures.

Contact Topa

Looking for unbeatable prices, top-tier quality, or custom solutions that fit your exact needs? Contact Topa Now!